Let Me Tell You About These Mini Peanut Butter Cup Cookies
Okay, so you know how some desserts just sort of sneak into every family gathering or bake sale? That’s these cookies. The first time I made a batch, it was for a cookie swap at the office, and I was basically arm-wrestled for the last one (I still feel a tiny bit bad about using my elbows—sort of). Anyway, these Mini Peanut Butter Cup Cookies have been a regular in my kitchen ever since, and I swear they bring out the best and worst in people. I usually end up making two batches: one for sharing and one for “sampling” while watching the telly. Not proud, but hey, who’s counting?
Actually, funny story—my neighbor Elsie tried the recipe once but forgot to buy the peanut butter cups and used Rolos instead. It was… not awful, just very sticky. Maybe skip that experiment unless you’re in a pinch (and then, good luck).
Why I Keep Coming Back to This Cookie (And Maybe You Will, Too)
So, I whip these up when I’ve got like half an hour before guests arrive and I want to seem like I have my life together. My family goes nuts for them—especially my brother-in-law, who can spot that chocolatey center from across the room, like some sort of sugar-seeking hawk. (Tip: hide a couple for yourself if you care about leftovers!)
Oh, one thing I never tell newcomers: the cookie dough sticks like mad to your hands. I used to get so frustrated, but now, a little flour on the palms, and it’s smooth sailing.
What You’ll Need (Optional Swaps & Gran-Approved Secrets)
- 1 1/4 cups all-purpose flour (Honestly, any regular flour will do—one time I used spelt flour from Trader Joe’s just to see what’d happen. Worked fine; tasted slightly earthier.)
- 1/2 teaspoon baking soda (My grandmother was convinced Clabber Girl is superior; I say, use whatever isn’t a brick in your pantry.)
- 1/4 teaspoon salt
- 1/2 cup unsalted butter, softened (Forgot to soften it once, banged it in the microwave…it mostly worked—but maybe let it soften on the counter for less drama.)
- 1/2 cup creamy peanut butter (Crunchy totally works! But it holds together a little less fancy.)
- 1/2 cup granulated sugar
- 1/2 cup packed light brown sugar (I ran out once, just used all white sugar—no major tragedy.)
- 1 large egg
- 1 teaspoon vanilla extract (Imitation is honestly fine if you’re on a budget. Don’t let anyone tell you otherwise.)
- 24 mini peanut butter cups, unwrapped (I usually use Reese’s, but Aldi’s knockoff is not half-bad.)
How To Make Mini Peanut Butter Cup Cookies (Or, How I Do It)
- Preheat your oven to 350°F (that’s about 175°C, if you’re working with Celsius like my cousin in Dublin does). Get a mini muffin pan—I mean, if you don’t have one, just use a regular cupcake tray and make fewer, bigger cookies, but the mini ones are cuter. Grease it decently. I sometimes just go wild with the cooking spray.
- Cream together the butter, peanut butter, granulated sugar, and brown sugar in a big bowl. I usually use a handheld mixer, but a wooden spoon works fine if you’re patient. At this stage, dough might look a bit weird and chunky—don’t panic.
- Add the egg and vanilla. Mix until smooth and fluffy. This is where I (inevitably) taste the dough “just to check,” but honestly, who am I kidding? I just want some raw dough.
- Sift or just dump in the flour, baking soda, and salt. Mix until things barely come together (don’t overbeat it—a lesson learned form many a tough cookie).
- Roll the dough into little balls—about the size of a big marble, maybe a scant tablespoon each. Plop the balls in the muffin pan wells. Sometimes I get lazy and eyeball it. Still seems to work.
- Bake for 8–10 minutes, or ‘til the edges just barely start to color. The first time I made these, I overbaked, so don’t wait for serious browning—just a hint.
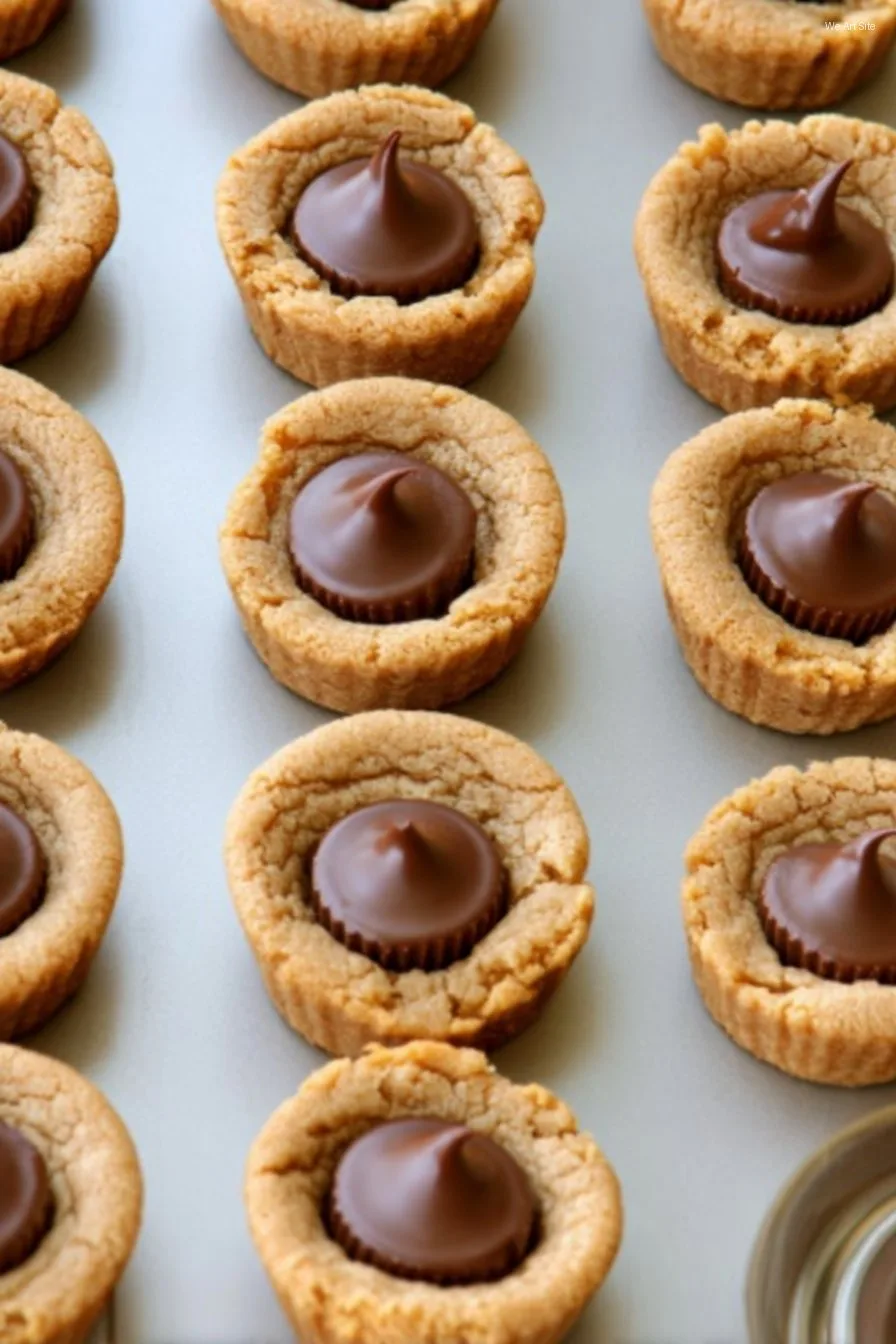
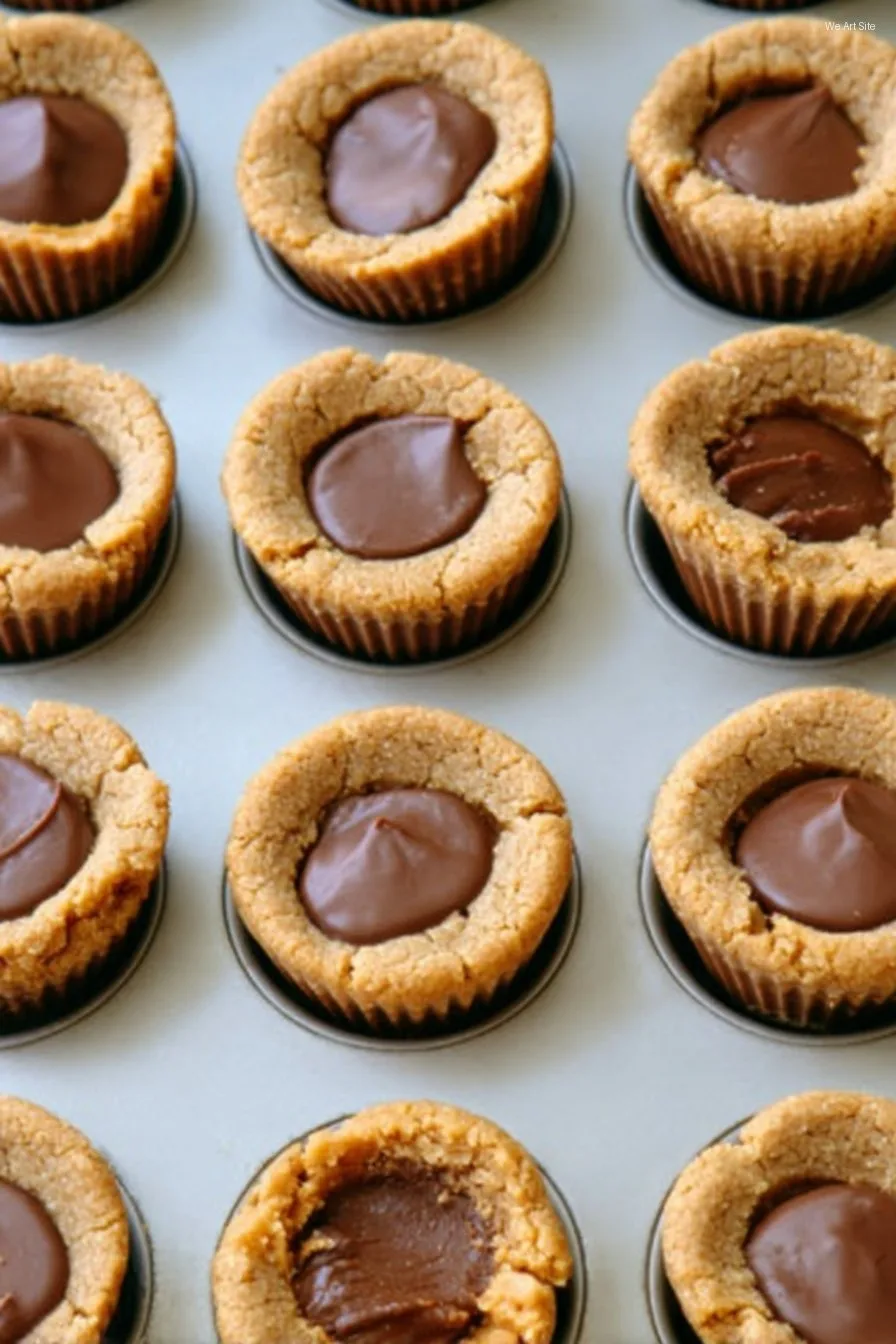
- Take out of oven and, straightaway, press a mini peanut butter cup into the center of each cookie. They’re melty and squishy. Just go with it. (They look a little goofy at this stage, but they set up nice.)
- Let the cookies cool in the pan; about 10 minutes. Sometimes I get impatient, then they fall apart, so yeah: patience is a virtue. Or just eat one messy anyway. Whatever.
- Pop them out—run a butter knife gently around the edges if needed. Marvel at your tiny masterpieces. High five yourself, if you’re into that.
Notes from the Perpetually Distracted Baker
- If your peanut butter cups start to melt funny or sink, you probably pressed too hard. Or maybe the dough was underbaked. I do this about every other batch—still tastes awesome.
- The dough comes together best if you don’t microwave the butter more than 10 seconds. Trust me. Otherwise, it kinda turns oily.
- Actually, leaving the cookies in the pan longer lets them firm up better, but I almost never wait. You’d think I’d learn.
Weird, Fun, and Not-So-Great Variations I’ve Tried
- Mini dark chocolate cups instead of milk chocolate: surprisingly posh. Looks fancier, too.
- Swapped in almond butter: it works, but loses something. Maybe if you’re feeling experimental.
- I tried Nutella once for the filling. It leaked everywhere. Delicious, but not for neat freaks.
- Sprinkling sea salt on top: yeah, do that. Takes it to a whole new level.
What If You Don’t Have Every Gadget?
Okay, a mini muffin tin is ideal. But, let’s be honest, you could use a regular muffin tin—just give them more space and maybe more time in the oven (and you get bigger cookies, which isn’t such a bad thing on a rough week).
No electric mixer? Elbow grease and a sturdy spoon work, though your arm might forgive you for borrowing a neighbor’s mixer. Or just invite a friend over and make them do it while you “supervise.”

Keeping (Or Not Keeping) Your Cookies Fresh
Toss ‘em in a lidded container, and they’re technically good for 3–4 days at room temp. But honestly, in my house, they never last more than a day…maybe two if I hide them behind the beans. You can freeze them for up to a month if you’re the plan-ahead type (which I’m not).
Serving Time! Here’s How We Do It
Oh, these are great just as they are, but my sister insists on dunking them in ice-cold milk (classic for a reason). For Christmas, we pop a little red and green sprinkle on each one when the chocolate is still gooey—makes ‘em look festive and, honestly, makes me look like I planned ahead.
If You Want My Two Cents: Pro Cookie Strategies
- I tried to rush chilling the dough in the freezer to “save time”—end result: tough cookies. Fridge is better, if you bother chilling at all (most of the time I don’t even do that).
- Don’t unwrap the peanut butter cups as you go—do them all at once before baking. Otherwise they get stuck and unwrapping mid-bake means you’ll end up melting chocolate everywhere (it’s not the look we’re after).
- Actually, if you want an extra gooey center, press the cup in while the cookies are still pretty hot. But, you might need a spoon to eat it, ha!
You Asked, I (Sometimes) Know!
Can I double the recipe?
Absolutely. Just get two trays or do it in rounds—it’s annoying, but worth it when you see people’s faces.
Is natural peanut butter okay?
Eh, I tried it once and the dough was a bit greasy (probably my fault), but it sort of works. Stir it really well first.
Can I use paper liners?
You can. But sometimes the cookies stick to the paper, so I usually skip them. Or, try parchment circles in a pinch.
HELP! My cups melted everywhere!
That happens due to pressing too early or if your oven was cranked a smidge too high. Now you have little chocolate puddles—still tastes fab, but grab a napkin.
Why do mine sometimes sink?
Cookie dough may be a bit underdone before pressing. Next time, bake a wee bit longer. Or…maybe they’re just more chocolatey. Win-win?
Hope you give these Mini Peanut Butter Cup Cookies a try—if you do, let me know how they whipped up for you! And if you invent a wild new twist that works, send it my way…unless it involves licorice. I’m scarred for life from that one time at a Halloween bake-off. But that’s another story.

Ingredients
- 1 1/4 cups all-purpose flour
- 1/2 teaspoon baking soda
- 1/4 teaspoon salt
- 1/2 cup unsalted butter, softened
- 1/2 cup creamy peanut butter
- 1/2 cup granulated sugar
- 1/2 cup packed brown sugar
- 1 large egg
- 1 teaspoon vanilla extract
- 24 mini peanut butter cups, unwrapped
Instructions
-
1Preheat oven to 350°F (175°C) and lightly grease a 24-cup mini muffin tin.
-
2In a medium bowl, whisk together the flour, baking soda, and salt. Set aside.
-
3In a large bowl, beat together butter, peanut butter, granulated sugar, and brown sugar until creamy and smooth.
-
4Add the egg and vanilla extract to the butter mixture and mix until combined. Gradually add the flour mixture and mix until just incorporated.
-
5Scoop dough into the prepared mini muffin tin, filling each cup about 2/3 full. Bake for 10 minutes, or until lightly golden.
-
6Remove from oven and immediately press a mini peanut butter cup into the center of each cookie. Cool in the pan for 10 minutes before transferring to a wire rack to cool completely.
Approximate Information for One Serving
Nutrition Disclaimers
Number of total servings shown is approximate. Actual number of servings will depend on your preferred portion sizes.
Nutritional values shown are general guidelines and reflect information for 1 serving using the ingredients listed, not including any optional ingredients. Actual macros may vary slightly depending on specific brands and types of ingredients used.
To determine the weight of one serving, prepare the recipe as instructed. Weigh the finished recipe, then divide the weight of the finished recipe (not including the weight of the container the food is in) by the desired number of servings. Result will be the weight of one serving.
Did you make this recipe?
Please consider Pinning it!!
Ingredients
- 1 1/4 cups all-purpose flour
- 1/2 teaspoon baking soda
- 1/4 teaspoon salt
- 1/2 cup unsalted butter, softened
- 1/2 cup creamy peanut butter
- 1/2 cup granulated sugar
- 1/2 cup packed brown sugar
- 1 large egg
- 1 teaspoon vanilla extract
- 24 mini peanut butter cups, unwrapped
Instructions
-
1Preheat oven to 350°F (175°C). Lightly grease a mini muffin pan or line with paper liners.
-
2In a medium bowl, whisk together flour, baking soda, and salt. Set aside.
-
3In a large bowl, beat together the butter, peanut butter, granulated sugar, and brown sugar until creamy. Add the egg and vanilla extract, mixing well.
-
4Gradually add the dry ingredients to the wet mixture until combined.
-
5Roll dough into 1-inch balls and place each ball into a mini muffin cup. Bake for 10-12 minutes or until lightly golden.
-
6Immediately press a mini peanut butter cup into the center of each cookie. Allow cookies to cool in the pan for 10 minutes before transferring to a wire rack to cool completely.
Approximate Information for One Serving
Nutrition Disclaimers
Number of total servings shown is approximate. Actual number of servings will depend on your preferred portion sizes.
Nutritional values shown are general guidelines and reflect information for 1 serving using the ingredients listed, not including any optional ingredients. Actual macros may vary slightly depending on specific brands and types of ingredients used.
To determine the weight of one serving, prepare the recipe as instructed. Weigh the finished recipe, then divide the weight of the finished recipe (not including the weight of the container the food is in) by the desired number of servings. Result will be the weight of one serving.
Did you make this recipe?
Please consider Pinning it!!