Let’s Chat About Grilled Cheese Burritos
Alright, so you’re probably thinking, “Isn’t a burrito supposed to be, well, not grilled cheese?” But hear me out. The first time I threw together a grilled cheese burrito, I was mostly just cleaning out my fridge. It was one of those days: I had leftover cheese, a pack of tortillas, and not much motivation to do dishes. I vaguely remember being halfway through a podcast and accidentally over-toasting the outside (which, actually, made it better). My brother wandered in and claimed I was having a “midweek crisis”—and then ate two of them anyway. That was, oh, three years ago, and now it’s a regular dinner when I want something familiar but also slightly ridiculous.
Why I Reach for This Recipe (A Lot)
I make this when the weather’s dreary or, honestly, when I want to feel like a genius for inventing something that’s basically cheese on cheese. My family goes a bit wild for this combo (even my cousin who claims to “hate cheese”—yeah, right). Sometimes, I get a little annoyed at how the cheese leaks out the sides, but I’ve mostly learned to embrace the crispy bits as “bonus flavor” instead of a cooking fail. And if you’re after something fast but still hearty, this is your ticket. Plus, it doubles as a great excuse to use up odds and ends from taco night—no judgment if you just dump in some leftover chicken.
What You’ll Need (But Don’t Panic If You Don’t Have Everything)
- 2 large flour tortillas (I’ve used whole wheat when I was out—honestly, whatever’s lurking in your bread bin works)
- 1 1/2 cups shredded cheese (cheddar is classic, but pepper jack adds a kick; my gran used to insist on sharp cheddar from the deli but I grab the bagged stuff more often than not)
- 1/2 cup cooked rice (optional—I skip this when I’m lazy or out of rice, which is… often)
- 1/2 cup black beans, rinsed (sometimes I use refried, sometimes just skip if I can’t be bothered)
- 1/4 cup sour cream (or plain yogurt if that’s all you’ve got, it works in a pinch)
- 1/4 cup salsa (I like the smoky kind but honestly, that sad jar at the back of your fridge? Use that!)
- 2 tbsp butter (margarine will work if that’s your vibe)
- Optional: chopped jalapeños, leftover cooked chicken, bell peppers, or whatever extra bits you like
So, Here’s How I Do It (More Or Less)
- If you’ve got rice, microwave it for 30 seconds so it’s not rock solid. Or just skip it. Lay your tortilla out flat—on a plate, on your clean countertop, whatever’s easy.
- Layer on a handful of cheese (don’t skimp, but also don’t go overboard—it’ll ooze out and you’ll have to clean the pan, trust me). Then spoon on the beans, rice, and whatever else you’re adding: chicken, peppers, salsa, a surprise bit of corn—I’ve even tried leftover taco beef (it was… okay, not my favorite, but edible).
- Dollop on sour cream (or yogurt). Sprinkle with extra cheese if you’ve had a rough day. Fold in the sides first, then roll it up tight from the bottom. If it tears a bit—just patch it with a cheese slice. No one will notice.
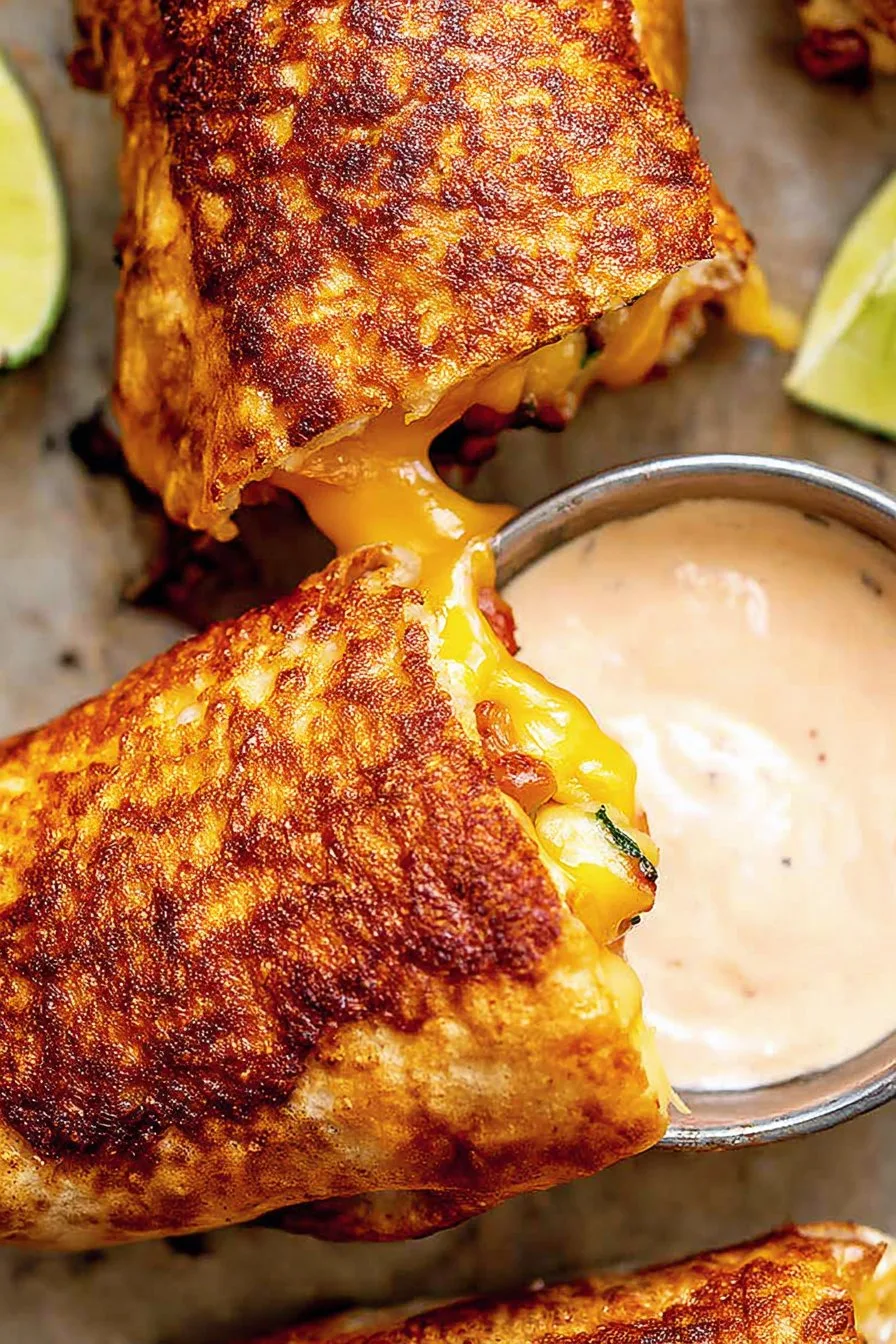
- Melt a knob of butter in a skillet over medium heat. Place your burrito seam-side down—this is where I usually sneak a taste of the filling that oozes out. Press it down a little with a spatula. Let it sizzle for 2-3 minutes, then flip (careful, it’s hot!). If you’re dealing with a stubborn pan, just nudge it around until it’s golden and crisp, maybe 2 more minutes on the other side.
- Remove and let it cool for a minute—honestly, it tastes better when you’re not burning the roof of your mouth, which I forget every single time. Slice in half and admire your work. Or just eat it whole, no judgment.
Notes From My Kitchen Experiments
- If the cheese starts escaping, don’t panic—those bits get all crispy and amazing. I actually prefer it that way (my pan… not so much).
- Tortillas can rip if they’re too cold, so microwave them for 10 seconds first. Or don’t, and just embrace the rustic look. It’s still delicious.
- Sometimes I forget the butter, and it’s fine. But, the butter really does make it extra golden.
If You Want to Mix Things Up
- Breakfast version? Scrambled eggs, a bit of bacon, and you’re in business. I tried adding hashbrowns once but it was a bit too much. Live and learn.
- Spicy mood? Jalapeños or chipotle in adobo. Warning: don’t overdo the adobo sauce like I once did unless you want to sweat through your shirt.
- Veggie overload? Roasted veggies work; just don’t pile them too high or you’ll need a fork. Actually, my friend Lisa swears by adding spinach, though I think it makes it a little soggy.
Do You Really Need Special Equipment?
A nonstick skillet is nice, but I’ve used my old sandwich press in a pinch (it was a bit squished but tasty). If you don’t have a spatula, tongs or even a wooden spoon kind of work—just don’t burn yourself. Serious Eats has some great pan recs if you’re curious.

How to Store It (Though Honestly, It Never Lasts)
Wrap leftovers in foil and keep in the fridge. They reheat okay in a pan or oven—microwave makes it a bit chewy, but it’s still edible. I think this tastes better the next day, but I’ve rarely had the chance to test that theory. My partner tends to “sample” them all by lunch the next day.
Serving It Up: What I Like To Do
Honestly, for me, it’s just a big pile of salsa and maybe some tortilla chips on the side. If we’re feeling fancy (rarely), we’ll serve with guac and a squeeze of lime. My nephew dips his in ketchup, which I pretend to be horrified by, but secretly it’s not bad.
Things I Messed Up (So You Don’t Have To)
- Don’t rush the toasting—I’ve tried cranking the heat to speed things up, and it just burns the outside. Low and slow wins.
- If you overstuff, you’ll have a burrito blowout. Not fun, and cleaning the pan is even less fun.
- Actually, I’ve found melting the butter first, instead of adding it cold, makes for a crispier crust.
Grilled Cheese Burrito FAQ: Real Answers
- Can I make these ahead? Sort of. They’ll lose a bit of crunch, but they’re still good. I usually re-toast them in a pan for a minute or two.
- What cheese is best? Up to you! Cheddar melts beautifully, but I’ve used Swiss, Monterey Jack, even that mystery “pizza blend” cheese. They all work. (I would avoid blue cheese, though. Learned that the hard way.)
- Can I freeze them? Technically yes, but the texture goes a bit funny. Best fresh, really.
- How do I stop the tortilla from splitting? Warm them up a bit first; or just patch with more cheese. I do it all the time.
- Where did you get the idea? Honestly, probably form late-night takeout cravings and a love of all things cheese. I think Taco Bell has something similar? (You can check out a copycat version on Delish.)
Wow, if you made it this far, maybe you deserve a grilled cheese burrito already. Or at least, a cuppa while you think about it. Let me know how yours turns out—unless you add pineapple; in that case, you’re on your own!
Ingredients
- 4 large flour tortillas
- 1 cup shredded cheddar cheese
- 1 cup shredded Monterey Jack cheese
- 1/2 pound ground beef
- 1 cup cooked rice
- 1/2 cup sour cream
- 1/2 cup nacho cheese sauce
- 1/4 cup diced onions
- 1 tablespoon taco seasoning
- 2 tablespoons butter
Instructions
-
1In a skillet over medium heat, cook the ground beef and diced onions until the beef is browned. Drain excess fat and stir in taco seasoning. Cook for 2 more minutes, then remove from heat.
-
2Warm the flour tortillas in a microwave or on a skillet until pliable.
-
3Lay each tortilla flat and layer with cooked rice, seasoned beef mixture, shredded cheddar cheese, shredded Monterey Jack cheese, sour cream, and nacho cheese sauce.
-
4Fold the sides of the tortilla and roll tightly to form a burrito.
-
5Melt butter in a large skillet over medium heat. Place each burrito seam-side down and grill for 2-3 minutes per side, or until golden brown and the cheese is melted.
-
6Serve hot with extra sour cream or salsa if desired.
CLICK FOR NUTRITION INFO
↑
Approximate Information for One Serving
Serving Size:
1 serving
Calories:
540 caloriescal
Protein:
24gg
Fat:
28gg
Saturated Fat:
0g
Trans Fat:
0g
Cholesterol:
0mg
Sodium:
0mg
Potassium:
0mg
Total Carbs:
48gg
Fiber:
0g
Sugar:
0g
Net Carbs:
0g
Vitamin A:
0
Vitamin C:
0mg
Calcium:
0mg
Iron:
0mg
Nutrition Disclaimers
Number of total servings shown is approximate. Actual number of servings will depend on your preferred portion sizes.
Nutritional values shown are general guidelines and reflect information for 1 serving using the ingredients listed, not including any optional ingredients. Actual macros may vary slightly depending on specific brands and types of ingredients used.
To determine the weight of one serving, prepare the recipe as instructed. Weigh the finished recipe, then divide the weight of the finished recipe (not including the weight of the container the food is in) by the desired number of servings. Result will be the weight of one serving.
Did you make this recipe?
Please consider Pinning it!!