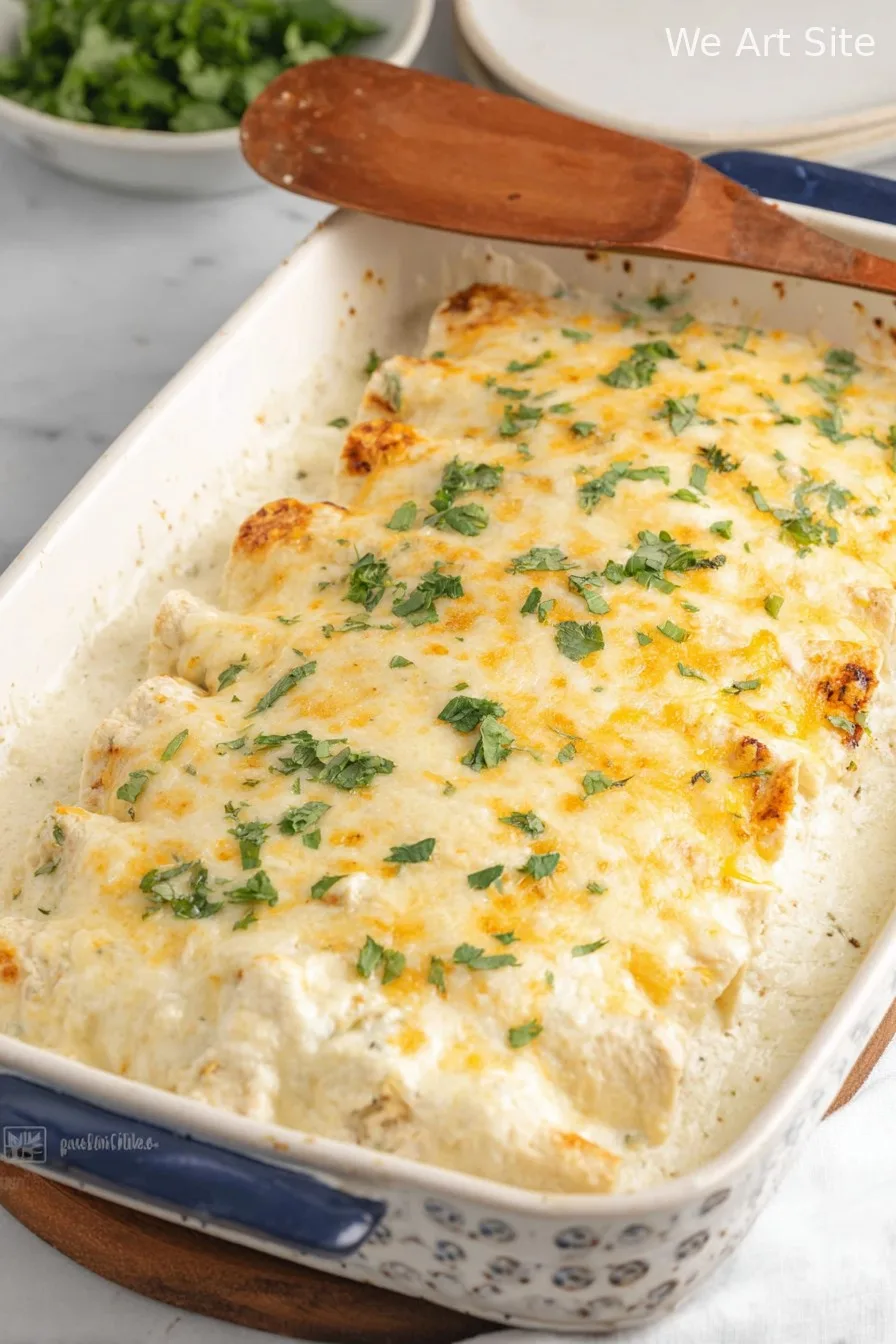
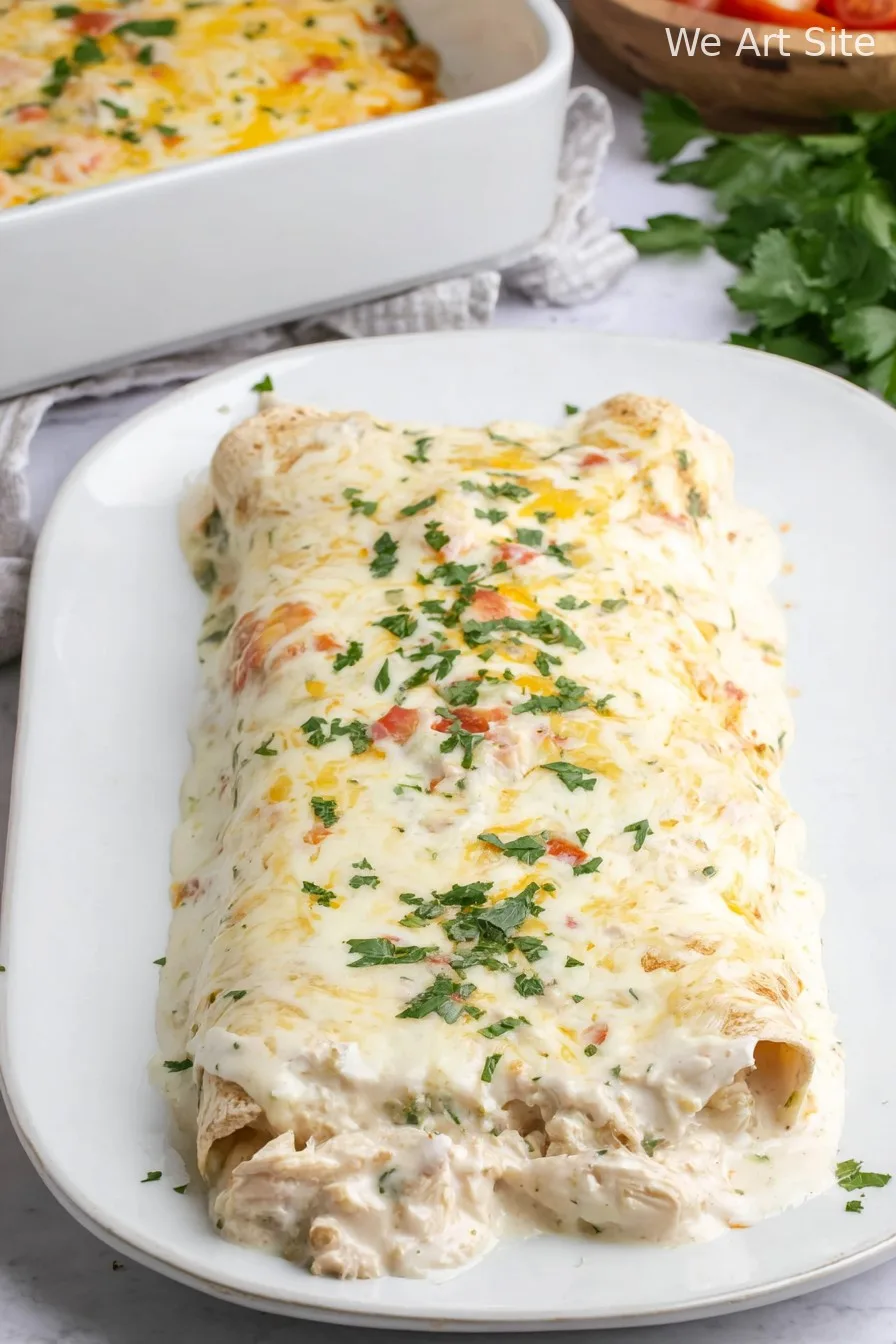
Hey y’all! Looking for a comforting, crowd-pleasing dinner that’s loaded with creamy, cheesy goodness? These Creamy White Chicken Enchiladas are exactly what your taste buds crave! With tender shredded chicken, gooey Monterey Jack cheese, and a luscious homemade white sauce, they’re a surefire hit for weeknights, potlucks, or any time you need an easy meal that feels special. Let’s get cooking!

Why You’ll Love This
- Super creamy and flavorful filling everyone raves about.
- Easy to customize with your favorite add-ins or heat level.
- Perfect for make-ahead meals—freezes and reheats beautifully.
- Kid-friendly and fuss-free for busy families.
- Pairs perfectly with classic Mexican sides or fresh salads.
Ingredients
- 2 cups cooked and shredded chicken (rotisserie works great)
- 8 small flour tortillas (8-inch)
- 2 cups shredded Monterey Jack cheese, divided
- 1/2 cup sour cream
- 2 cups chicken broth
- 3 tablespoons unsalted butter
- 3 tablespoons all-purpose flour
- 1 can (4 ounces) diced green chilies, drained
- 1 teaspoon garlic powder
- 1/2 teaspoon onion powder
- 1/2 teaspoon salt
- 1/4 teaspoon black pepper
- Chopped fresh cilantro, for garnish (optional)
Directions
Prep and Fill Enchiladas
- Preheat your oven to 375°F (190°C). Lightly grease a 9×13-inch baking dish.
- In a large bowl, combine shredded chicken, 1 cup of Monterey Jack cheese, and half of the green chilies. Set aside.
Make the Creamy White Sauce
- In a medium saucepan over medium heat, melt butter. Whisk in flour and cook, stirring for 1 minute to eliminate raw flour taste.
- Gradually whisk in chicken broth until smooth. Bring to a simmer, stirring constantly, until thickened (about 3-5 minutes).
- Stir in remaining green chilies, garlic powder, onion powder, salt, pepper, and sour cream. Remove from heat and mix until smooth and creamy.
Assemble & Bake
- Warm tortillas slightly to make them pliable. Evenly distribute the chicken mixture into each tortilla, roll up tightly, and place seam-side down in the prepared baking dish.
- Pour the creamy white sauce evenly over the enchiladas, then sprinkle the remaining 1 cup of cheese on top.
- Bake uncovered for 25-30 minutes, or until bubbly and cheese is melted with golden edges. Broil for an extra 2-3 minutes for a golden top if desired.
- Let cool for 5 minutes, garnish with fresh cilantro, and serve warm!
Notes
- Rotisserie or leftover roasted chicken saves time and adds flavor.
- If your sauce is too thick, thin it with a splash of warm milk or broth.
- For a thicker filling, use less chicken broth in the sauce.
Variations
- Spicy Kick: Add chopped jalapeños or a pinch of cayenne to the sauce.
- Veggie Enchiladas: Substitute chicken with sautéed mushrooms, spinach, and black beans.
- Cheesy Deluxe: Use a blend of Monterey Jack, cheddar, and pepper jack cheeses.
Required Equipment
- 9×13-inch baking dish
- Medium saucepan
- Large mixing bowl
- Whisk
- Measuring cups and spoons
Storage Instructions
- Refrigerate cooled enchiladas in an airtight container for up to 3 days.
- Freeze tightly wrapped (before baking) for up to 2 months; thaw overnight in the fridge and bake as directed.
- Reheat individual portions in the microwave or a 350°F oven until warmed through.
Suggested Pairings & Serving Recommendations
- Serve with Spanish rice, refried beans, or a crisp green salad.
- Top with avocado slices, pico de gallo, or a drizzle of extra sour cream.
- A refreshing margarita or icy limeade pairs well for festive occasions.
Pro Tips
- Warming the tortillas prevents cracking while rolling.
- Let enchiladas rest for 5 minutes after baking so the sauce settles.
- Mix cheese into the filling while chicken is still warm for extra creamy results.
FAQ
- Can I use corn tortillas?
- Yes, corn tortillas work too! Briefly warm them to prevent tearing during rolling.
- Can I make this recipe ahead?
- Absolutely! Assemble up to a day ahead and refrigerate, then bake before serving.
- What type of chicken is best?
- Any cooked, shredded chicken works—rotisserie, poached, or leftover grilled chicken are all delicious options.
Ingredients
- 2 cups cooked and shredded chicken (rotisserie works great)
- 8 small flour tortillas (8-inch)
- 2 cups shredded Monterey Jack cheese, divided
- 1/2 cup sour cream
- 2 cups chicken broth
- 3 tablespoons unsalted butter
- 3 tablespoons all-purpose flour
- 1 can (4 ounces) diced green chilies, drained
- 1 teaspoon garlic powder
- 1/2 teaspoon onion powder
- 1/2 teaspoon salt
- 1/4 teaspoon black pepper
- Chopped fresh cilantro, for garnish (optional)
Instructions
-
1Preheat your oven to 375°F (190°C). Lightly grease a 9×13-inch baking dish.
-
2In a large bowl, combine shredded chicken, 1 cup of Monterey Jack cheese, and half of the green chilies. Set aside.
-
3In a medium saucepan over medium heat, melt butter. Whisk in flour and cook, stirring for 1 minute to eliminate raw flour taste.
-
4Gradually whisk in chicken broth until smooth. Bring to a simmer, stirring constantly, until thickened (about 3-5 minutes).
-
5Stir in remaining green chilies, garlic powder, onion powder, salt, pepper, and sour cream. Remove from heat and mix until smooth and creamy.
-
6Warm tortillas slightly to make them pliable. Evenly distribute the chicken mixture into each tortilla, roll up tightly, and place seam-side down in the prepared baking dish.
-
7Pour the creamy white sauce evenly over the enchiladas, then sprinkle the remaining 1 cup of cheese on top.
-
8Bake uncovered for 25-30 minutes, or until bubbly and cheese is melted with golden edges. Broil for an extra 2-3 minutes for a golden top if desired.
-
9Let cool for 5 minutes, garnish with fresh cilantro, and serve warm!
CLICK FOR NUTRITION INFO
↑
Approximate Information for One Serving
Serving Size:
1 serving
Calories:
550cal
Protein:
37 gg
Fat:
29 gg
Saturated Fat:
0g
Trans Fat:
0g
Cholesterol:
0mg
Sodium:
0mg
Potassium:
0mg
Total Carbs:
36 gg
Fiber:
0g
Sugar:
0g
Net Carbs:
0g
Vitamin A:
0
Vitamin C:
0mg
Calcium:
0mg
Iron:
0mg
Nutrition Disclaimers
Number of total servings shown is approximate. Actual number of servings will depend on your preferred portion sizes.
Nutritional values shown are general guidelines and reflect information for 1 serving using the ingredients listed, not including any optional ingredients. Actual macros may vary slightly depending on specific brands and types of ingredients used.
To determine the weight of one serving, prepare the recipe as instructed. Weigh the finished recipe, then divide the weight of the finished recipe (not including the weight of the container the food is in) by the desired number of servings. Result will be the weight of one serving.
Did you make this recipe?
Please consider Pinning it!