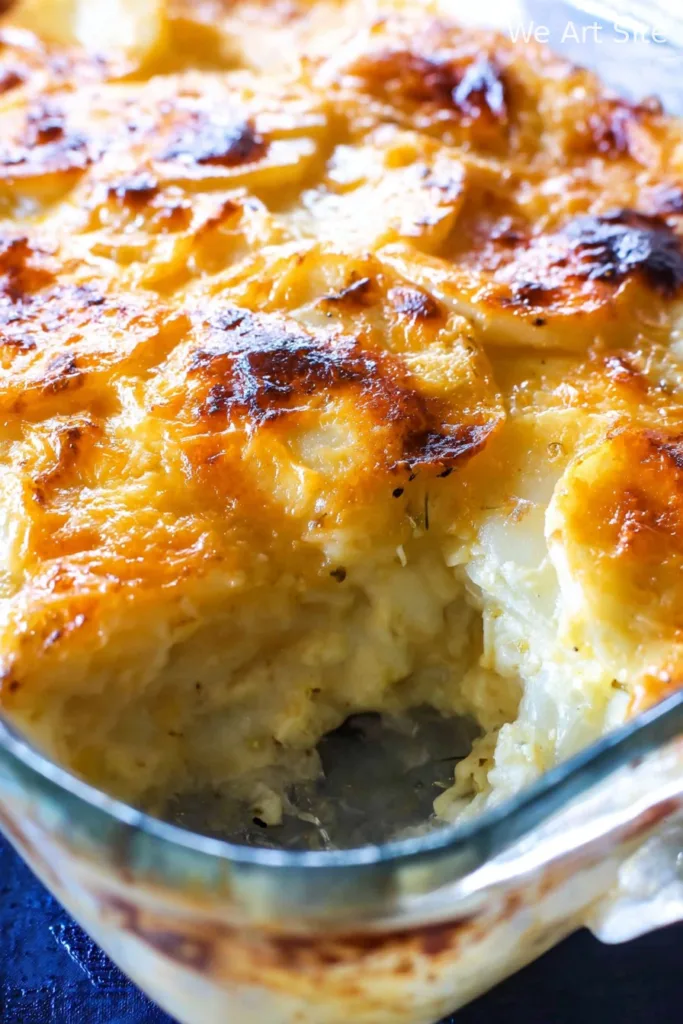
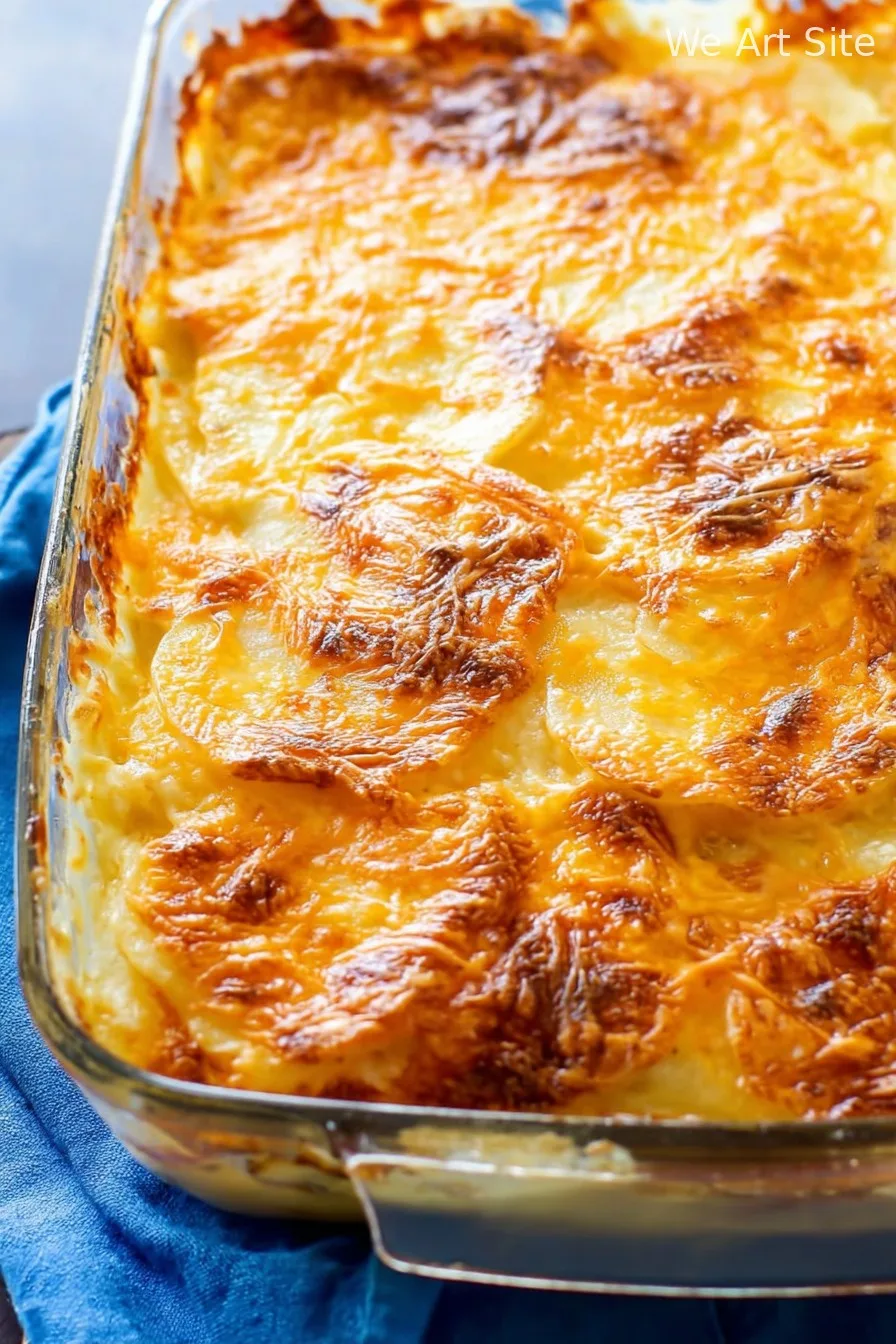
Honestly, I Could Eat Scalloped Potatoes Every Day
Hey friend! So, scalloped potatoes. For me, it’s the dish that means someone’s either coming over to dinner or we’re about to hunker down for a movie-night feast with way too much butter on our hands. My mum used to make them on Sundays when honestly, all we wanted was to eat and nap. One time I tried to sneak in extra cheese, thinking she wouldn’t notice; of course, she noticed, but she just winked and said, “Good call.” So, that’s the vibe here: comfort, a touch of rebelliousness, and, well, maybe a little minor chaos in the kitchen.
Why You’ll Love Making These
I make scalloped potatoes when my house is full of people, especially when everyone’s a little bit picky and you need a dish that’ll make the table go quiet—because everyone’s too busy having seconds. My kids fight (good-naturedly) over the crispy bits on the edge. (Honestly, I do too; I’m not above wrestling a nine-year-old for corner pieces.) Whenever I’ve had a disaster day, this is one recipe that’s saved my mood. Though, I will admit, I did once forget the salt—don’t do that, it’s weirdly tragic. But you probably won’t, right?
What You’ll Need (and a Few Shortcuts)
- 6-7 medium potatoes (Yukon Golds are my favorite, but russets or even those big red ones are fine; I use whatever looks less sad in the pantry)
- 2 cups whole milk (honestly, I’ve subbed in half milk and half cream when I want it extra rich; my aunt swears by evaporated milk, but I’m not that patient)
- 3 tbsp butter (salted or unsalted, not worth stressing over)
- 2 tbsp all-purpose flour (grandma used to say to sift it, but I barely have the patience for that)
- 1 medium onion, finely chopped (or sometimes I skip it when I’m in a rush—no one’s noticed yet!)
- 2 cloves garlic, minced (optional, but I mean, why not?)
- 1 cup shredded cheese (cheddar, or whatever needs using up; sometimes I do half gruyere ’cause I feel fancy)
- Salt and pepper, to taste (I always toss in a little paprika too—because, color)
- Optional: Pinch of nutmeg, fresh thyme leaves, or a sneaky handful of chopped chives at the end
How I Throw This Together
- Preheat your oven to 180°C (350°F). Grab a decent baking dish (mine’s somewhere between a 9×13 and “whatever doesn’t spill”). Butter it up or spray it—less washing up later.
- Slice those potatoes pretty thin—about 1/8″ is what the fancy recipes say. Sometimes I just try for as thin as my patience allows. If you don’t have a mandoline, just go slow with a sharp knife. And if your slices aren’t perfectly even, who’s checking?
- Melt the butter in a saucepan over medium heat, toss in the chopped onion, and cook it till it’s soft and smells amazing. Add garlic if you’re using it—give it about 30 seconds.
- Stir in the flour and whisk it into a roux. It’ll look a bit weird and lumpy; that’s normal. Don’t panic. Let it bubble for about a minute—this is apparently important so it doesn’t taste like paste (I learned that one the…less tasty way).
- Gradually pour in the milk, whisking constantly, until it’s smooth. If it’s a bit lumpy at first, keep going—it almost always smooths out. Bring it to a simmer, let it thicken up (2-3 min), then add salt, pepper, and a pinch of paprika if you like.
- Sneak a taste (I always do, seriously, who could resist?) and adjust seasoning.
- Layer half the potatoes in the dish. Pour over half the sauce. Scatter on half the cheese. Repeat potatoes, sauce, and cheese. Sometimes I save a little cheese for a final sprinkle near the end, but that’s just showing off.
- Cover tightly with foil—shiny side down, if you care—and bake for about 40 minutes. Then, yank off the foil and bake another 20-25 minutes until bubbly and the top is golden. If you’re footy about extra crispy edges (like me), broil it for a couple minutes at the end and try not to wander off and forget it.
- Let it sit ten minutes so it sets a little. Or not, if you’re ravenous. Honestly, it just falls apart a bit more—still tastes fabulous.
Notes from My Kitchen Disasters (and Triumphs)
- I tried slicing potatoes thicker to save time—don’t recommend it; they just never get tender. (But if you like a bit of bite, go for your life)
- If your sauce’s too thick, just thin with a glug more milk. I once used oat milk and, well, it tasted…healthy.
- The crispy cheese corner pieces? Worth fighting for (in a loving way, of course)
Variations I’ve (Mostly) Survived
- Add a layer of cooked ham or shredded chicken for a meal-in-one (I did bacon once—delish but honestly too salty for my taste, though my brother-in-law still talks about it)
- Swap the cheddar for blue cheese if you’re brave. I did this for a potluck—only half the guests appreciated it, but hey, more for me
- I once tried sneaking in broccoli—let’s just say, stick to sides next time.
Don’t Sweat the Equipment
If you don’t have a mandoline slicer, just use a sharp knife. And if you’re missing a big baking dish, any oven proof thing will do—one time I split the batch into two bread pans. Little fiddly, but it worked.
How I (Sometimes) Store Leftovers
Toss any leftovers in a lidded container in the fridge. Reheat with a splash of milk to wake it up. Though honestly, in my house it never lasts more than a day! (If it does, it’s probably because someone hid it at the back of the fridge)
Here’s What I Like to Serve With It
I love scalloped potatoes with roast chicken and green beans. Sometimes, for a real treat, I’ll have it with nothing else but a generous salad and maybe—don’t judge—a cold cider. My cousin likes hers with baked beans which, well, to each their own I guess!
Pro Tips, Learned the Hard Way
- I once tried to rush the baking time and ended up with crunchy undercooked potatoes. Just…don’t. Let ’em bake.
- Oh, and use a baking sheet underneath—overflowed cheese sauce is a nightmare stuck to the bottom of the oven
Questions Folks Have Actually Asked Me
- Can you make this ahead? Yup, and actually I think it tastes better the next day. Just reheat gently so it doesn’t dry out. I’ve even frozen it, though texture gets a bit wonky.
- Do I have to peel the potatoes? Honestly, sometimes I skip peeling and no one’s the wiser, especially if you scrub them well first.
- Is this the same as au gratin potatoes? Eh, not exactly—au gratin usually has breadcrumbs and sometimes more cheese. But in my kitchen, they’re pretty interchangeable, so go with what you like.
- Can I make a bigger batch? Sure thing! Just use a bigger pan, or two. And maybe call someone to help with the dishes, ha!
- What potatoes are best? Yukon Golds hold up well (less mush), but I’ve used russet in a pinch and never heard any complaints.
Random Digression (Because, Why Not?)
By the way, if you ever have leftover cheese going unloved in your fridge, check out this guide on storing cheese from Serious Eats—total gamechanger. Oh, and for sourcing the *really* good potatoes, my favorite farmers’ market has a handy locator here. I just like sharing things that help!

Ingredients
- 2 pounds russet potatoes, peeled and thinly sliced
- 2 cups whole milk
- 1 cup heavy cream
- 1 1/2 cups shredded cheddar cheese
- 1 small onion, finely chopped
- 3 tablespoons unsalted butter
- 3 tablespoons all-purpose flour
- 1 teaspoon salt
- 1/2 teaspoon black pepper
- 1/4 teaspoon ground nutmeg
Instructions
-
1Preheat oven to 375°F (190°C). Grease a 9×13-inch baking dish with butter or non-stick spray.
-
2In a medium saucepan, melt butter over medium heat. Add chopped onion and sauté until translucent, about 3 minutes.
-
3Stir in flour and cook for 1 minute, then gradually whisk in milk and cream. Cook, stirring constantly, until the sauce thickens, about 4-5 minutes.
-
4Add 1 cup shredded cheddar cheese, salt, pepper, and nutmeg. Stir until the cheese has melted and the sauce is smooth.
-
5Layer half of the sliced potatoes in the prepared baking dish. Pour half of the cheese sauce over the potatoes. Repeat with the remaining potatoes and sauce.
-
6Sprinkle the remaining 1/2 cup of cheddar cheese on top. Cover with foil and bake for 45 minutes, then uncover and bake for an additional 30 minutes or until the potatoes are tender and the top is golden brown. Let cool for 10 minutes before serving.
CLICK FOR NUTRITION INFO
↑
Approximate Information for One Serving
Serving Size:
1 serving
Calories:
340cal
Protein:
10 gg
Fat:
19 gg
Saturated Fat:
0g
Trans Fat:
0g
Cholesterol:
0mg
Sodium:
0mg
Potassium:
0mg
Total Carbs:
32 gg
Fiber:
0g
Sugar:
0g
Net Carbs:
0g
Vitamin A:
0
Vitamin C:
0mg
Calcium:
0mg
Iron:
0mg
Nutrition Disclaimers
Number of total servings shown is approximate. Actual number of servings will depend on your preferred portion sizes.
Nutritional values shown are general guidelines and reflect information for 1 serving using the ingredients listed, not including any optional ingredients. Actual macros may vary slightly depending on specific brands and types of ingredients used.
To determine the weight of one serving, prepare the recipe as instructed. Weigh the finished recipe, then divide the weight of the finished recipe (not including the weight of the container the food is in) by the desired number of servings. Result will be the weight of one serving.
Did you make this recipe?
Please consider Pinning it!!