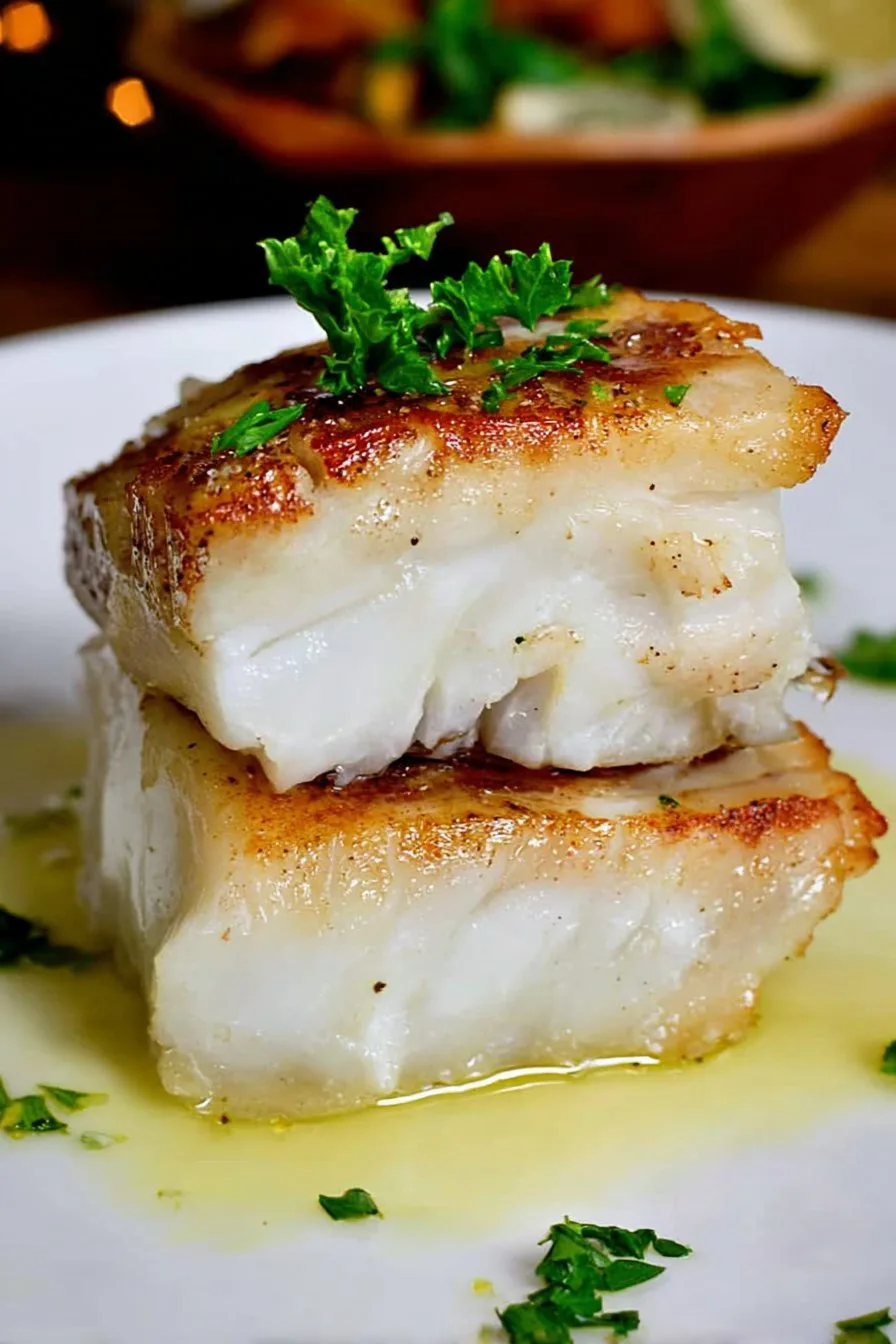
Let’s Dive Into the Best Sea Bass Ever (Seriously)
Oh man, are you ready for a treat? So, the first time I cooked Chilean sea bass, I was about 80 percent sure I was going to screw it up. (Fish makes me nervous!) But I wanted to impress my friend Carla, who claims she can tell when something was cooked in a restaurant just by the way it flakes. I was determined to prove her wrong. Long story short: It did NOT go as planned that first time (smoke alarm, a weirdly sticky glaze situation), but now, after a few stops and starts, I’ve kind of nailed it. And if little ol’ me can pull off a restaurant-style Chilean sea bass with only a couple minor disasters, you absolutely can, too.
Why You’ll Love This (According to My Family)
I make this when someone’s coming over I want to impress but still want them to feel at home (you know, not like they’re at some stuffy, white-tablecloth place—unless you count my dog’s hair on everything). My family gobbles it up each time, which is saying something, because my husband, Tom, usually acts like fish is just a vehicle for tartar sauce. Oh, and PSA: this is also one of the few things my picky niece will eat without bribery. I’ve even managed to convert a hard-core salmon fan!
(Confession: I still panic a bit when flipping the fish. But eh, it’s resilient.)
Here’s What You’ll Need (Give or Take)
- 4 fillets Chilean sea bass (about 170g each, but look, I’ve used bigger pieces and just adjusted time. It’s not rocket science)
- 2 tbsp olive oil (when I’m out, I swap in avocado oil—my grandmother would be horrified, but honestly, who can taste the difference?)
- 1 tbsp unsalted butter (one time I used salted and just skipped adding salt later. It worked fine, promise!)
- 1 juicy lemon (if it’s really stubborn and dry, squeeze two)
- Salt—I’m partial to flaky sea salt, but good old table salt hasn’t let me down
- Black pepper—cracked fresh if you’re feeling fancy
- 2 garlic cloves, minced (sometimes one if I’m lazy or not in a garlicky mood)
- Optional: A few sprigs of fresh thyme or parsley. Or dried herbs are totally fine when the grocery store’s greens look sad
- Optional glaze: 1 tbsp honey plus 1 tbsp soy sauce—I don’t always glaze, but friends rave when I do
Here’s How I Do It (More or Less)
- Start by patting the fish dry. Don’t skip this, or it won’t brown up nicely. (This is usually where I realize I should’ve taken the fillets out of the fridge earlier. Room temp helps, trust me.)
- Heat your trusty nonstick skillet over medium-high heat. If you don’t have nonstick, it’s okay—I used cast iron once (though, honestly, the cleanup was rude.) Glug in the olive oil.
- Salt and pepper those sea bass fillets on all sides. If you want to be extra, toss some thyme leaves or parsley right on top.
- Put the fish in the pan, skin-side down if there’s skin. Fight the urge to move it around, just let it be! About 4–5 minutes does it. The edges start going sort of opaque—that’s your cue.
- Flip (gently—this is my Achilles heel) and add the butter and garlic. As it melts, spoon it over the top. Don’t worry about a rogue garlic bit burning; just fish it out if you see it getting too brown.
- If you’re feeling fancy, mix honey and soy sauce in a tiny bowl and brush over the fillets for the last minute of cooking. Watch it bubble, but don’t let it turn into caramel (voice of experience here…)
- Squeeze lemon over everything. I usually sneak a taste of the buttery pan sauce at this point, just to “check seasoning,” but really because it’s delicious.
- Serve it straight from the pan or plate it up if you want to show off. Nobody’s grading your presentation!
Random Notes From My Kitchen Adventures
- The fish can look a little, well, odd when just flipped—sometimes the skin sticks, sometimes it doesn’t. No stress, it’ll taste the same.
- I once added rosemary—nope, don’t do it. Way too strong for this fish.
- If I’m out of honey, a bit of brown sugar works in the glaze, but don’t let it sit too long or it goes weirdly gritty.
Things I’ve Tried (Some Hits, Some Misses)
- Cilantro instead of parsley—honestly, not for me, but my friend loved it.
- Crusting the fish in a bit of panko before searing: crispy, but makes it harder to glaze without burning bits. Meh.
- Once (let’s not talk about why) I tried an orange-maple glaze. Too sweet. If you like a sugar rush, maybe you’ll dig it?
What You Need (And What to Do If You Don’t Have It)
- Nonstick pan (but I’ve used stainless in a pinch—just use more oil and be patient scraping up the tasty bits)
- Spatula (preferably fish-shaped, just kidding—any will do, but if you don’t have one, two forks work just fine; it’s not a restaurant, right?)
- Bowl/mug for mixing glaze—yes, your favorite coffee mug will survive
How to Store (Not That There’s Ever Leftovers…)
If by some miracle you have leftovers, I just pop them in an airtight container and stick them in the fridge. They’re still quite good the next day—I almost think they taste better, like the flavors had a good long chat overnight. Should be fine up to 2 days, but in my house, it never lasts that long!
How I Serve It (Good Enough for Guests)
Ooh, this fish with garlicky mashed potatoes on the side and some roasted green beans… that’s my comfort meal. Sometimes I go for buttery rice just because it soaks up all the sauces (which is the best part, right?). At a family dinner once, we all sat on the floor picnic-style watching The Great British Bake Off and just picked at the fish right from the platter—no plates, loads of napkins. Fancy? Nope, but fun!
Lessons Learned (So You Don’t Have To)
- Don’t rush the searing step. I once cranked the heat to high to “save time”—ended up with smoky fish and a grumpy smoke detector. Medium-high is your friend; patience is, too.
- Fish is done when it flakes easily and feels kind of springy. If it’s super firm, you’ve gone too far. There’s no shame in gently poking it to check, just don’t be aggressive.
- Actually, I find adding the glaze at the last minute keeps it from burning. I used to do it earlier, and…let’s just say, not my brightest idea.
Real Questions Friends (and My Dad) Have Asked Me
- Can I use another fish if I can’t find Chilean sea bass? Oh, for sure! Try cod, halibut, or even sablefish. Just tweak the time a bit if they’re thinner.
- Is the honey-soy glaze necessary? Absolutely not, but it does make you feel like a chef. Sometimes I skip it and just use the buttery garlic sauce; nobody’s complained.
- How do you keep the fish from falling apart when you flip it? Silicone spatula helps, but honestly, just let it cook undisturbed until it wants to come up. If it splits, who cares—makes it look rustic!
- Can you bake this instead? Yup, bake at 200°C (about 400°F) for 13–15 minutes. But the pan-fry method gets the best crust (in my opinion).
- Where do you buy your fish? I get mine at the local market, but online delivery from Pike Place Fish Market is weirdly reliable. If you’re curious about more sustainable seafood choices, Monterey Bay Aquarium’s Seafood Watch guide is super handy and not at all preachy.
And that’s it. If I forgot to mention anything, blame my wandering mind and the fact that my kitchen timer just buzzed. Let me know how it goes, and if you find an even better sauce, seriously, spill the beans!

Ingredients
- 4 (6-ounce) Chilean sea bass fillets
- 2 tablespoons olive oil
- 2 tablespoons unsalted butter
- 3 cloves garlic, minced
- 1 lemon, juiced and zested
- 1 teaspoon sea salt
- 1/2 teaspoon freshly ground black pepper
- 2 tablespoons chopped fresh parsley
Instructions
-
1Preheat oven to 400°F (200°C). Pat the Chilean sea bass fillets dry with paper towels and season both sides with salt and pepper.
-
2Heat olive oil in a large oven-safe skillet over medium-high heat. Add sea bass fillets, skin side down, and sear for 3-4 minutes until golden and crisp.
-
3Flip the fillets, add butter and minced garlic to the skillet. Let the butter melt while spooning the mixture over the fish for 1-2 minutes.
-
4Add lemon juice and zest to the skillet. Transfer the skillet to the preheated oven and roast the sea bass for 8-10 minutes, or until the fish flakes easily with a fork.
-
5Remove from oven, spoon the pan sauce over the fillets, and sprinkle with chopped fresh parsley. Serve immediately.
CLICK FOR NUTRITION INFO
↑
Approximate Information for One Serving
Serving Size:
1 serving
Calories:
350cal
Protein:
42 gg
Fat:
17 gg
Saturated Fat:
0g
Trans Fat:
0g
Cholesterol:
0mg
Sodium:
0mg
Potassium:
0mg
Total Carbs:
3 gg
Fiber:
0g
Sugar:
0g
Net Carbs:
0g
Vitamin A:
0
Vitamin C:
0mg
Calcium:
0mg
Iron:
0mg
Nutrition Disclaimers
Number of total servings shown is approximate. Actual number of servings will depend on your preferred portion sizes.
Nutritional values shown are general guidelines and reflect information for 1 serving using the ingredients listed, not including any optional ingredients. Actual macros may vary slightly depending on specific brands and types of ingredients used.
To determine the weight of one serving, prepare the recipe as instructed. Weigh the finished recipe, then divide the weight of the finished recipe (not including the weight of the container the food is in) by the desired number of servings. Result will be the weight of one serving.
Did you make this recipe?
Please consider Pinning it!!