So, About This Chili Cheese Dip…
Let me tell you, if there’s one recipe that’s survived every single one of my awkward parties, it’s this Easy Chili Cheese Dip. I started making it somewhere around my first real apartment — the one with the hideous carpet and a stove that ran either freezing or volcanic. Makes you appreciate reliable recipes, right? I’d whip this up before friends arrived, clear the junk mail off the couch, and—poof!—it made my place smell like something you actually wanted to hang out in. Plus, it’s saved my bacon more times than I can count when unexpected guests showed up (or, okay, when dinner plans totally went sideways).
Why I Think You’ll Like This One
I make this whenever my brother brings over his crowd—he’s not coming for a salad, trust me. My family goes positively wild for this dip because it’s one of those no-brainer, satisfying snacks that nobody even pretends to feel guilty about. I don’t know if it’s the oozy cheese or just the combo of warm food and cold weather, but honestly, it vanishes so fast I sometimes wonder if I imagined putting it out at all.
Oh, and it reheats like a dream (not that there’s ever much left). On game days, I’ll actually double the recipe; it never makes it past halftime. And if you’ve ever felt frustrated trying to get cheese to melt without turning rubbery — same. This version fixed that for me.
Stuff You’ll Need (and What I Swap in When I’m Out)
- 1 (15 oz) can of chili (no beans, or with — I bounce between both, and my grandmother always insisted on Wolf Brand, but seriously, use what you’ve got; homemade chili is decadent but let’s be real)
- 1 (8 oz) package cream cheese (room temp if you remember, but I’ve chucked it in cold more than once, just takes a bit more mixing)
- 2 cups shredded cheddar (sometimes I do half cheddar, half Pepper Jack for a kick, or just the bagged stuff that’s lurking in the back of the fridge)
- 1 handful of sliced green onions (optional but they make it pretty)
- A sprinkle of garlic powder or a tiny clove minced if you want to get fancy
- Hot sauce or a pinch of cayenne (just if you’re into that sort of thing)
Here’s How I Put It All Together
- Preheat your oven to 350°F (if you don’t want to wait, stick it in while it heats — it’ll survive, trust me). Actually, the microwave works too if you’re running late, but the oven’s got my heart.
- In a medium baking dish (like 8×8 or whatever’s not currently busy with your last failed baking project), spread out the cream cheese in an even-ish layer. Sometimes I just plop little blobs in and call it day.
- Pour the canned chili right on top. No fancy swirling required, but if you want, go wild.
- Throw the shredded cheese on top. (I heap it, because too much cheese is just not a thing in my house.)
- Bake for about 20 minutes, until it’s hot, bubbling at the edges, and the cheese is melted. This is usually where I sneak a taste that burns my tongue every single time. Don’t worry if it looks a bit weird or oily at this point—it always settles down after a few minutes out of the oven.
- Scatter on green onions, maybe hit it with a glug of hot sauce if folks are up for it.
Don’t Skip These (Tried-And-Failed-First) Notes
- Once, I used fat-free cream cheese. I wouldn’t recommend it, unless you like sadness in dip form.
- If your cheese isn’t melting, it’s probably just too thick. Spread it out or give it a stir, or let it sit just a bit longer. (Actually, sometimes I *do* just mix the whole thing together halfway through baking — it’s not pretty but it works!)
- Your dish doesn’t need to be fancy; a pie pan, cast iron, whatever’s oven-safe, you get it.
The Wild (and One Not-So-Great) Variations
- I tried adding black beans once for “protein.” Tasted okay, but folks picked around them — texture thing, I guess.
- Layering some pickled jalapenos between chili and cheese: surprisingly awesome if you like a jolt.
- On second thought, I once stirred in salsa instead of chili and it got watery…wouldn’t do that again except maybe as a last resort.
- Vegan cheese? Could work. But I haven’t tested a version I truly liked yet, so if you’ve got any suggestions, let me know. (And if you want to learn more about vegan melting cheese, Serious Eats has a decent round-up.)
Gear You’ll Actually Need (Don’t Panic If You’re Missing One)
- Baking dish. Or an oven-safe skillet. One time I used a bread pan with slightly tragic results… but dip still tasted good.
- An oven. Nope, a microwave will do in a pinch — just zap in bursts and stir a lot.
- Spoon or spatula (but honestly, I have used a random fork and survived).

How I (Try To) Store This Stuff
Well, if you’re lucky enough to have leftovers, just cover the dish with foil or dump it in any container and stash in the fridge. Should keep for up to 3 days, maybe more…though honestly, in my house it never lasts more than a day because someone always sneaks a midnight scoop.
Serving It Up: What We Do
Tortilla chips are the classic (but hey, Fritos scoops are underrated if you ask me). Sometimes I cut a baguette into rounds and toast ’em for dipping, or just use carrot sticks if I’m feeling “virtuous.” My cousin dips pizza crusts in it and says it’s the best — not my thing, but you do you. Oh, and I always leave the baking dish on a folded towel so nobody gets a burnt hand; learned that the hard way.
A Couple of Pro-Tips (a.k.a. My Favorite Mistakes)
- I once rushed the cheese melting part by cranking up the heat. Big mistake — the edges turned into crunchy cheese crisps, which sounds dreamy, but really just stuck to the dish like cement.
- Actually, leaving it to cool just a few minutes before serving helps everything set up and not be so soupy. (Plus, nobody burns their mouth. Unless you’re me—patience is hard!)
FAQs — Or, Questions I’m Always Asked
- Can I make this ahead of time? Umm, yes. Actually, I think it tastes even better the next day; just reheat slowly so it doesn’t separate.
- Help — I’m out of cream cheese! Been there. You can swap in ricotta, or even Greek yogurt (the thick stuff), but I’ll be honest, flavor will be a bit different.
- Do I have to bake it? Not at all! The microwave’s your friend here. And on second thought, I sometimes just use a slow cooker if I’m bringing it to a tailgate. Here’s a good slow-cooker method if that’s your jam.
- What’s the best way to make it spicy? Oh, just go wild—add hot sauce, a chopped chipotle, or fresh jalapenos. Or just use spicy chili and call it a day!
- Someone doesn’t eat meat—can I still make this? Yep. Find a good veggie chili (like Amy’s), or try one of the many plant-based ones you’ll see at the shop. As long as it’s thick, you’re good to go.
Anyway, that’s the gist. Just remember — even if it doesn’t look like Instagram food, nobody’s gonna remember that; they’ll remember how fast it vanished. And probably the cheese stain on the couch (oops). Enjoy!
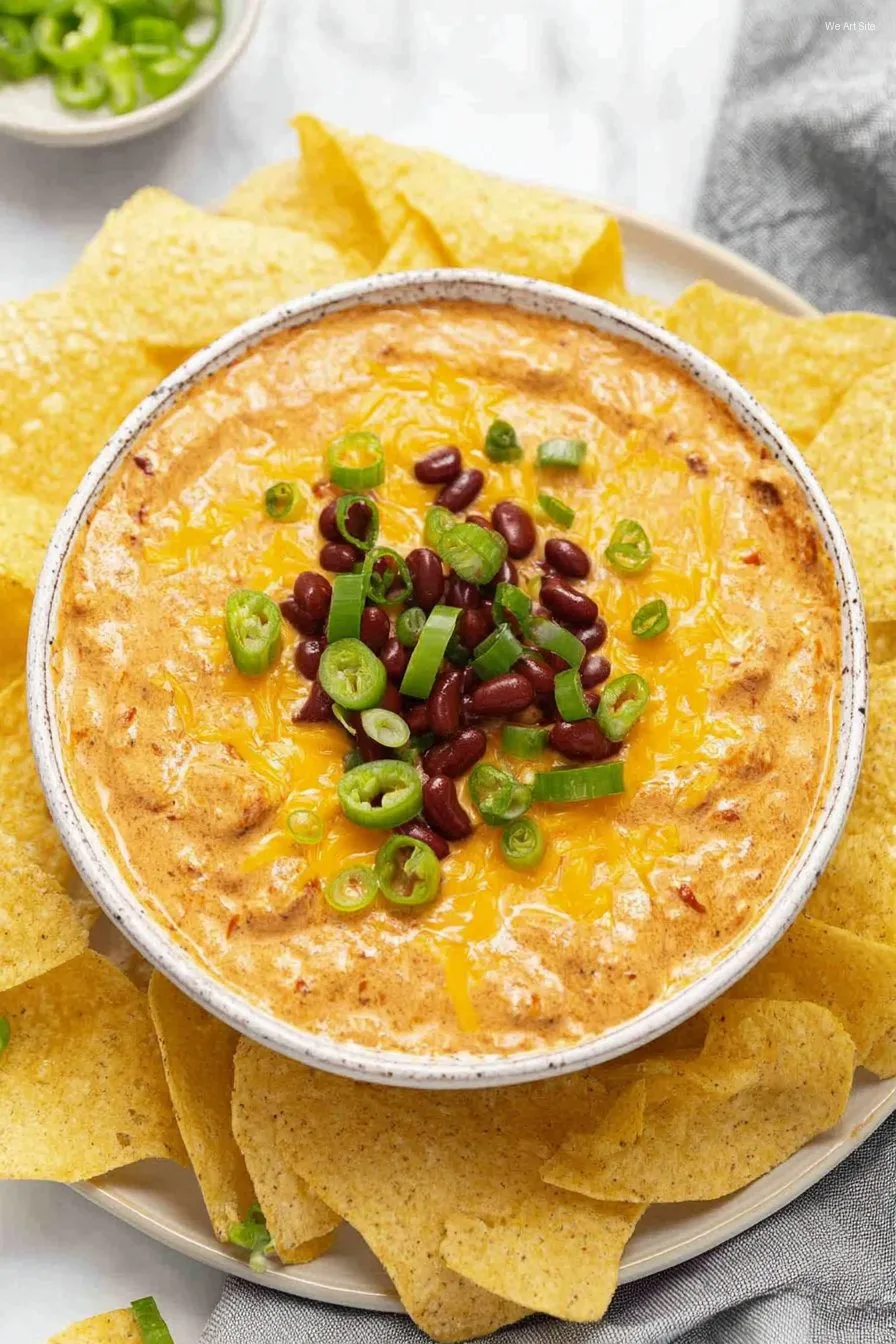
Ingredients
- 1 can (15 oz) chili with no beans
- 1 package (8 oz) cream cheese, softened
- 2 cups shredded cheddar cheese
- 1/2 cup chopped green onions
- 1/4 cup sliced jalapeños (optional)
- 1/2 teaspoon garlic powder
- 1/2 teaspoon smoked paprika
- Tortilla chips, for serving
Instructions
-
1Preheat the oven to 350°F (175°C).
-
2Spread the softened cream cheese evenly on the bottom of a medium-sized baking dish.
-
3Pour the chili over the cream cheese layer and spread it evenly.
-
4Sprinkle the shredded cheddar cheese on top of the chili layer.
-
5Add chopped green onions and sliced jalapeños for extra flavor, if desired. Sprinkle garlic powder and smoked paprika over the top.
-
6Bake for 15 minutes, until the cheese is melted and bubbly. Serve hot with tortilla chips.
CLICK FOR NUTRITION INFO
↑
Approximate Information for One Serving
Serving Size:
1 serving
Calories:
280 caloriescal
Protein:
11gg
Fat:
21gg
Saturated Fat:
0g
Trans Fat:
0g
Cholesterol:
0mg
Sodium:
0mg
Potassium:
0mg
Total Carbs:
9gg
Fiber:
0g
Sugar:
0g
Net Carbs:
0g
Vitamin A:
0
Vitamin C:
0mg
Calcium:
0mg
Iron:
0mg
Nutrition Disclaimers
Number of total servings shown is approximate. Actual number of servings will depend on your preferred portion sizes.
Nutritional values shown are general guidelines and reflect information for 1 serving using the ingredients listed, not including any optional ingredients. Actual macros may vary slightly depending on specific brands and types of ingredients used.
To determine the weight of one serving, prepare the recipe as instructed. Weigh the finished recipe, then divide the weight of the finished recipe (not including the weight of the container the food is in) by the desired number of servings. Result will be the weight of one serving.
Did you make this recipe?
Please consider Pinning it!!