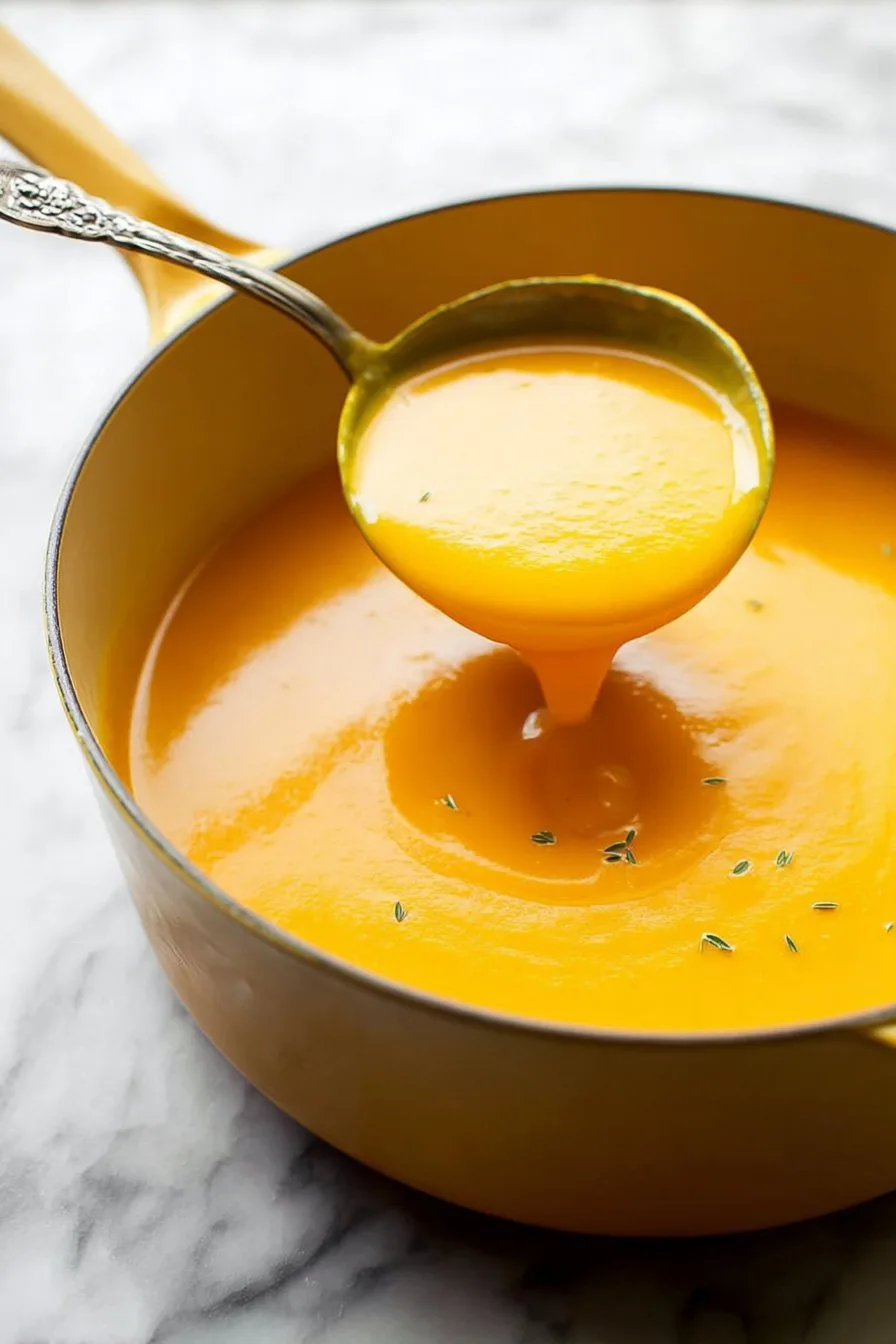
Let’s Talk About Butternut Squash Soup (and Why I Make It So Much)
If you’ve ever had one of those chilly evenings where you just want to curl up under a too-small blanket with something warm, well, that’s exactly how I fell into making this easy butternut squash soup so often. I think it was last November—right after I tried (and failed) to knit my own scarf—I realized what I really wanted was some homemade, velvety soup. And honestly, this recipe’s become my go-to cure for those “why is it so dark at 5pm?” days. The first time I made it, I accidentally doubled the garlic, but you know what? It was actually great. At least nobody came near me at the grocery store the next day, so there’s that.
Why You’ll Love This Soup (And Why I Keep Making It)
I make this whenever I’ve got a squash staring at me from the counter, looking all smug (or, okay, just about to turn), or when I need something that feels like a hug in a bowl. My family goes crazy for this one, mostly because it’s smooth and just the right side of sweet. My youngest calls it “pumpkin soup”—I stopped correcting her years ago. If I’m honest, the main reason I love it is because it’s forgiving; if you overcook or under-season, it’s still pretty tasty (although, I once tried to add too much curry powder—don’t do that unless you want your kitchen smelling like a spice bazaar for a week). Plus, cleanup’s a breeze, and you can get away with using whatever bits and bobs are left in the veg drawer.
What You’ll Need (With Some Real-Life Swaps)
- 1 medium butternut squash, peeled and cubed (sometimes I use frozen pre-cut squash when I’m feeling lazy—nobody’s judging)
- 1 large onion, chopped (red or yellow, honestly, both work fine)
- 2-3 cloves garlic, minced (my grandma always insisted on using fresh, but the jar stuff works in a pinch)
- 1 carrot, peeled and chopped (or a handful of baby carrots—just chop ‘em up)
- 3 cups vegetable broth (sometimes I use chicken stock if that’s what’s open)
- 1–2 tbsp olive oil or butter
- Salt and pepper, to taste
- Optional: a sprinkle of nutmeg or a splash of cream (I rarely bother, but it’s nice if I’m feeling fancy)
Here’s How I Make It (But You Don’t Have to Follow This to the Letter)
- First things first—heat a big ol’ pot over medium heat. Add the olive oil or butter. Once it’s hot, throw in the onion. Let it get soft and a little translucent, about five minutes, but don’t stress if you lose track of time—just don’t burn it. (I have, and it’s not the end of the world.)
- Add in the garlic. Give it a minute. This is where I usually sneak a taste, even though it’s mostly just onions and garlic. Weird, maybe, but delicious.
- Toss in the carrot and butternut squash. Stir it all around so everything gets cozy together.
- Pour in the broth. Enough so the veggies are just about covered. Sometimes I add a splash more water if it looks dry—soup should be, well, soupy.
- Bring it all to a boil, then lower the heat and let it bubble away for about 20–25 minutes. The squash should be fork-tender (or, as I like to test, “mashable against the side of the pot”). Don’t worry if it looks a bit weird at this stage—it always does!
- Turn off the heat. Now, here’s where I use my stick blender right in the pot (careful, it’s hot and splatters—ask me how I know). If you don’t have one, just ladle it in batches into a blender or food processor. Actually, sometimes I leave it a bit chunky—nobody’s complained yet.
- Season with salt and pepper. Taste it. Taste it again. Add more seasoning if you think it needs it. If you want it creamier, add a splash of cream or even coconut milk. Or not. You’re the boss here.
- Spoon it into bowls, maybe with a dollop of yogurt or a swirl of cream if you’re feeling proper.
Some Notes I’ve Picked Up Along the Way
- If you accidentally leave the skin on the squash, it’s not the end of the world, but the texture can get a bit… rustic. I tried it once and regretted it; peeling is worth it.
- Adding a pinch of nutmeg really does make it taste more autumnal, but I always forget until it’s too late. Oops.
- Don’t stress about perfect chopping—it all gets blended anyway.
Variations I’ve Actually Tried (and One That Bombed)
- Curry twist: A spoonful of curry powder makes it really warming, just don’t get carried away like I did once—wow.
- Apple addition: Toss in a chopped apple with the squash. Adds a nice sweetness; my husband loves it, I’m more on the fence.
- Smoky: I once added smoked paprika. It was… interesting. Maybe too interesting. Probably won’t do that again.
What If You Don’t Have All the Gear?
Honestly, a stick blender is easiest, but if all you’ve got is an old-school potato masher, just go at it. The soup’ll be chunkier, but sometimes that’s the vibe. I’ve even used a fork in a pinch. If you want to see my favorite stick blender, this review helped me pick mine.
How to Store It (Or, Why Ours Never Lasts Long)
Store leftovers in a tub or jar in the fridge—should keep for 3 days, maybe 4, but honestly, in my house it never lasts more than a day! You can freeze it too, which is handy, but I rarely get the chance. If you want to learn more about freezing tips, this guide is pretty handy.
How I Like to Serve It (And the Odd Family Tradition)
I’m all for a big hunk of crusty bread on the side (sometimes garlic bread, if I’m feeling wild). Or—bit odd—my cousin dunks grilled cheese in hers and swears it’s the only way. I’ll leave that debate to you. In winter, we sometimes sprinkle pumpkin seeds on top for crunch; don’t knock it till you’ve tried it.
Pro Tips I Learned the Hard Way
- Don’t skip softening the onions—they add way more flavor than you’d think. I once tried rushing this bit and regretted it because the soup tasted a bit flat.
- Let it cool a little before blending—unless you like orange polka dots on your ceiling. Trust me, it’s a mess.
- Actually, I find it works better if I let the soup sit for 10 minutes before serving—the flavors seem to hang out together more.
Wait, What If… (FAQs I’ve Actually Been Asked)
- Can I make this vegan? Totally! Just use olive oil and veggie broth. Skip the cream or swap for coconut milk. Easy-peasy.
- Do I have to peel the squash? Yes, unless you’re fond of a chewy texture. I’ve tried both ways. Peeling wins.
- Can I double the recipe? Absolutely. Just get a bigger pot. I did it once for a party, and it went quick!
- What if it’s too thick? Just add more broth or a bit of water. No big deal.
- Is it better the next day? Honestly, yes. But good luck having leftovers. At least in my house.
Oh—before I forget, if you’re looking for more cozy soups, Smitten Kitchen has a bunch that I keep going back to for inspiration. Anyway, I hope you like this one as much as I do—let me know if you try any weird variations and how they turn out (unless it involves chocolate; that’s a story for another time).

Ingredients
- 1 medium butternut squash (about 2 pounds), peeled and cubed
- 1 medium onion, chopped
- 2 cloves garlic, minced
- 3 cups vegetable broth
- 1 cup coconut milk (or heavy cream)
- 2 tablespoons olive oil
- 1/2 teaspoon ground nutmeg
- Salt and black pepper to taste
Instructions
-
1Heat olive oil in a large pot over medium heat. Add chopped onion and cook until softened, about 5 minutes.
-
2Add minced garlic and cook for 1 minute until fragrant.
-
3Add cubed butternut squash, vegetable broth, nutmeg, salt, and pepper. Bring to a boil, then reduce heat and simmer for 20-25 minutes, until squash is tender.
-
4Remove from heat. Use an immersion blender to puree the soup until smooth, or carefully blend in batches in a blender.
-
5Stir in coconut milk (or heavy cream) and heat gently for 2-3 minutes. Adjust seasoning to taste and serve warm.
CLICK FOR NUTRITION INFO
↑
Approximate Information for One Serving
Serving Size:
1 serving
Calories:
180 caloriescal
Protein:
3gg
Fat:
9gg
Saturated Fat:
0g
Trans Fat:
0g
Cholesterol:
0mg
Sodium:
0mg
Potassium:
0mg
Total Carbs:
25gg
Fiber:
0g
Sugar:
0g
Net Carbs:
0g
Vitamin A:
0
Vitamin C:
0mg
Calcium:
0mg
Iron:
0mg
Nutrition Disclaimers
Number of total servings shown is approximate. Actual number of servings will depend on your preferred portion sizes.
Nutritional values shown are general guidelines and reflect information for 1 serving using the ingredients listed, not including any optional ingredients. Actual macros may vary slightly depending on specific brands and types of ingredients used.
To determine the weight of one serving, prepare the recipe as instructed. Weigh the finished recipe, then divide the weight of the finished recipe (not including the weight of the container the food is in) by the desired number of servings. Result will be the weight of one serving.
Did you make this recipe?
Please consider Pinning it!!