Alright, friend, let me spill the beans: these Bisquick cinnamon rolls are what I pull out when I’m craving that gooey, cinnamon-y goodness but can’t be bothered with all the kneading and rising. (Patience is a virtue and all, but sometimes I just want cinnamon rolls now.) Honestly, I first started making these because I forgot to buy yeast—classic me. But they turned out so well, I keep coming back—even when my pantry’s stocked. Plus, once, my cousin tried to eat half the pan when I wasn’t looking. True story.
Why I (and My Family) Love These
I make this recipe when it’s a rainy Saturday or I want to bribe my kids out of bed (success rate: about 80%). My family goes crazy for these because they’re soft, sweet, and you can eat ’em warm straight from the pan. And, because Bisquick does most of the heavy lifting, I don’t have to wrestle with sticky dough at 7 a.m. Oh, and here’s a confession: I used to dread rolling dough (too much flour, too little, who knows?), but with this version, it’s pretty much foolproof. Or as close as I get, anyway.
Gather Your Ingredients (and a Few Substitutions)
- 2 cups Bisquick mix (I’ve used the store-brand stuff too—honestly, no one noticed)
- 2/3 cup milk (skim, whole, almond—whatever’s in the fridge; oat milk got a bit weird, though)
- 2 tbsp granulated sugar (brown sugar if you like a richer taste)
- 2 tbsp butter, melted (I sometimes use margarine if I’m running low—shh don’t tell my mom)
- 1 tsp ground cinnamon (my grandmother insisted on Ceylon, I just use whatever’s on sale)
- Optional: pinch of salt
- For the glaze: 1 cup powdered sugar, 2 tbsp milk, 1/2 tsp vanilla extract (sometimes I add a tiny bit of cream cheese—just for kicks)
Let’s Make Bisquick Cinnamon Rolls!
- Preheat your oven to 400°F (about 200°C). Grease a small baking pan or, if you can’t find yours like I often can’t, just use a cast iron skillet.
- In a medium bowl, mix Bisquick, milk, and a pinch of salt until you get a soft dough. Don’t overthink it—it’ll look a bit sticky, but that’s normal.
- Sprinkle some Bisquick (or flour, in a pinch) on your countertop. Turn out the dough and pat it into a rectangle, about the size of a big magazine. Sometimes mine’s a weird shape, but it all works out in the end.
- Brush the dough with melted butter. Sprinkle sugar and cinnamon all over. (This is where I sneak a taste—old habits die hard.)
- Now, roll it up tightly from the long side. If it tears a little, just pinch it back together. Slice into about 8 pieces—though, sometimes I end up with 7 and a tiny oddball one. It’s fine.
- Arrange rolls in the prepared pan. Bake 18–22 minutes—edges should be golden and the middle puffed. Don’t panic if the middles look a smidge soft; carry-over heat finishes the job.
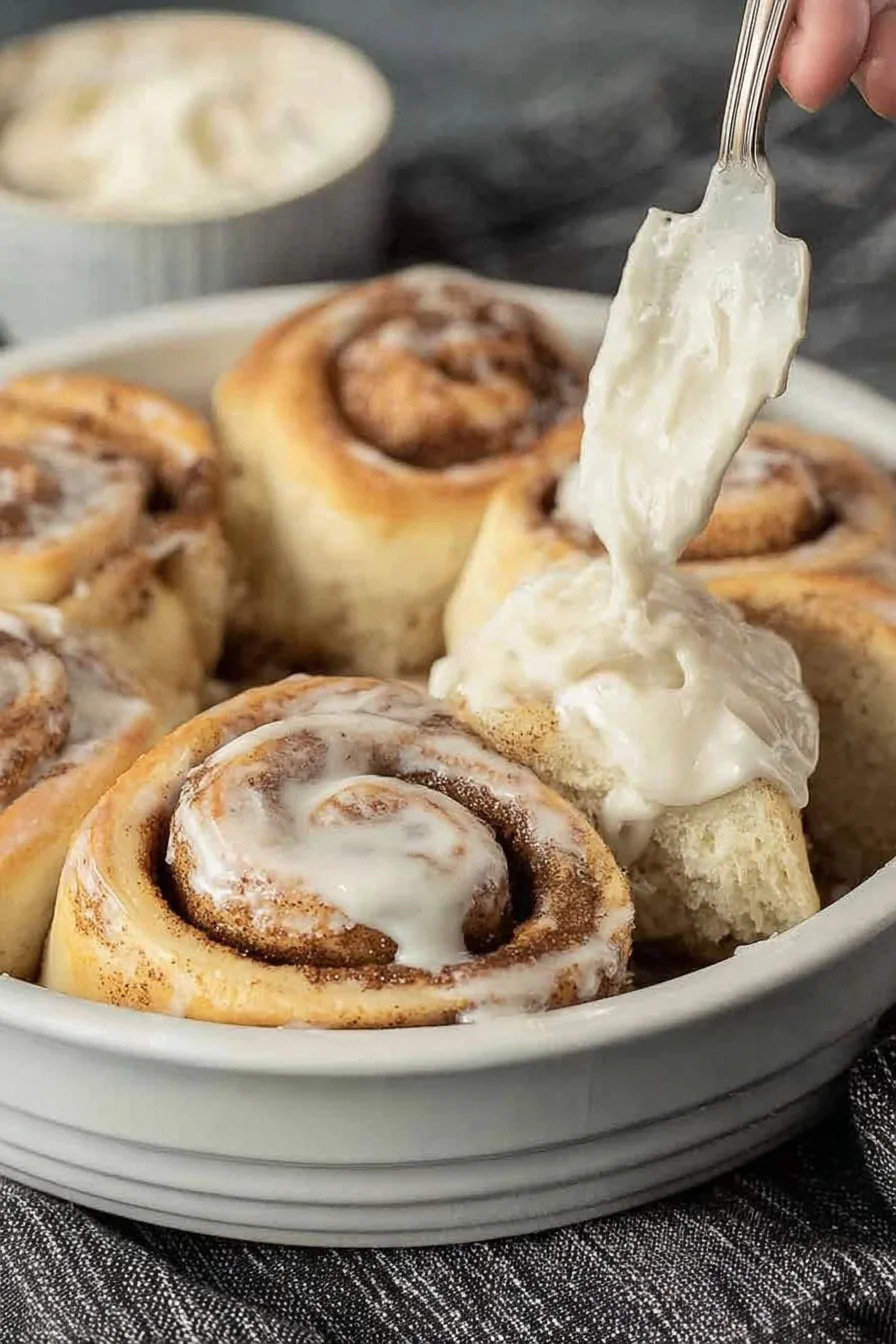
- Stir up the glaze ingredients in a small bowl. If it’s too thick, add a drop more milk; too runny, more sugar. Drizzle over the rolls while they’re still warm and watch it ooze into all the cracks. (Some people like to wait till they cool, but I’m not that patient.)
Random Notes (Because I’ve Messed This Up Before)
- If the dough sticks to the counter, just dust more Bisquick. Or use parchment paper, which I always forget about until it’s too late.
- I once tried baking these at 375°F because I misread the recipe. They turned out fine, just a little pale. Maybe don’t do that unless you like them softer.
- If you like more filling (who doesn’t?), double the cinnamon and sugar. It gets messy, but that’s half the fun.
Variations I’ve Actually Tried (Plus One Fail)
- Adding chopped pecans or walnuts inside. If you like a bit of crunch, this is the ticket.
- Using orange zest in the glaze—super fresh, especially for brunch.
- One time I tried cocoa powder in the filling. It sounded good; tasted kinda meh. Live and learn.
Do You Need Fancy Equipment? Nope, But…
A rolling pin is handy, but I’ve used a wine bottle in a pinch (don’t judge—it works). If you don’t own a baking pan, a pie dish or even a rimmed baking sheet will do. Actually, I think I’ve used a roasting tin once when nothing else was clean.
Storing These Rolls (If They Last That Long)
Store in an airtight container at room temp for up to 2 days. But honestly, in my house, they never last more than a day—by evening, there’s just crumbs left. If you must, pop leftovers in the microwave for 10 seconds to freshen them up.
Serving Suggestions (How We Like ’Em)
I usually serve these warm with coffee, or hot chocolate for the kids. Sometimes we add fresh fruit or a handful of toasted nuts on top, but mostly, it’s just a free-for-all straight from the pan. Sunday mornings rarely get fancier around here.
Lessons Learned (a.k.a. My Hard-Earned Pro Tips)
- Don’t rush the rolling step—once, I hurried and the filling just fell out everywhere. Slow and steady makes for prettier spirals.
- Actually, I find it works better if you let the rolls sit for 5 min before glazing. The icing soaks in more evenly, though sometimes I can’t resist anyway.
- If you want to make a double batch, use two pans—one big pan leads to underbaked middles (ask me how I know…)
Chit Chat: Some FAQs I’ve Gotten
- Can I prep these ahead?
- Sort of! You can assemble the rolls, cover, and refrigerate overnight, then bake in the morning. Sometimes they take a smidge longer to bake cold from the fridge.
- Can I freeze them?
- Sure can! Bake as usual, cool, then freeze individually wrapped. Reheat in the microwave—better than store-bought, I think.
- Do I really need Bisquick?
- Technically, you could use a homemade baking mix, but it’s never quite the same for me. If you want to try a DIY version, check out this mix from King Arthur Baking—I’ve used it in a pinch.
- Can I make these vegan?
- Probably! Use plant milk and vegan margarine. I’ve seen folks do it on baking forums like r/veganbaking on Reddit, but I haven’t tried it myself yet.
- How thick should I roll the dough?
- About 1/4 inch, but honestly, I just eyeball it. A bit too thin gets crispy edges, thicker is fluffier. Your call.
Anyway, that’s the whole song and dance. If you make these Bisquick cinnamon rolls, let me know how it goes—unless you eat them all before you can snap a picture, which, well, I totally get. If you want more breakfast ideas, Sally’s Baking Addiction has a ton of fun options—though none quite as lazy-and-delicious as these, in my entirely biased opinion.

Ingredients
- 2 cups Bisquick baking mix
- 2/3 cup milk
- 2 tablespoons granulated sugar
- 2 tablespoons unsalted butter, melted
- 1/2 cup brown sugar, packed
- 2 teaspoons ground cinnamon
- 1/2 cup powdered sugar
- 2 tablespoons milk (for glaze)
Instructions
-
1Preheat oven to 375°F (190°C). Grease an 8-inch round baking pan.
-
2In a large bowl, mix Bisquick baking mix, granulated sugar, and 2/3 cup milk until a soft dough forms.
-
3Turn dough onto a floured surface and knead gently 5 times. Roll dough into a 12×8-inch rectangle.
-
4Brush dough with melted butter. Sprinkle evenly with brown sugar and cinnamon.
-
5Roll up tightly from the long side. Cut into 8 equal slices and place cut side up in prepared pan.
-
6Bake for 23-25 minutes or until golden brown. Mix powdered sugar and 2 tablespoons milk to make glaze; drizzle over warm rolls before serving.
CLICK FOR NUTRITION INFO
↑
Approximate Information for One Serving
Serving Size:
1 serving
Calories:
250 caloriescal
Protein:
4gg
Fat:
6gg
Saturated Fat:
0g
Trans Fat:
0g
Cholesterol:
0mg
Sodium:
0mg
Potassium:
0mg
Total Carbs:
45gg
Fiber:
0g
Sugar:
0g
Net Carbs:
0g
Vitamin A:
0
Vitamin C:
0mg
Calcium:
0mg
Iron:
0mg
Nutrition Disclaimers
Number of total servings shown is approximate. Actual number of servings will depend on your preferred portion sizes.
Nutritional values shown are general guidelines and reflect information for 1 serving using the ingredients listed, not including any optional ingredients. Actual macros may vary slightly depending on specific brands and types of ingredients used.
To determine the weight of one serving, prepare the recipe as instructed. Weigh the finished recipe, then divide the weight of the finished recipe (not including the weight of the container the food is in) by the desired number of servings. Result will be the weight of one serving.
Did you make this recipe?
Please consider Pinning it!!