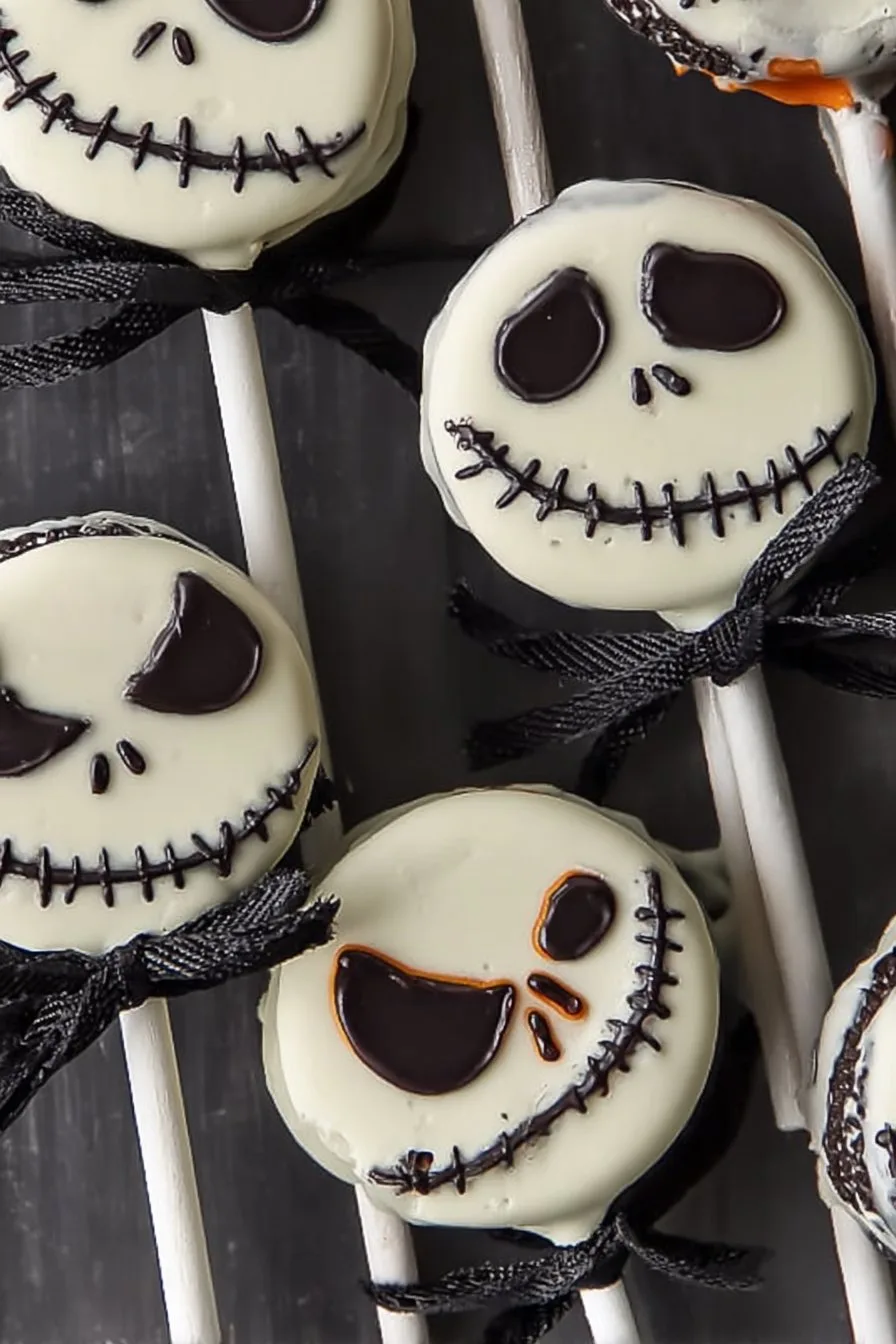
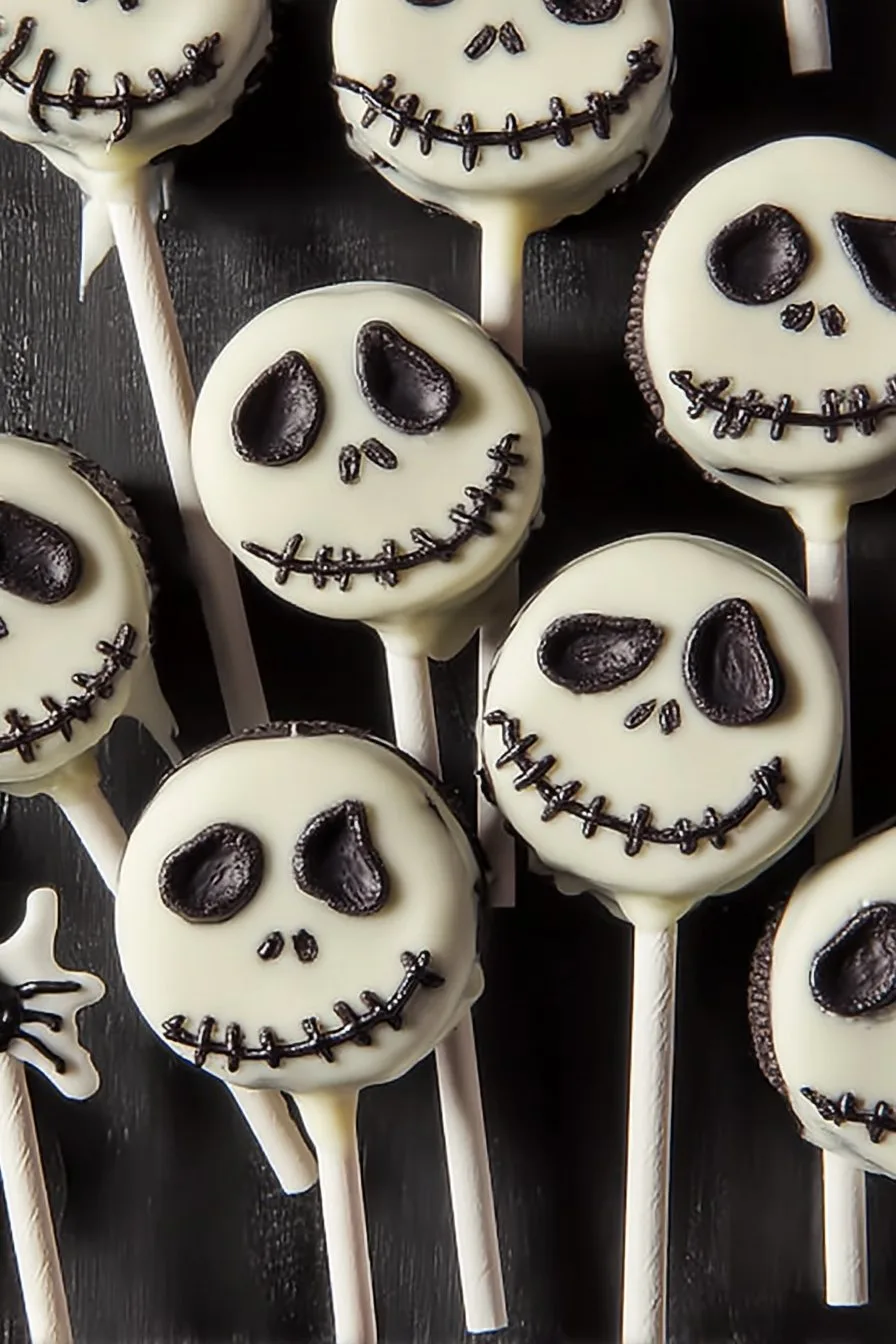
Okay, so have you ever found yourself knee-deep in Halloween decorations and just thought, “What if Jack Skellington showed up as dessert?” Well, that’s honestly how these Jack Skellington Oreo Pops were born in my kitchen. The first time I tried these, it was a total mess—think icing everywhere, a lopsided smile or two, and my dog eyeing the fallen Oreos with deep suspicion. But that’s half the fun, isn’t it? I mean, if you can’t laugh at your own wobbly skeleton faces, what can you laugh at?
Anyway, they’re now a regular October treat at my place, especially since my niece decided they’re ‘the best’—her words, not mine. I do try to get those smiles right, but let’s be honest, Jack’s had a rough day sometimes. That actually makes them even spookier. If you can get your hands on a good playlist (I like this Nightmare Before Christmas soundtrack), it makes the whole process more fun.
Why I Keep Making These (Even When I Swear I Won’t)
I make these Jack Skellington Oreo Pops every year when the weather turns chilly and the house starts to smell like pumpkin spice (not that these taste anything like pumpkin, but you get the vibe). My family goes crazy for these because, well, they’re adorable and just a little bit creepy—plus they’re ridiculously sweet and you can eat them off a stick, which seems to make everything taste better. I do sometimes get frustrated because the black food gel can get everywhere (I once had to explain why my fingernails were black at the office) but honestly, it’s worth it for the giggles. And if you’ve got kids around, they’ll jump in for the decorating, even if half of the pops look more like Jack’s long-lost cousin than the real deal.
Ingredients (And a Few Swaps I’ve Tried)
- 1 pack of Oreo cookies (I use classic, but double-stuf works great if you want a sturdier pop—my cousin says the off-brand version is fine, but she’s braver than me)
- 200g white chocolate (sometimes I use white candy melts if the shop is out of chocolate—it does set faster)
- Black decorating gel or edible marker (I once tried using melted dark chocolate, but it was a bit too runny for faces)
- Lollipop sticks (or just use wooden skewers in a pinch—just tell folks to watch for splinters)
- Optional: a smidge of coconut oil if your chocolate is too thick; it happens to the best of us
How I Make Jack Skellington Oreo Pops (The Imperfect Way)
- First up, line a tray with baking paper. This is just to spare yourself a mountain of washing up later (trust me).
- Carefully twist open each Oreo. If they crack, just press them gently back together—or eat the broken ones. No one’s judging.
- Melt the white chocolate, slow and steady in the microwave. I go for 30 second bursts and stir inbetween. Don’t rush, unless you want weird clumps (been there).
- Dip a lollipop stick into the melted chocolate, then sandwich it back inside the Oreo. This helps it stay put. Let them set for a few minutes so the stick’s nice and secure.
- Now, dunk each Oreo into the white chocolate, rolling them around with a fork until they’re good and coated. Tap off the excess (I usually sneak a taste here, not gonna lie).
- Place them on the lined tray. If they drip or look bumpy, don’t worry. Jack’s face was never smooth, anyway!
- Chill in the fridge for about half an hour, or until the chocolate’s firm. Or, impatiently poke them every five minutes like I do.
- Once set, use the black gel or edible marker to draw on Jack’s stitched mouth, nose, and those big eyes. Wobbly lines? That’s character, mate.
- Let the faces dry a bit before stacking or serving. Or just hand them out straight away—fingers crossed for no smudges.
Stuff I’ve Learned the Hard Way
- If your white chocolate seems too thick, I add a tiny bit of coconut oil. Too much, and they slide off the sticks, though.
- Don’t try to decorate when the chocolate’s still soft. I did once and ended up with a face that melted into a puddle. Not my best work.
- Sometimes the Oreos split when you poke in the stick. Actually, it works better if you twist the stick a little instead of just shoving it in.
Some Variations I’ve Experimented With
- I tried using golden Oreos for a ‘ghostly Jack’—looks odd, but tastes fab if you like vanilla.
- Sprinkling a pinch of edible glitter before the chocolate sets makes them look more magical than scary. My nephew called this one ‘disco Jack.’
- Once, I mixed in a bit of orange food coloring for a pumpkin-y version… let’s just say it looked more like a sunburned Jack. Wouldn’t really recommend, unless you like explaining yourself.
Tools and Workarounds (Because Who Has Everything?)
- Lollipop sticks are great, but if you’re in a pinch, wooden coffee stirrers or even little teaspoons work. I once used chopsticks—bit overkill, but hey, it worked.
- Don’t have a microwave? Just melt the chocolate in a bowl over simmering water. I think it’s easier to control, anyway.
Keeping Them Fresh (If You Can Somehow Resist Them)
Store these in an airtight container in the fridge for up to 3 days. Though honestly, in my house, they never last more than a day—someone always sneaks a late-night treat. If you do manage to save a few, I think they taste even better after chilling overnight, but maybe that’s just me.
How I Like to Serve These (And What My Family Does)
I usually poke them into a pumpkin or a foam block for a spooky display—sometimes surrounded by plastic spiders for extra drama. Or just pile them up on a plate and watch them vanish. We’ve even used them as cupcake toppers at one birthday party, which was a hit (and a bit chaotic, but it worked!).
Lessons Learned (Aka, My Pro Tips)
- Don’t rush the chilling—seriously. I once tried to speed things up in the freezer and cracked half the pops. Patience is key here, oddly enough.
- If you want really neat faces, practice on a bit of baking paper first. Or just accept the wonkiness—half the charm, right?
- Actually, I find it works better if you let the pops come back up to room temperature before eating. The chocolate doesn’t crack your teeth then!
FAQ (Stuff People Actually Ask Me)
- Can I make these ahead of time?
- Yep, just keep them cold. But I wouldn’t do more than two days ahead or the Oreos go a bit soft. Unless you like that, which, fair enough!
- What if I can’t find black decorating gel?
- Use an edible black marker (I like Wilton ones). Or just melt some dark chocolate—might be a tad messy, but gets the job done.
- Do I need to use lollipop sticks?
- Nope! I’ve done them just as sandwich cookies without sticks, like homemade Halloween Oreos. Just a bit harder to dip, is all.
- Can I use gluten free Oreos?
- For sure. I haven’t noticed a huge difference, though they do break a bit easier, so be gentle.
- How do you keep the chocolate coating smooth?
- Honestly? Sometimes you just can’t. But a little coconut oil and a gentle hand helps. Plus, the fridge sets it up nice and shiny most times.
- Wait, isn’t this just chocolate-covered Oreos?
- Well, yes, but with silly faces and a lot more kitchen mess. And somehow, they taste spookier (in a good way).
So there you have it—a recipe that’s more about the laughs and slightly spooky charm than pure perfection. If yours look a bit wonky, you’re doing it right. And if you want more fun Halloween ideas, check out Sally’s Halloween recipes—she’s got some wild stuff. Happy haunting, and may your Oreos stay mostly intact!
Ingredients
- 12 Oreo cookies
- 1 cup white chocolate chips or candy melts
- 12 lollipop sticks
- 1 tablespoon coconut oil (optional, for melting chocolate)
- Black decorating gel or black icing
- Sprinkles or edible markers (optional, for details)
- Wax paper or parchment paper
- Small bow candies (optional, for decoration)
Instructions
-
1Carefully insert a lollipop stick into the cream center of each Oreo cookie, making sure not to break the cookie.
-
2Melt the white chocolate chips or candy melts in a microwave-safe bowl, stirring every 20 seconds until smooth. Add coconut oil if needed for a smoother consistency.
-
3Dip each Oreo pop into the melted white chocolate, coating it completely. Let excess chocolate drip off, then place the pops on wax or parchment paper.
-
4Allow the chocolate coating to set for about 10 minutes. Once set, use black decorating gel or icing to draw Jack Skellington’s eyes, nose, and stitched mouth on each pop.
-
5Add any additional decorations, such as small bow candies or sprinkles, if desired. Let the pops set completely before serving.
Approximate Information for One Serving
Nutrition Disclaimers
Number of total servings shown is approximate. Actual number of servings will depend on your preferred portion sizes.
Nutritional values shown are general guidelines and reflect information for 1 serving using the ingredients listed, not including any optional ingredients. Actual macros may vary slightly depending on specific brands and types of ingredients used.
To determine the weight of one serving, prepare the recipe as instructed. Weigh the finished recipe, then divide the weight of the finished recipe (not including the weight of the container the food is in) by the desired number of servings. Result will be the weight of one serving.
Did you make this recipe?
Please consider Pinning it!!