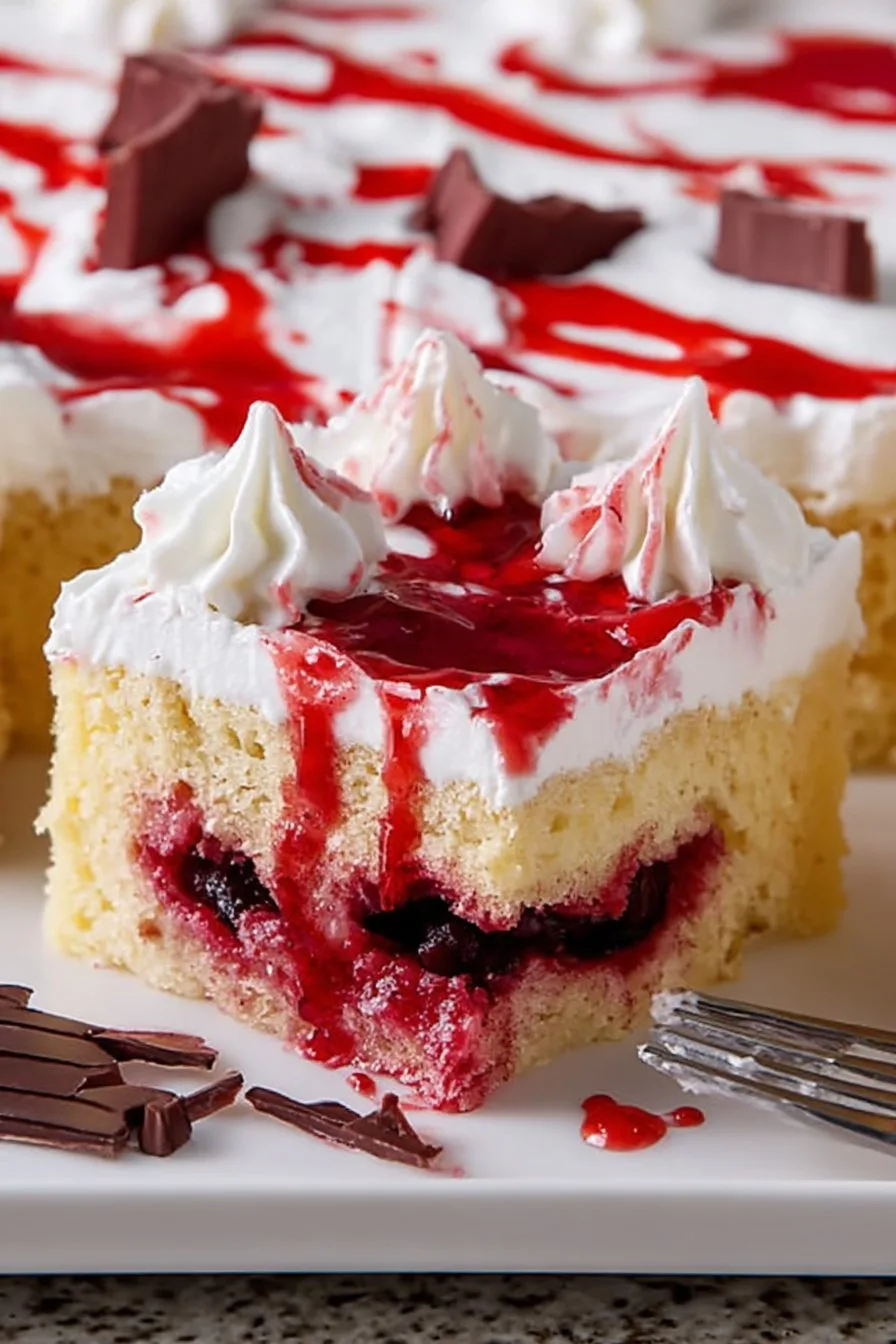
Let Me Tell You About This Wild Vampire Poke Cake
Alright, so the first time I brought this Vampire Poke Cake to a Halloween potluck, I thought people might think it was a bit over the top (I mean, come on, “bloody” cake?), but oh boy, it vanished faster than you can say “fangtastic.” My kids kept sneaking extra slices, and my neighbor—who usually just picks at desserts—grabbed a second helping. I guess that says something. Plus, any excuse to stab a cake with a straw just feels a bit mischievous and fun, doesn’t it?
Why You’ll Love This (And Why I Keep Making It…)
I make this cake when I want to see both kids and adults light up (with just a little shriek). My family goes bonkers for it because, well, it’s super moist (sorry if you hate that word). And the whole “poke” thing is fun. There’s zero pressure to make it look perfect. Actually, the messier, the better! I used to stress about the gelatin soaking in right, but honestly, even if it runs a bit wild, nobody cares—they’re too busy wolfing it down.
What You’ll Need (Plus Some Swaps and Grandma’s Opinions)
- 1 box white cake mix (I’ve used yellow cake in a pinch—still tasty. Grandma swears by Betty Crocker, but whatever’s on sale works!)
- Eggs, oil, water (as per the box—sometimes I use applesauce instead of oil when I’m feeling virtuous, but not always)
- 1 box (3 oz) red gelatin mix (cherry or raspberry is my go-to, but strawberry or even cranberry? Sure.)
- 1 cup boiling water (measurements are more forgiving than you think)
- 1 cup cold water
- 1 tub whipped topping (like Cool Whip. I’ve made my own whipped cream before, but honestly, not worth the mess unless you love whipping cream by hand.)
- Red food coloring (optional, but it does ramp up the “blood” effect)
- Candy vampire teeth or red gel (for spooky garnish—sometimes I just use gummy worms, and nobody complains)
Alright, Here’s How I Throw It Together
- First off, bake that cake. Just follow the directions on the box. I use a 9×13 pan, but once used a round one—just had to watch the bake time. Let it cool about 30 minutes (or until you can poke it without burning yourself—learned that the hard way).
- Now comes the fun: grab a fat straw, handle of a wooden spoon, or honestly, anything poke-able. Jab holes all over the cake. Don’t be shy. More holes = more juicy “blood.”
- Mix your gelatin with the boiling water. Stir until it’s dissolved, then add the cold water. Sometimes I add a few drops of red food coloring here if I want a more dramatic look.
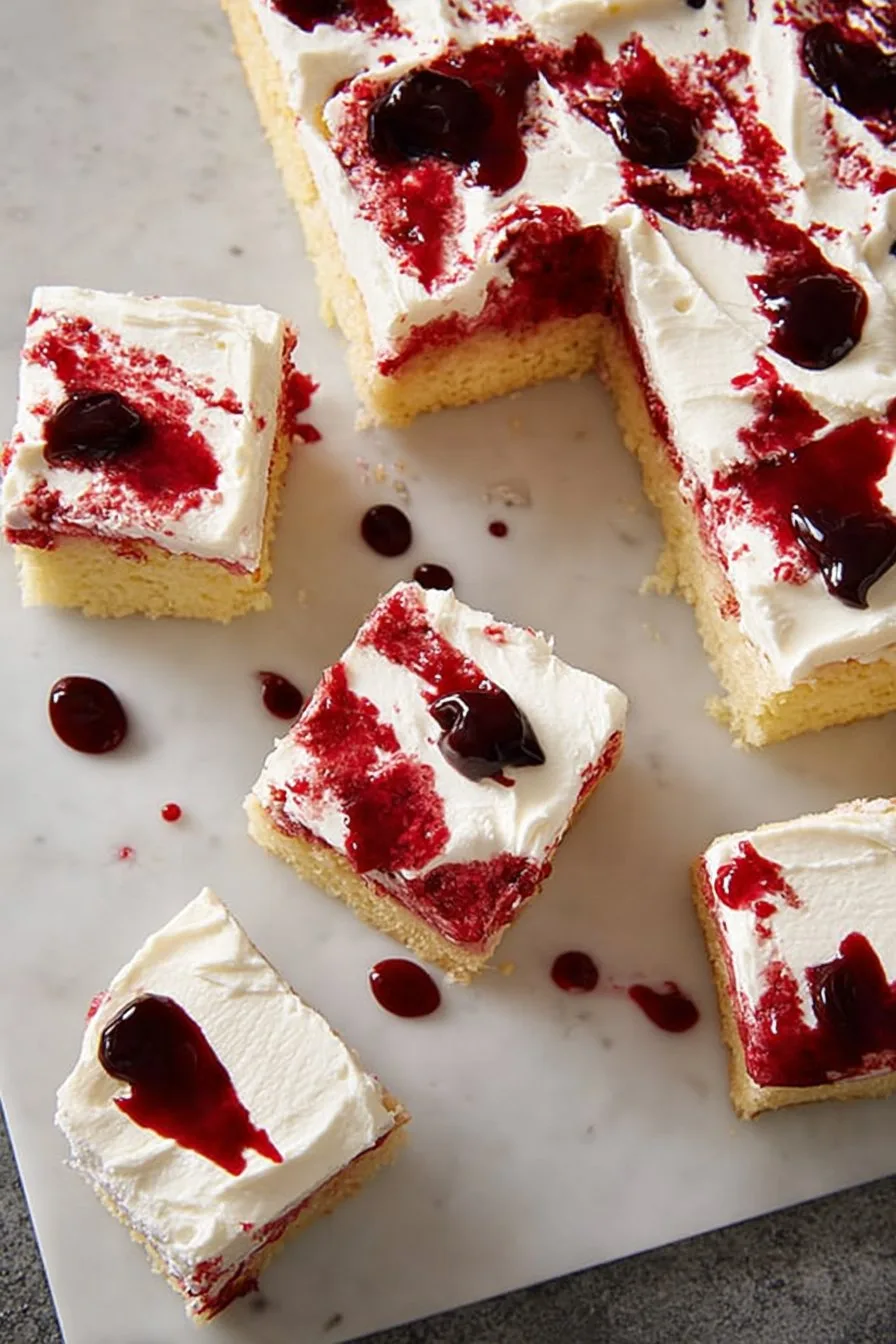
- Pour the gelatin carefully over the cake, making sure it gets into the poked holes. It looks messy. That’s normal. If it pools on the sides, just spread it back into the holes with a spatula (or your finger—I won’t judge.)
- Chill in the fridge at least an hour. Longer is better—I think it tastes better the next day, but my lot never waits that long.
- Once it’s set, slather the whipped topping over the whole cake. I sometimes add a few swirls with a spoon for drama. If you want real vampire vibes, drizzle some red gel “blood” on top or stick in candy vampire teeth. I did gummy bats once, but they just kind of melted. Whoops.
Notes from My Kitchen: No Lab Coat Required
- If you forget to thaw the whipped topping, just pop it in the microwave for a few seconds at a time. Not too long or you’ll have a sweet puddle.
- Don’t panic if the gelatin leaks under the cake. Actually, I think it makes the bottom even tastier (and more dramatic!)
- I had a batch where I poked too few holes and the “blood” didn’t soak in. Now I know: more is more.
Stuff I’ve Tried to Switch It Up
- Used lemon cake and blue gelatin for a “Frankenstein” vibe—looked weird, but tasted fine.
- Black cherry gelatin? A bit too goth for my taste, but maybe you’ll love it.
- Once tried chocolate cake base. Honestly… not a fan, but my cousin devoured it, so what do I know?
What You Need (And What to Do If You Don’t Have It)
- 9×13 baking pan (if you’ve only got a round tin, just check it earlier and don’t fill it too high)
- Mixing bowls (or, in a pinch, a big pasta pot—I’ve done it)
- Whisk or fork for stirring gelatin (a fork will do in a jam)
- Something to poke holes—straw, wooden spoon handle, end of a chopstick. Improvise! My husband used a pen cap once (washed, I hope?)
How to Store (If You Have Any Left!)
Keep it in the fridge, covered, for up to 3 days. Though honestly, in my house it never lasts more than a day! Oh, and if you stack anything on top, it’ll squish the topping. Learned that one the hard way during a midnight fridge raid.
How I Like to Serve It (And the Family’s Weird Requests)
I usually slice big slabs and serve with a little extra “blood” gel drizzled over. On Halloween, my kids want candy eyes stuck on top (why not?). Once, we lit some candles and ate in the dark for full effect. Spooky and fun, though I did drop my fork behind the couch. Oops.
If I Could Give Just a Few Pro Tips…
- I once tried rushing the cooling step—don’t! Pouring gelatin on hot cake makes a soggy mess. Patience, my friend.
- If your whipped topping starts to melt, just stick the cake back in the fridge for a bit. Or eat it with spoons directly from the pan, which I may have done once or twice.
FAQ (Questions I Actually Get… and My Real Answers)
- Can you use homemade cake instead of boxed? You bet! But if I’m honest, the box mix just saves a load of time. Plus, less washing up. If you want a homemade recipe, Sally’s Baking Addiction has a good one.
- Can I use a different gelatin flavor? Go wild! My favorite’s raspberry, but whatever’s in the pantry works. Except lime. That was… odd.
- Any tips for making it look extra spooky? Oh, absolutely. I sometimes check this blog for decorating ideas—she uses edible glitter, which is honestly genius.
- Is it gluten-free? Depends on your cake mix! There are gluten-free versions out there (King Arthur’s is pretty good), just check the labels.
- Can you freeze it? Technically yes, though the texture gets a bit weird. If you do, wrap it well and defrost in the fridge. But honestly, just eat it fresh.
Oh, and quick sidetrack—if you’re looking for other fun party ideas, check out Good Housekeeping’s Halloween roundup. I got lost there for an hour last week. Anyway, happy baking and don’t be afraid to get a little messy—after all, vampires wouldn’t have it any other way.
Ingredients
- 1 box (15.25 oz) vanilla cake mix
- 1 cup water
- 1/2 cup vegetable oil
- 3 large eggs
- 1 box (3 oz) strawberry or cherry gelatin
- 1 cup boiling water
- 1/2 cup cold water
- 2 cups whipped topping
- 1/4 cup Halloween sprinkles
Instructions
-
1Preheat oven to 350°F (175°C). Grease a 9×13-inch baking pan.
-
2Prepare the vanilla cake mix according to package instructions using water, oil, and eggs. Pour batter into the prepared pan and bake for 28-32 minutes or until a toothpick inserted in the center comes out clean.
-
3Allow the cake to cool for 10 minutes. Using the handle of a wooden spoon, poke holes all over the cake, about 1 inch apart.
-
4In a bowl, dissolve the gelatin in 1 cup boiling water. Stir in 1/2 cup cold water. Pour the gelatin mixture evenly over the cake, making sure it seeps into the holes. Refrigerate for at least 1 hour.
-
5Spread whipped topping evenly over the chilled cake. Decorate with Halloween sprinkles before serving.
CLICK FOR NUTRITION INFO
↑
Approximate Information for One Serving
Serving Size:
1 serving
Calories:
260 caloriescal
Protein:
3 gg
Fat:
9 gg
Saturated Fat:
0g
Trans Fat:
0g
Cholesterol:
0mg
Sodium:
0mg
Potassium:
0mg
Total Carbs:
41 gg
Fiber:
0g
Sugar:
0g
Net Carbs:
0g
Vitamin A:
0
Vitamin C:
0mg
Calcium:
0mg
Iron:
0mg
Nutrition Disclaimers
Number of total servings shown is approximate. Actual number of servings will depend on your preferred portion sizes.
Nutritional values shown are general guidelines and reflect information for 1 serving using the ingredients listed, not including any optional ingredients. Actual macros may vary slightly depending on specific brands and types of ingredients used.
To determine the weight of one serving, prepare the recipe as instructed. Weigh the finished recipe, then divide the weight of the finished recipe (not including the weight of the container the food is in) by the desired number of servings. Result will be the weight of one serving.
Did you make this recipe?
Please consider Pinning it!!