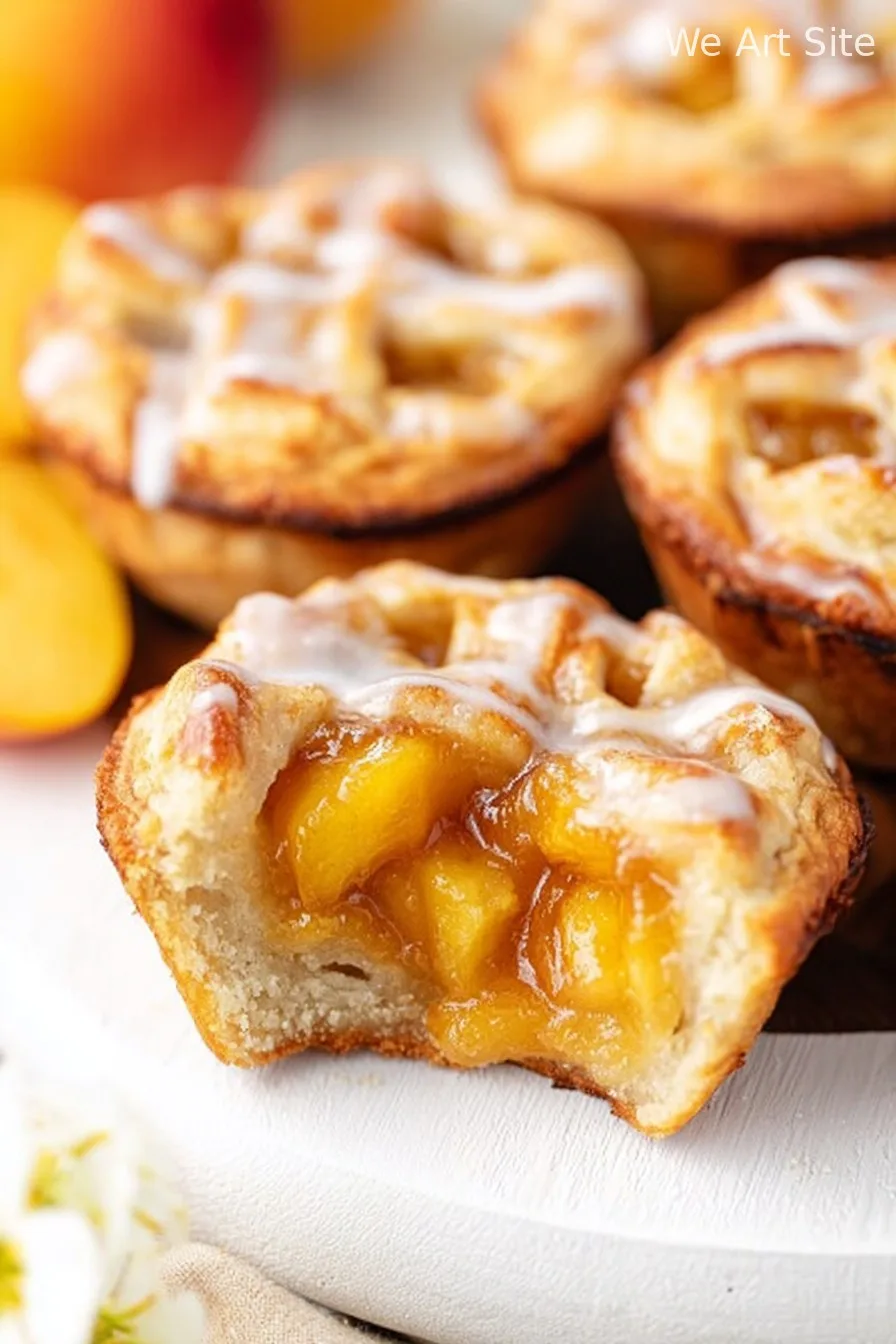
Let Me Tell You About These Two Ingredient Mini Peach Pies…
Alright, you know how sometimes you just want something ridiculously easy but a little fancier than eating fruit straight form the can? That’s honestly how these mini peach pies first came about in my kitchen. One time, years ago, my cousin Tara popped by unexpectedly with her kids; I had almost nothing ready (except coffee, because… priorities) but I remembered I’d stashed some pie dough and a tin of peaches. Randomly cobbled this together and it became our personal “panic pie”—so now, the story gets retold at every holiday. And, oh, if you’re the kind of person who eats dessert while standing at the counter… you’re among friends here!
Why You’ll Love This (Maybe Obsessively)
I make these when I’ve totally spaced on dessert duties but still want something homey—especially in summer when heating the oven for a whole pie seems, well, mad. My nephews go a bit wild (not just sugar-high wild, I mean genuinely excited) when they realize these are on the table. Big bonus: no peeling or sticky syrup splashed all over the kitchen floor. I tried getting fancy once with fresh peaches, except they were rock hard—a lesson in patience, or lack thereof. Basically, it’s dessert for impatient, occasionally scatterbrained people. (Hands up if that’s you too!)
What You Need—And What Swaps I’ve Tried
- Refrigerated pie dough (one pack—sometimes I grab the store-brand because honestly, after all that cinnamon sugar gets sprinkled, you can’t tell)
- Canned peach slices—in juice or syrup, both work fine. I’ve used those giant cling peaches or dinky little organic ones; not much difference unless you’re a total peach purist. (Pro tip: in a pinch, I’ve done this with tinned apricots. Not bad… but definitely not as peachy!)
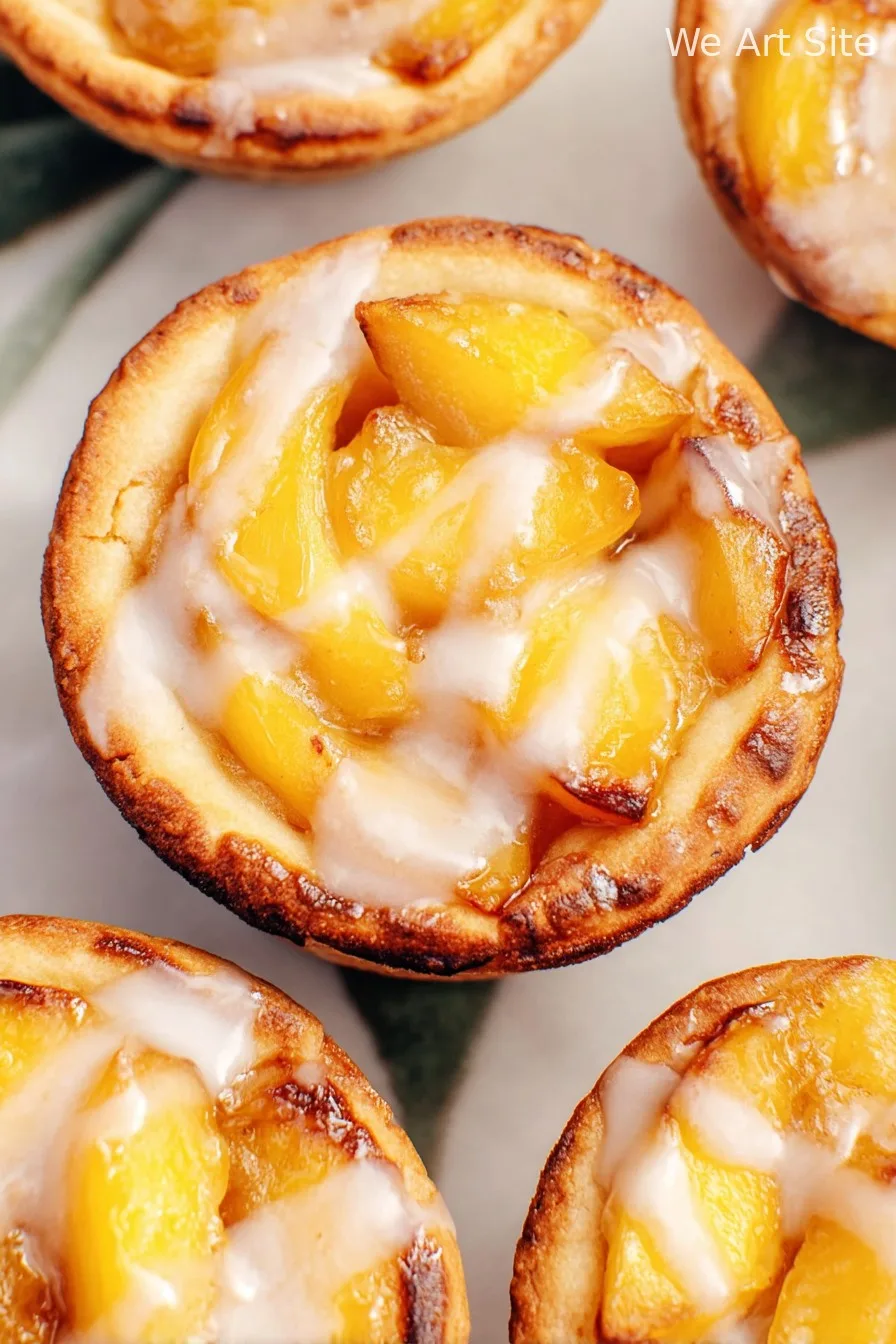
Optional: a handful of coarse sugar for sprinkling (makes it sparkle), cinnamon if you want a warm vibe, or a splodge of vanilla right on the fruit before baking. My gran swore by the fancy French brand, but the local market stuff is great too.
Here’s How You Throw These Together
- Heat your oven to 400°F/200°C. Or, you know, start preheating whenever you remember—sometimes I do this half-way through assembly, and it still works out.
- Roll out the pie crust onto a (clean, or let’s be real, reasonably clean) work surface. Use a cookie cutter or a glass to cut out rounds, about 3.5 inches across. You’ll get, say, 8-10 from one sheet—depends on how big you make them, and whether you snack on the scraps. (I do.)
- Drain the peach slices a bit (not obsessively—just enough so the pies don’t go soggy). Place one or two slices in the middle of each pastry round. I sometimes sneak a bite here—quality control!
- Fold up the edges kind of scruffily—no need to aim for bakery worthy neatness. Seriously, these should look rustic; mine are never the same shape twice. Pinch the sides together so the filling stays in. If you’re feeling energetic, brush with a little milk or that fancy egg wash thing.
- Toss them onto a baking sheet lined with parchment. Sprinkle with sugar if you feel like it. Bake until golden and bubbling, around 15-18 minutes. They sometimes look a little odd at this stage, but don’t panic—their weirdness is their charm.
- Let them cool slightly—or don’t, if your family is anything like mine and just grabs them as soon as they’re edible-temperature.
If You Want the Honest Scoop (Notes from Many Experiments)
- I’ve burned the bottoms more often than I like to admit because I didn’t check halfway through. Now, I pop a look—sometimes the back ones get toasty faster.
- Chilling the pies for 10 minutes before baking keeps the pastry from shrinking weirdly. But I forget this step half the time and honestly, they’re still gobbled up.
- Sometimes the filling leaks out. Nothing tragic. I just call it a “caramelized bonus” and everyone’s happy.
Variations (Some Successes, One Not So Much)
- Once tried with apples and a smidge of nutmeg—really cozy flavor. But apples weren’t as juicy, so toss them with a little sugar first.
- Puff pastry instead of pie dough? Incredible. But mine puffed so big they exploded. Still yummy though, if a bit odd-looking.
- Don’t bother with frozen peaches—somehow they go weird in the oven. (Unless there’s a trick I’m missing. If you figure it out, tell me!)
- Oh, and for a vegan version, use the plant-based crust—most of the store ones are, but check.
No Special Tools? No Drama
You only really need a baking tray and some parchment, but my mate Eli once used a pizza stone (don’t ask) and it actually worked. Oh, and if you don’t have a round cutter, literally just grab a mug or turn a bowl upside down—I’m told by Google that’s what folks do in a pinch.
Storing Leftovers (Haha, Good Luck!)
Technically, you can store leftovers in an airtight box once they’re cooled—maybe two days max. But honestly, in my house these are usually gone before I’ve even made a cup of tea. If you somehow have a lot left, pop them in the fridge and warm them up in the oven (microwave works too, they just go a bit floppy).
How We Serve Them (Family Quirks)
We eat them just as is with heaps of ice cream on the side—sometimes the peach syrup drizzled over for good measure. My uncle tops his with plain Greek yogurt and swears it’s practically breakfast. Now and then, I’ll make a quick custard if I’m feeling fancy. Or, if you want other serving vibes, there are cute ideas at The Kitchn’s guide.
Stuff I Learned the Hard Way – Pro Tips
- I rushed sealing the edges once, and they all popped open. Since then, I just pinch them tight (sometimes with a fork—that’s what I saw at Sally’s Baking Addiction).
- If you overfill, expect leaks. Just mop it up and call it rustic—that’s my motto.
- Don’t stress about pastry cracks—they get hidden once everything’s bubbly. Actually, I sort of like the look.
FAQ: Real Questions I’ve Gotten, Real Answers
Q: Can I make these ahead for a party?
A: Yep! Bake and then freeze—just reheat for 8-ish min in a hot oven; they’ll be almost as good. (I did this for my neighbour’s potluck.)
Q: What if my pie crust turns out chewy?
A: Usually means it was overworked or overbaked. But sometimes, if you go thinner it crisps right up. Actually, I find it works better if you don’t roll the dough too much.
Q: Can I do this gluten-free?
A: Yes, use your fave gluten-free pastry—my friend likes the Wholly Wholesome GF pie dough. Haven’t tried making my own yet (maybe one day). But yeah, works!
Q: The filling bubbled out. Did I mess it up?
A: Not at all! Happens all the time—gives it caramelized edges. Kinda the best part, honestly.
Phew, okay, that’s my not-so-secret Two Ingredient Mini Peach Pie recipe, with all the chats, quirks, and semi-occasional missteps. If you give them a try, let me know how it goes—or, if you swap in some completely wild fruit combo and it somehow works, I’ll be thrilled to hear! And if you need a good laugh, I’ll tell you the story about the time I tried to make a blueberry version and ended up with blue hands (don’t ask—just know it included a blender mishap and one very surprised cat).
Ingredients
- 1 sheet refrigerated pie crust (about 8-9 oz)
- 1 1/2 cups canned peach slices, drained and chopped
- 2 tablespoons granulated sugar
- 1 teaspoon cornstarch
- 1/2 teaspoon ground cinnamon
- 1 egg, beaten (for egg wash)
- 1 tablespoon coarse sugar (optional, for topping)
Instructions
-
1Preheat your oven to 375°F (190°C). Line a baking sheet with parchment paper.
-
2Roll out the pie crust and, using a round cookie cutter or glass, cut out 12 circles about 3 inches wide.
-
3In a small bowl, mix chopped peaches with granulated sugar, cornstarch, and cinnamon until evenly coated.
-
4Place 1 tablespoon of peach filling onto the center of half of the dough circles. Cover with the remaining circles and press edges to seal with a fork.
-
5Brush the tops with beaten egg and sprinkle with coarse sugar, if using. Cut a small vent in the top of each pie.
-
6Bake for 18-20 minutes, or until golden brown. Let cool slightly before serving.
CLICK FOR NUTRITION INFO
↑
Approximate Information for One Serving
Serving Size:
1 serving
Calories:
160 caloriescal
Protein:
2gg
Fat:
6gg
Saturated Fat:
0g
Trans Fat:
0g
Cholesterol:
0mg
Sodium:
0mg
Potassium:
0mg
Total Carbs:
25gg
Fiber:
0g
Sugar:
0g
Net Carbs:
0g
Vitamin A:
0
Vitamin C:
0mg
Calcium:
0mg
Iron:
0mg
Nutrition Disclaimers
Number of total servings shown is approximate. Actual number of servings will depend on your preferred portion sizes.
Nutritional values shown are general guidelines and reflect information for 1 serving using the ingredients listed, not including any optional ingredients. Actual macros may vary slightly depending on specific brands and types of ingredients used.
To determine the weight of one serving, prepare the recipe as instructed. Weigh the finished recipe, then divide the weight of the finished recipe (not including the weight of the container the food is in) by the desired number of servings. Result will be the weight of one serving.
Did you make this recipe?
Please consider Pinning it!!