Let Me Tell You About This Roast Beef (Spoiler: It’s a Winner)
You know those days when you try a new recipe, expecting it to be just okay, but then your family acts like you just pulled off a magic trick? That pretty much sums up the first time I made this tender eye of round roast beef with gravy. Honestly, when I started making it, I was half-distracted listening to a radio show, and didn’t even think it would turn out that amazing. But (no kidding) this dish somehow manages to be both super simple and totally crowd-pleasing. My sister used to claim I had “roast anxiety,” but after a few rounds of this one, even she asked for the recipe. If you’ve got memories of dry, disappointing roasts (I sure do) — trust me, this’ll redeem the genre.
Why I Keep Coming Back to This Roast (and Maybe You Will Too)
I make this when it’s Sunday and I want the house to smell like something good’s happening (plus, it’s oddly impressive considering how easy it is!). My family goes a bit bonkers for it because the beef turns out crazy tender — and the gravy, mmm, don’t get me started. (It’s possible I make far too many mashed potatoes just as an excuse to mop up every drop.) There was a time I’d overcook this cut into oblivion and wonder why it chewed like a boot… but I’ve learned my lesson. Actually, I find it works better if you trust the process and don’t peek too often.
It’s almost a dinner miracle, really. The kind where you can pop it in the oven and, apart from a bit of fuss when making the gravy, maybe even get through half an episode of Bake Off.
Here’s What You’ll Need (Swaps Welcome)
- 1 eye of round roast (somewhere in the 2-3 pound range works — use a top round if that’s all you’ve got, which I have, in a pinch)
- 2 tablespoons olive oil (but I’ve grabbed canola once or twice and nobody noticed)
- 1 tablespoon kosher salt (sea salt is fine; my grandmother would insist on Morton’s, but honestly, any basic salt will do)
- 1 teaspoon black pepper
- 2 teaspoons dried thyme (I’ve swapped with Italian seasoning, worked okay but thyme is best)
- 1 tablespoon garlic powder (or 2 cloves of minced garlic if you like fresher vibes)
- 1 large onion, sliced (yellow, white, or even a few shallots if you’re feeling posh)
- 2 cups beef broth (I sometimes use chicken broth and my kids never know…)
- 2 tablespoons Worcestershire sauce (if you can’t pronounce it, just call it “Wooshter”)
- 2 tablespoons all-purpose flour (or cornstarch will do — though it’s a bit different in texture)
- Optional: a splash of red wine (when I have a bottle open; don’t sweat it if you don’t)
How I Make It (and Occasionally Mess Up)
- Let it sit: Take the roast out of the fridge at least 30 minutes before cooking. Trust me, it cooks more evenly this way. (One time I forgot — the edges cooked fine but the middle, not so much.)
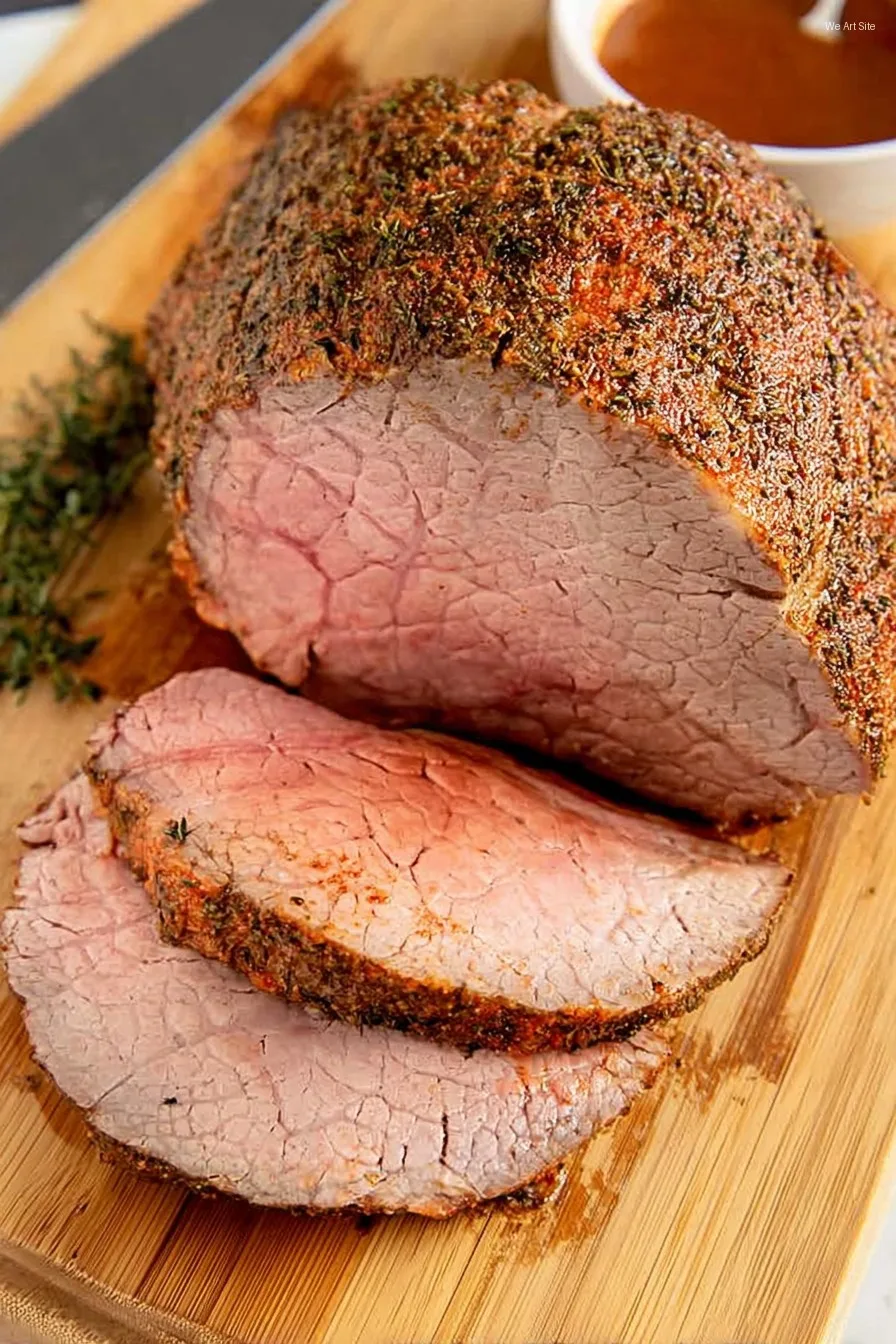
- Get that pan hot: Preheat your oven to 500°F (yup, really — don’t be nervous). Pat the roast dry, rub on the oil, salt, pepper, thyme, and garlic powder. I usually toss the onion slices right into the roasting pan now.
- Sear it up: Pop the roast onto the onions, fat side up. Into the oven it goes for 15 mins. It might smoke a little; just ignore it (or crack a window if you’re sensitive — I often forget!)
- Drop the temp: After 15 mins, lower the oven to 325°F. Pour the broth and Worcestershire (wine too, if using) around — not on — the roast. Back in for about 50-60 mins (15-18 mins per pound for medium rare). I mean, check with a meat thermometer honestly, because ovens are wild. You want 125-130°F for medium rare. This is usually when I poke at it a bit too much.
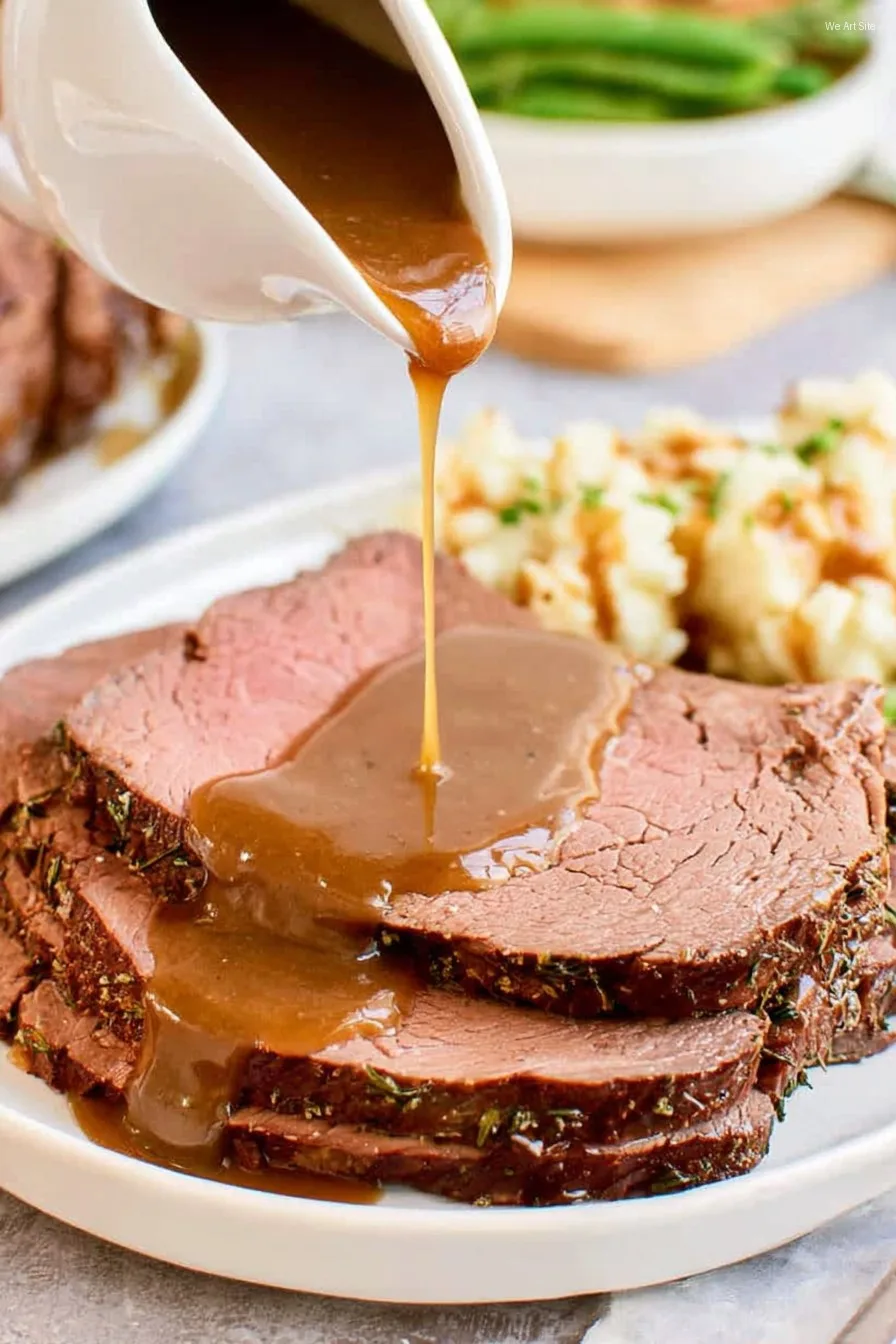
- Let it rest! Take out the roast and tent it with foil for 20-30 mins. Don’t skip this or everything will be swimming when you slice.
- Gravy time: Skim the fat if you like (I rarely worry about it); put the pan with juices on the stovetop over low. Stir in the flour and cook a minute. Then whisk in a bit more broth (half a cup, maybe) until it gets gravy-thick. If you’ve got lumps, just strain them. Or leave them, honestly — it’s homemade.
- Slice it thin: Against the grain is key. Honestly, the thinner the better, unless you want a jaw workout.
I usually sneak a piece right from the cutting board. Who doesn’t?
Some Notes I Wish I’d Known Earlier
- If you forget to rest the meat, it will be juicier than Niagara Falls — except that’s not good in this context. Just wait, even if you’re hangry.
- Using too much flour in the gravy makes it go gloppy fast; add a little at a time. I’ve definitely had to thin it out (and rescue it from near disaster).
- If the roast looks a bit anemic on top, just whack the broiler on for a minute or two — but keep your eyes peeled. Ask me how I know (smoky kitchen syndrome).
Variations I’ve Actually Tried (Yep, Even the Dud)
- Herb swap: Oregano or rosemary work okay, but thyme wins (rosemary overpowers for me).
- Red wine: Really deepens the gravy, but once I used a cheap bottle and… big mistake. Stick to what you’d actually sip.
- Veg: Toss in carrots or potatoes around the roast. Actually, potatoes soak up all the beefy goodness (I could eat them solo… and have).
- Balsamic gravy: I tried splashing in balsamic vinegar once. Meh. Came out way too tangy.
Tools I Use (and Workarounds If You Don’t Have Them)
- Roasting pan: Any oven-proof skillet or casserole dish works. Once, I used a quarter-sheet pan in desperation. It was fine, but trickier with the gravy part.
- Meat thermometer: I say this is essential — but if you don’t have one, poke with a knife and peek (not ideal, but I’ve done it).
- Whisk: I’ve used a fork for gravy in a pinch. Little more work, but hey, it’s rustic.
What to Do with Leftovers (If You Actually Have Any)
Store leftover slices and gravy in an airtight container in the fridge; they’ll keep about 3 days. Though honestly, in my house it never lasts more than a day — people seem to find it, no matter how well you hide it. I like it cold for sandwiches (really, it’s better than store deli)—try with horseradish mayo.
Serving: My Favorite Ways
A classic: heaps of mashed potatoes (see Smitten Kitchen’s mashed, my stand-by), spoon over generous gravy, maybe some green beans if you’re feeling virtuous. Or Yorkshire puddings if you want to be proper posh (I’ve followed these basic ones). Occasionally we just rip up a crusty loaf to catch every bit of gravy. Don’t judge. My little one puts ketchup on his—I pretend not to notice.
Big Lessons I’ve Learned (a.k.a. Pro Tips)
- I once tried rushing the oven steps — seriously regretted it. Don’t skip the high-heat sear, it really makes the difference.
- Actually, I find resting the meat works better if you leave it longer than you think you should.
- If carving against the grain sounds confusing — google it. Makes a world of difference. Also, don’t use your bread knife. (Learned the hard way.)
Questions People Always Ask Me About This Roast
- Can I use a different cut of beef?
- Sure! I’ve used top round and even bottom round. Just watch the cook time; some cuts dry out quicker.
- Is it okay if I skip the wine?
- Yes, totally fine. The gravy’s plenty good with or without it. Sometimes I actually prefer the non-wine version, honestly.
- How do I get that really tender texture?
- Don’t overcook (use a thermometer if you can) and always rest the meat. No shortcuts here — I promise it makes a difference.
- Do I need a roasting rack?
- Nah. The onions act as a little trivet, so unless you really like more washing up, just skip it. I do.
- Help, my gravy’s lumpy!
- It happens. Just strain or whisk like crazy. Or, you know, call it rustic and serve it anyway — I have, plenty of times!
- My roast came out tough; what did I do wrong?
- Usually, that means it cooked too long or didn’t rest. Or maybe both. Next time, give it the meat thermometer love and trust the rest period.
And by the way, if you want even more kitchen know-how, Serious Eats has an awesome deep-dive on beef roasts. Oh, and if you’re in a bind and need substitution ideas for sides, the folks at Simply Recipes have tons of fallback options (I may have cribbed a few in my time).
Anyway, there you have it — my full run-down on making a roast that people actually rave about. Let me know if you try it out, and if your gravy stays lump-free, you’re already a step ahead of me some days!
Ingredients
- 3 lb eye of round beef roast
- 2 tablespoons olive oil
- 2 teaspoons kosher salt
- 1 teaspoon black pepper
- 2 teaspoons garlic powder
- 1 teaspoon onion powder
- 2 cups beef broth
- 2 tablespoons all-purpose flour
- 1 tablespoon butter
- 1 teaspoon dried thyme
Instructions
-
1Preheat oven to 325°F (163°C). Pat the beef roast dry with paper towels.
-
2Rub the roast all over with olive oil, salt, black pepper, garlic powder, onion powder, and dried thyme.
-
3Heat a large oven-safe skillet over medium-high heat. Sear the roast on all sides until browned, about 2 minutes per side.
-
4Add beef broth to the skillet, cover with foil, and transfer to the preheated oven. Roast for 1 hour 30 minutes or until an internal temperature of 135°F (57°C) for medium-rare.
-
5Remove the roast to rest on a cutting board, tented with foil. Meanwhile, place the skillet with juices over medium heat. Whisk in flour and butter to thicken into a gravy, stirring constantly.
-
6Slice the roast thinly against the grain and serve with the homemade gravy.
CLICK FOR NUTRITION INFO
↑
Approximate Information for One Serving
Serving Size:
1 serving
Calories:
325cal
Protein:
44 gg
Fat:
14 gg
Saturated Fat:
0g
Trans Fat:
0g
Cholesterol:
0mg
Sodium:
0mg
Potassium:
0mg
Total Carbs:
4 gg
Fiber:
0g
Sugar:
0g
Net Carbs:
0g
Vitamin A:
0
Vitamin C:
0mg
Calcium:
0mg
Iron:
0mg
Nutrition Disclaimers
Number of total servings shown is approximate. Actual number of servings will depend on your preferred portion sizes.
Nutritional values shown are general guidelines and reflect information for 1 serving using the ingredients listed, not including any optional ingredients. Actual macros may vary slightly depending on specific brands and types of ingredients used.
To determine the weight of one serving, prepare the recipe as instructed. Weigh the finished recipe, then divide the weight of the finished recipe (not including the weight of the container the food is in) by the desired number of servings. Result will be the weight of one serving.
Did you make this recipe?
Please consider Pinning it!!