Alright, so let’s talk rhubarb muffins. Honestly, I started making these on a rainy Thursday when my neighbor dropped off a pile of rhubarb the size of a small dog. I didn’t even like rhubarb back then (thought it was for people who collect porcelain ducks). But one batch later, I was converted. Now, every spring, my kitchen turns into a floury war zone, and my kids hover like seagulls waiting for scraps. You know it’s good when they stop arguing and just eat.
Why I Keep Coming Back to This Recipe
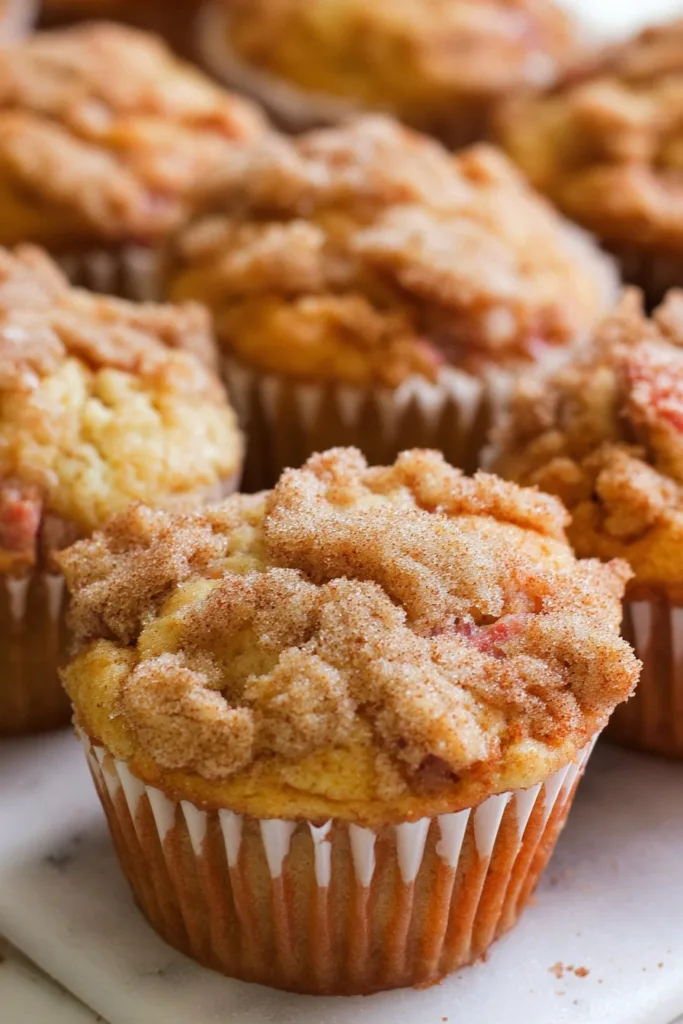
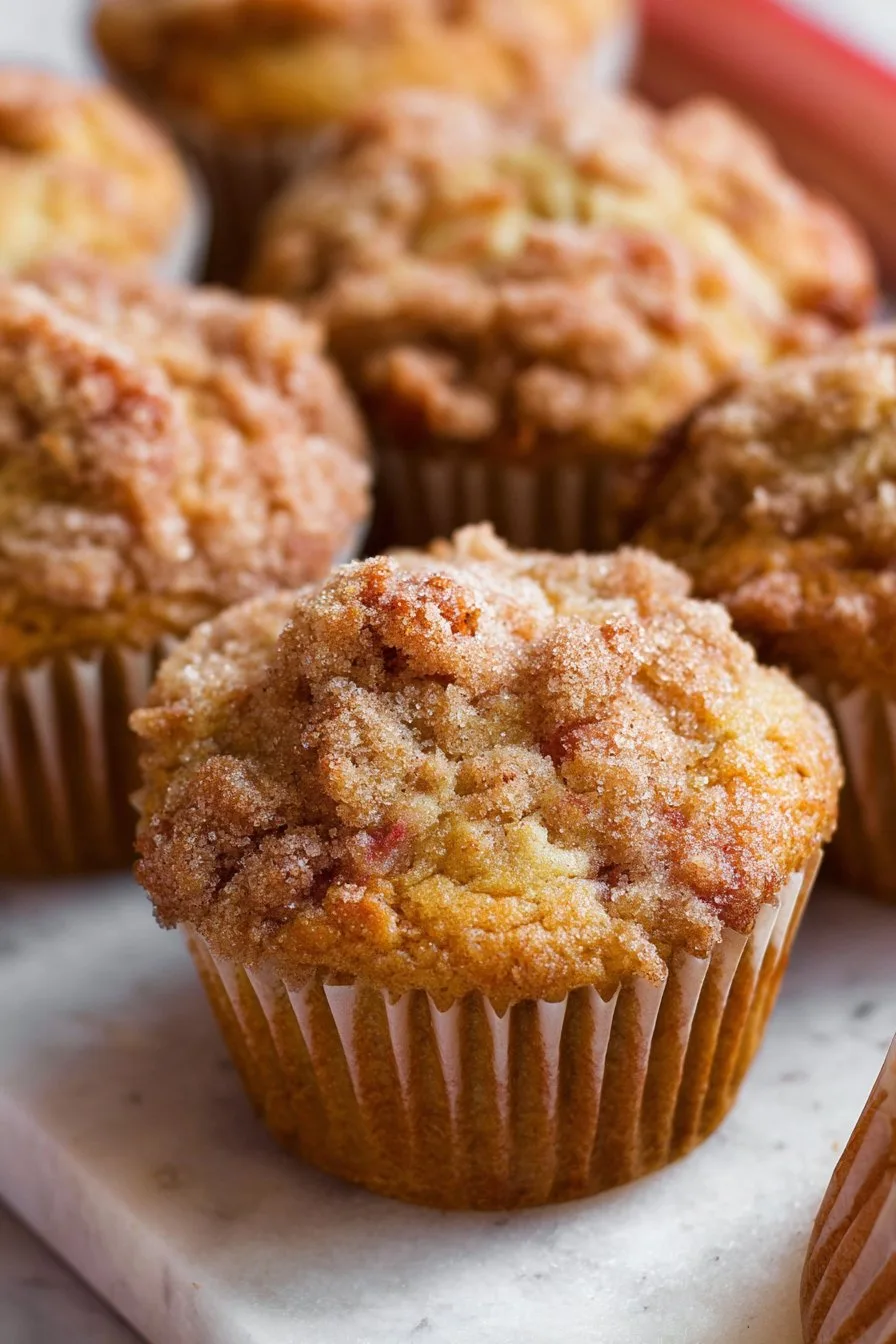
I make these muffins when I’m craving something that walks the line between tart and sweet (and when I want something that feels a bit more virtuous than a donut, let’s be honest). My family goes bonkers for these—especially if I sprinkle a little extra sugar on top. Once, I tried skipping the topping to save time; total mutiny. Oh, and these are my go-to for brunch potlucks because they’re just the right amount of scruffy-looking—nobody thinks you bought them from the store.
What You’ll Need (But You Can Improvise, Promise)
- 2 cups all-purpose flour (I’ve swapped half for whole wheat before; it’s fine but a bit heavier)
- 1 cup sugar (sometimes I do half brown, half white—it adds some caramel-y magic)
- 2 teaspoons baking powder
- 1/2 teaspoon baking soda
- 1/2 teaspoon salt (my gran always used Maldon flakes, but regular table salt is perfectly fine)
- 1 cup buttermilk (or just use milk with a splash of lemon juice when I’m out—no one notices)
- 1/3 cup melted butter or neutral oil (use whatever’s on hand. Margarine in a pinch)
- 1 teaspoon vanilla extract (I ran out once and used almond extract—was a happy accident)
- 1 large egg
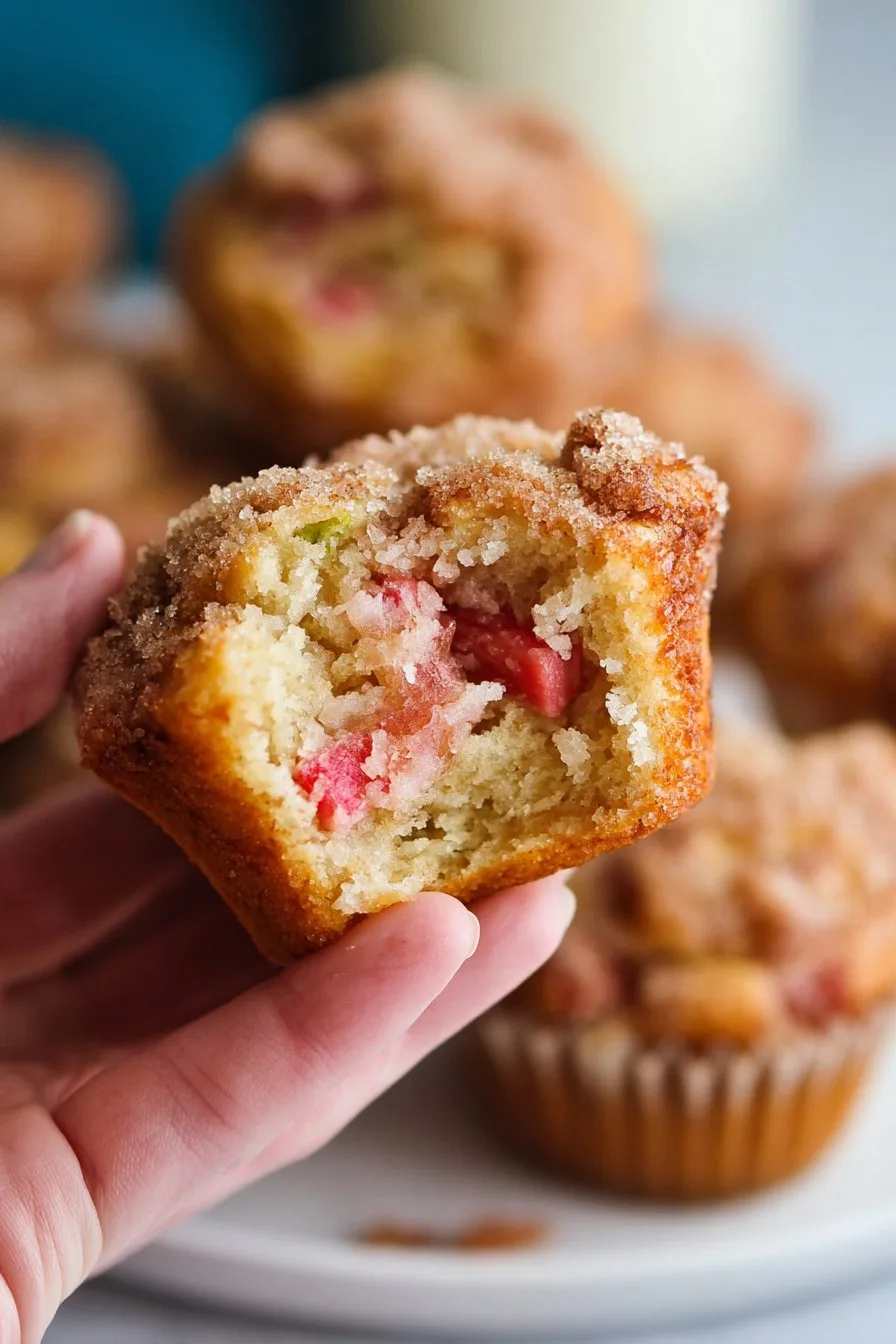
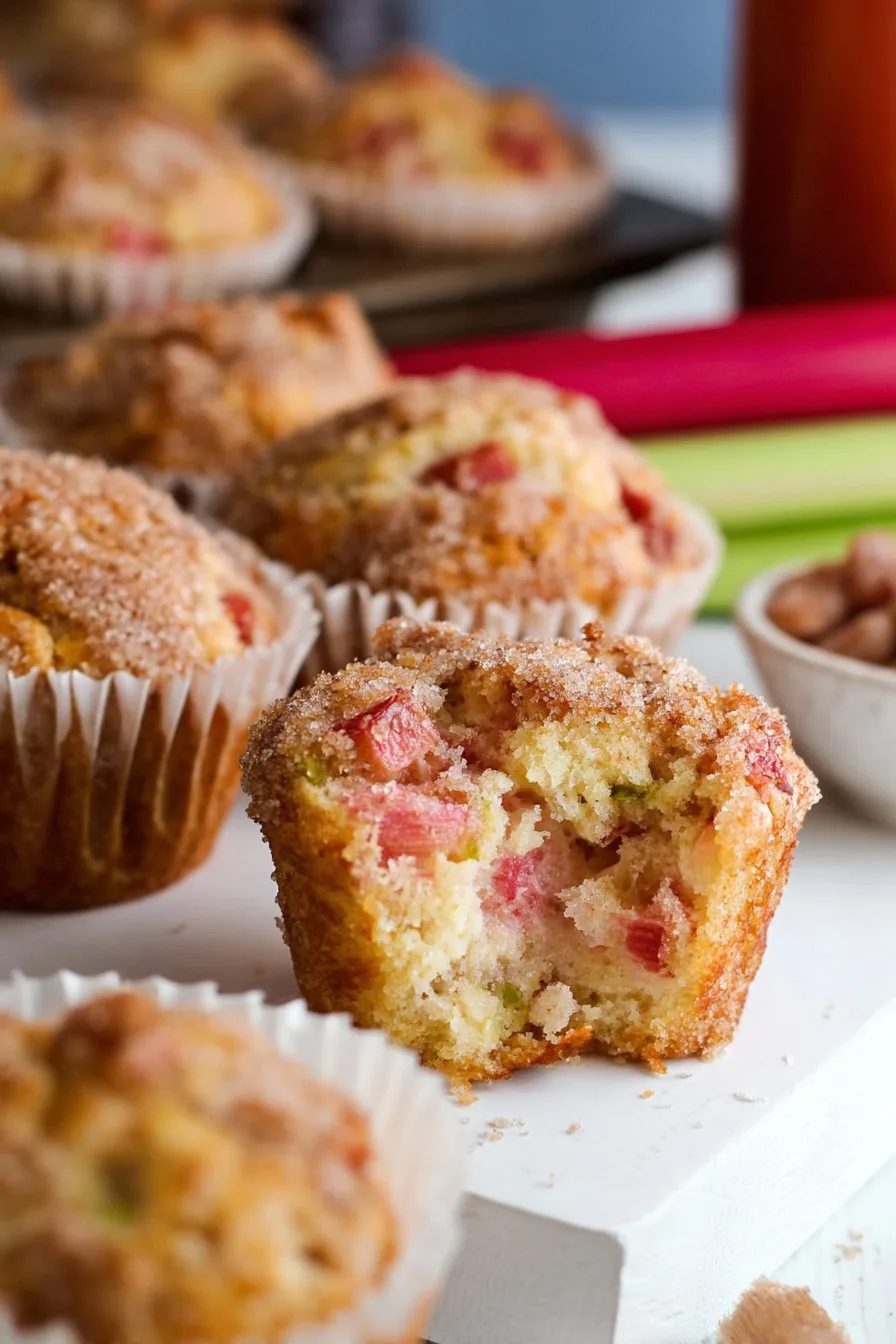
- 1.5 cups chopped rhubarb (about 2-3 stalks, but honestly I just eyeball it)
- Optional: 1/2 cup chopped walnuts or pecans (I like pecans for a bit of crunch, but leave ‘em out if you want)
- Topping: 2 tablespoons sugar + 1/2 teaspoon cinnamon (or skip it, but see above re: family mutiny)
How I Throw These Muffins Together
- Preheat your oven to 375°F (190°C) and line a muffin tin with papers, or just butter the heck out of it. I sometimes forget the liners, and it’s fine if you give the tin a good grease.
- In a big bowl, whisk flour, sugar, baking powder, baking soda, and salt. This is where I sometimes realize I’ve measured none of it exactly. Don’t stress, muffins are forgiving.
- In another bowl, mix the buttermilk, melted butter, vanilla, and egg. Stir with a fork or, if you’re feeling fancy, a whisk. If the butter clumps a bit, shrug and move on—it’ll all work out.
- Pour the wet stuff into the dry. Stir until just combined. It should look lumpy. Do not beat the heck out of it, or you’ll have tough muffins. (Trust me: been there, done that.)
- Fold in the chopped rhubarb and nuts if using. This is usually when I sneak a taste—raw batter is a childhood thing, I suppose.
- Scoop into your muffin tin. Fill about 3/4 full. Sometimes I overfill and things get wild in there, but a little batter spill never hurt anyone.
- Sprinkle with the cinnamon-sugar topping. My little one helps here—she’s a heavy hand, but I let her go wild.
- Bake for about 20–25 minutes. Or until a toothpick comes out clean-ish (a few crumbs are okay; wet batter is not). Sometimes my oven cooks unevenly, so I swap the trays halfway through—if I remember.
- Let cool in the tin for 5 minutes, then tip them onto a rack. This is where my family starts circling, so guard them if you want any left for yourself.
Notes from the Trenches
- Actually, I find it works better if you use room-temperature buttermilk and egg, but if you forget (like I often do), it still turns out fine.
- Rhubarb can be a bit stringy—peel off the tough outer bits if you notice them, especially later in the season.
- If you only have frozen rhubarb, thaw and drain it first, otherwise the muffins get a bit soggy in the middle. Learned that the messy way.
Experiments (Some Brilliant, Some…Not)
- I tried adding orange zest once, and it was surprisingly zingy. Worth a go!
- Made a version with chocolate chips. Not my cup of tea, but my neighbor’s kids ate the whole batch.
- Once swapped out all the flour for almond meal—wouldn’t recommend, unless you like muffins that fall apart like a bad Jenga tower.
If You Don’t Have All the Fancy Gear…
Look, I love my muffin tin, but I’ve used a regular cake tin in a pinch—just bake a bit longer and cut into squares. Muffin papers? Pff, I’ve used torn baking parchment (just crumple it up first so it fits). No cooling rack? Set ‘em on a clean tea towel. Done.
How to Store (If You Actually Have Leftovers)
Just pop ‘em in an airtight container at room temp; they’ll last two days. Maybe three, but they start to get a bit dense (I think they taste better the next day, but that’s just me). You can freeze them too, though honestly, in my house they never last more than a day!
Serving—How We Do It
These are best still a bit warm, with a dab of butter and a cup of tea (Yorkshire Gold, if you’re asking). Sometimes we eat them with a scoop of vanilla ice cream if it’s a special occasion or honestly, just because it’s Tuesday. My aunt crumbles them into yogurt for breakfast, which is a bit odd but actually pretty tasty.
Things I Learned the Hard Way (Pro Tips…Sort Of)
- I once tried rushing the cooling step—burnt my tongue, and the muffins collapsed. Just wait five minutes, trust me.
- Don’t overmix the batter. If you do, you’ll get muffins with the texture of a hockey puck (been there, regretted it).
- Use fresh rhubarb if you can; the flavor is brighter. But honestly, supermarket stuff works too.
FAQ—Because Folks Always Ask
Can I make these gluten-free? Oh, for sure! Just swap in your favorite gluten-free flour blend. They’ll be a bit crumblier, but still tasty.
Do I need to peel rhubarb? Sometimes. The older, thicker stalks can be stringy, so I just peel those. Young rhubarb? Nah, I leave it as is.
Can I use strawberries too? Absolutely—go half and half. Makes it less tart and a bit more dessert-y. (I found this tip here actually, and it’s brilliant for cakes too.)
How do I avoid soggy bottoms? Well, don’t use frozen rhubarb straight from the freezer (see notes above), and let muffins cool on a rack, not in the tin all day. Learned that after a batch went straight to the compost bin. Oh, and Mary Berry would probably agree with me on this one.
Can I double the recipe? Yep, but I find my oven gets a bit grumpy and heats unevenly, so I rotate the trays halfway through. Or just make two batches if you’re feeling patient.
Where do you get the best rhubarb? Farmer’s market is always my first stop, but I also had great luck with this supplier online—good for when you want to stock up.
Oh, and before I forget—a quick tangent: last time I made these, my dog managed to swipe a muffin off the counter. She seemed to love it, but then spent the afternoon looking slightly guilty. That’s how you know it’s good, right?

Ingredients
- 2 cups all-purpose flour
- 1 cup granulated sugar
- 2 teaspoons baking powder
- 1/2 teaspoon baking soda
- 1/2 teaspoon ground cinnamon
- 1/4 teaspoon salt
- 2 large eggs
- 1/2 cup vegetable oil
- 1 cup sour cream
- 1 1/2 cups chopped fresh rhubarb
- 1 teaspoon vanilla extract
Instructions
-
1Preheat the oven to 375°F (190°C). Line a 12-cup muffin tin with paper liners or grease lightly.
-
2In a large bowl, whisk together the flour, sugar, baking powder, baking soda, cinnamon, and salt.
-
3In another bowl, beat the eggs, then mix in the oil, sour cream, and vanilla extract until smooth.
-
4Add the wet ingredients to the dry ingredients and stir gently until just combined. Fold in the chopped rhubarb.
-
5Divide the batter evenly among the prepared muffin cups. Bake for 22–25 minutes, or until a toothpick inserted into the center comes out clean.
-
6Let the muffins cool in the pan for 5 minutes, then transfer to a wire rack to cool completely. Serve warm or at room temperature.
CLICK FOR NUTRITION INFO
↑
Approximate Information for One Serving
Serving Size:
1 serving
Calories:
210 caloriescal
Protein:
3gg
Fat:
8gg
Saturated Fat:
0g
Trans Fat:
0g
Cholesterol:
0mg
Sodium:
0mg
Potassium:
0mg
Total Carbs:
32gg
Fiber:
0g
Sugar:
0g
Net Carbs:
0g
Vitamin A:
0
Vitamin C:
0mg
Calcium:
0mg
Iron:
0mg
Nutrition Disclaimers
Number of total servings shown is approximate. Actual number of servings will depend on your preferred portion sizes.
Nutritional values shown are general guidelines and reflect information for 1 serving using the ingredients listed, not including any optional ingredients. Actual macros may vary slightly depending on specific brands and types of ingredients used.
To determine the weight of one serving, prepare the recipe as instructed. Weigh the finished recipe, then divide the weight of the finished recipe (not including the weight of the container the food is in) by the desired number of servings. Result will be the weight of one serving.
Did you make this recipe?
Please consider Pinning it!!