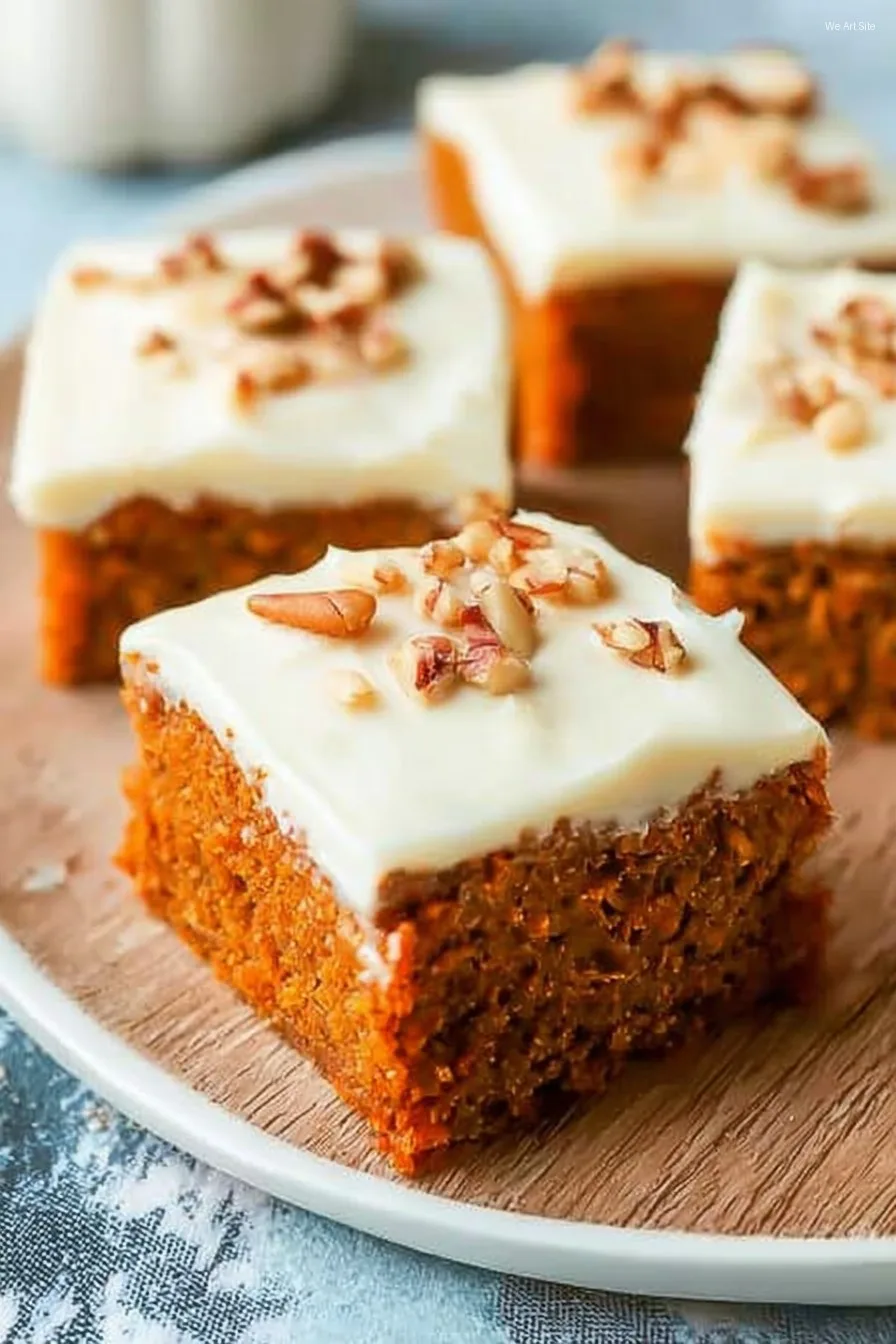
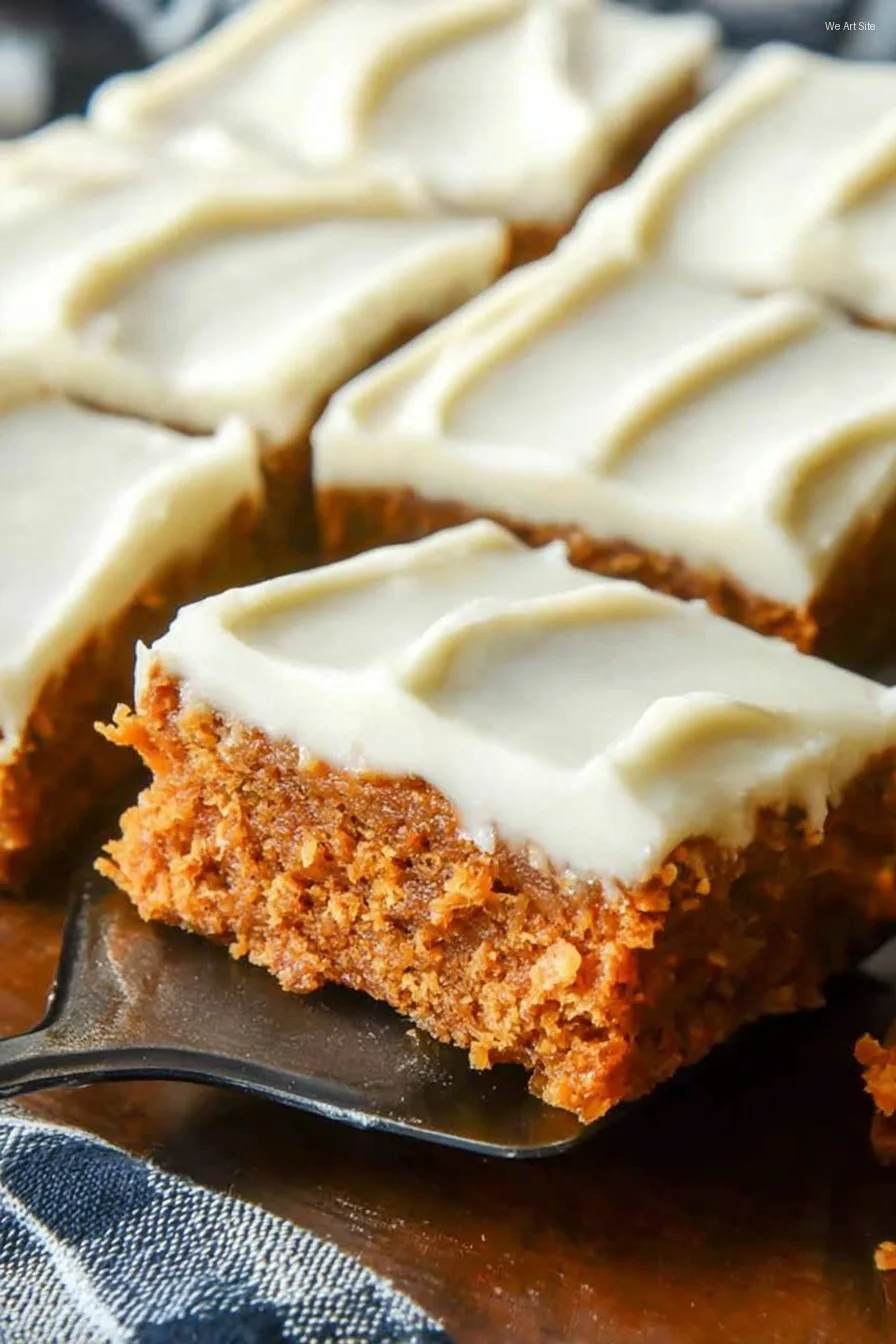
Alright, Pumpkin Bars with Cream Cheese Frosting—Let’s Actually Talk About Them
You know, whenever the leaves start looking like crumpled dollar bills and there’s that chill in the air (the kind that makes you think, Okay, where did I put those socks from last winter?), I remember this recipe. I’ve been making these pumpkin bars since, gosh, before my oldest was tall enough to see over the counter. Once, my sister-in-law decided to “help”—she swapped the baking soda with baking powder; disaster. Anyway, nothing says autumn like the smell of pumpkin spice swirling through the kitchen, and at this point, my family would probably start a mutiny if I didn’t whip these up at least a couple times every season. So, here’s my slightly chaotic, always loved approach to pumpkin bars with that tangy cream cheese frosting that never makes it to leftovers (unless someone’s hiding them behind the broccoli in the fridge, which… well, not naming names).
Why I Keep Making These (and Why My Neighbors Make Me Share)
I make these because, honestly, they’re just easy. Not like, boxed cake easy, but easy enough that I can pull them off with a little one underfoot. My family goes nuts for them—well, except my brother, but he doesn’t like pumpkin anything, so does that even count? I also love that you don’t have to be precious about spreading out the batter. (Sometimes I get lazy and just dump it in with a spatula, and you know what, still comes out good.)
The frosting, oh man. There’s something about cream cheese and pumpkin that’s just meant to be. I’ll admit, one year the frosting turned out a tad runny because I got distracted watching that pumpkin puree taste test video; after that, I started chilling my cream cheese like the smarter folks suggest.
Ingredient Roundup (With My Not-So-Secret Shortcuts)
- 2 cups all-purpose flour (Granny claimed it had to be Gold Medal, but honestly, any flour except the really fancy bread stuff will do.)
- 1 1/2 cups granulated sugar – sometimes half white, half brown if I’m feeling wild
- 2 teaspoons baking powder (not soda! Trust me, learned the hard way)
- 1 teaspoon baking soda
- 2 teaspoons ground cinnamon (Once, I threw in pumpkin pie spice instead—pretty tasty!)
- 1/2 teaspoon salt
- 1 cup pumpkin puree (canned Libby’s is fine; fresh is fab if you’ve got time—don’t stress it)
- 1 cup vegetable oil (melted butter sometimes if I run out)
- 4 large eggs (Fridge eggs, brown eggs, whatever’s on sale works for me)
- 1 teaspoon vanilla extract (the real stuff is fancy, but the store-brand imitation still gets the job done)
For the glorious Cream Cheese Frosting:
- 8 oz cream cheese, softened (But if I forget and it’s still cold, I just microwave it super slowly—10 seconds at a time, no more)
- 1/2 cup unsalted butter, also softened
- 2 cups powdered sugar (Sometimes I have to sift it to get the lumps out, but usually I just power through)
- 1 teaspoon vanilla extract
- Pinch of salt (this is totally optional, but it helps if the cream cheese is a tad too sweet)
How I Actually Make Pumpkin Bars (Warts and All)
- Preheat your oven to 350°F (that’s about 175°C if you, like my cousin from Dublin, still think in metric). Grab a 9×13″ pan and line it with parchment if you’ve got it—or just grease whatever you have. If it sticks a bit, that’s what frosting covers.
- In a big bowl, whisk the flour, sugar(s), baking powder and soda, cinnamon (or spice blend—your call), and salt. Don’t overthink it; lumps here are fine.
- In another bowl (if you only have one, just do this after the dry stuff is in the pan), mix the pumpkin, oil, eggs, and vanilla. I just use a fork when I don’t want to clean the electric mixer.
- Make a well in the dry mix and pour the wet right in. Stir till it’s just barely combined—don’t go overboard or you’ll get tough bars. Honestly, if there’s a streak of flour, that’s fine; it’ll work itself out.
- Pour (or scrape, if it’s stubborn) the batter into your pan. Spread it around, but again, doesn’t need to be pretty. This is usually when I sneak a taste (raw eggs—live dangerously, right?).
- Bake for about 25-30 minutes. Yours might take a tad more or less (oven quirks), so check with a toothpick. If the top springs back (not unlike my enthusiasm for fall baking), you’re set.
- Let them cool fully—or mostly, if you’ve got zero patience—before you frost. Otherwise the frosting just slides right off. Been there. Another time, I iced them while hot and ended up with pumpkin bar soup.
- For the frosting: beat cream cheese and butter. Add powdered sugar bit by bit (not all at once unless you love cleaning up sugar clouds). Dash in the vanilla; beat till fluffy. Add salt if you want.
- Spread the frosting on thick, or thin if you’re pretending to be healthy. Sometimes I swirl little designs with a spoon. Cut into bars, squares, wedges—whatever floats your boat.
The Notes I Wish I’d Known First Time
- This is way better when the bars get at least an hour to cool before frosting. Forgetting this has led to some, erm, creative plate-licking.
- If your cream cheese is too firm, slap it on the radiator for a few minutes (kidding—sort of. But warm it gently.)
- Store-bought pumpkin puree can taste a bit flat, so if you’ve got extra cinnamon or a shake of nutmeg, toss it in.
Running Experiments: Variations I’ve Actually Tried
Sometimes I stir in a handful of chocolate chips (good, but not my fave). Last Christmas, I threw in chopped pecans and a dash of maple extract—surprisingly great for breakfast. One time, I tried replacing all oil with applesauce. Do not recommend; the texture was, um, unique (like biting a sweet sponge).
About That Equipment List (Or Lack Thereof)
- A 9×13-inch pan (except when my cousin camped over and we made it in a roasting tray instead. Worked, but the bars were much thinner)
- Mixing bowls—plastic, glass, or the big salad bowl you always forget to use
- Hand mixer, or honestly, a strong whisk and some elbow grease
- Parchment paper is nice, but if you’re out, grease with good old butter or oil. On second thought, cooking spray is quickest
If Somehow You Have Leftovers: Storage
Store them in the fridge—airtight, if you’re fancy. Supposedly they keep 3-4 days but, honestly, in my house they vanish before then. If you want to freeze ‘em, skip the frosting and slap it on after thawing. Learned that after scraping runny icing off with a spoon once (messy, but still edible).
Serving Style—What We Actually Do
I like them straight from the fridge, but my husband microwaves his for 20 seconds. We sometimes toss a few toasted walnuts or extra cinnamon sugar on top if company’s coming (or if the batch looks ‘rustic’). Oh, and they pair awfully well with homemade pumpkin spice lattes. Sometimes we serve them with vanilla ice cream at Thanksgiving—total crowd-pleaser.
What Not to Rush—Hard Lessons Learned
I once tried frosting these bars while half asleep at midnight; needless to say, I woke up to gooey puddles. Take the time to let them cool, seriously. Also, be sure to taste the frosting before you slather it on—one time I mixed up the sugar bowls and used regular sugar; gritty doesn’t exactly describe that disaster. And if the bars seem wobbly in the middle, give ‘em another 5ish minutes. They firm up as they cool, but raw batter is never a good look (unless you like living dangerously).
Questions I’ve Actually Gotten From Friends
Can I use fresh pumpkin?
Definitely! Roast it, blend it up, and use about 1 cup. But, fair warning, sometimes fresh pumpkin makes the batter a bit wetter, so maybe cut back a splash of oil if it seems soupy.
What if I don’t have a 9×13 pan?
Honestly, use whatever you have—just keep an eye on the baking time. Did it once in a muffin tin; made for cute little portions, though some were kind of muffin-top-y (in a good way?).
Can you reduce the sugar?
For sure. I’ve done 1 cup, and it’s still nice and pumpkin-y, just less sweet.
Is that much spice really necessary?
If you aren’t big on spice, use less. Or, if you want to be bold, triple it (I’m not your boss!).
Can these be vegan?
I’ve seen people try it using flax eggs and vegan butter. Haven’t done it myself though—if you do, let me know how it turns out (unless it’s terrible, in which case, maybe don’t mention it).
Help, my frosting is lumpy!
Room temperature cream cheese, and persist. Or, honestly, toss it all in a blender if you’re getting desperate. Smooth is the goal (chunky never did it for me, except in guac).
If you want more genuinely practical baking nerd-out stuff, Sally’s Baking Addiction has some awesome, down-to-earth tips. Anyway, if you’ve baked these, let me know how they turned out. Awkwardly-shaped bars, frosting rivers, and all—I’m here for it. Enjoy!
Ingredients
- 1 3/4 cups all-purpose flour
- 1 cup granulated sugar
- 1/2 cup light brown sugar, packed
- 1 teaspoon baking powder
- 1 teaspoon baking soda
- 1/2 teaspoon salt
- 2 teaspoons ground cinnamon
- 1 cup canned pumpkin puree
- 1/2 cup vegetable oil
- 2 large eggs
- 1 teaspoon vanilla extract
- 8 oz cream cheese, softened
- 1/4 cup unsalted butter, softened
- 1 1/2 cups powdered sugar
- 1/2 teaspoon vanilla extract (for frosting)
Instructions
-
1Preheat oven to 350°F (175°C). Grease a 9×13-inch baking pan or line with parchment paper.
-
2In a large bowl, whisk together flour, granulated sugar, brown sugar, baking powder, baking soda, salt, and cinnamon.
-
3In another bowl, mix pumpkin puree, vegetable oil, eggs, and vanilla extract until smooth. Add to dry ingredients and mix until just combined.
-
4Pour batter into prepared pan and spread evenly. Bake for 25-30 minutes, or until a toothpick inserted in the center comes out clean. Let cool completely.
-
5For the frosting, beat together cream cheese and butter until creamy. Gradually add powdered sugar and vanilla extract, mixing until smooth.
-
6Spread cream cheese frosting evenly over cooled pumpkin bars. Cut into squares and serve.
CLICK FOR NUTRITION INFO
↑
Approximate Information for One Serving
Serving Size:
1 serving
Calories:
230 caloriescal
Protein:
3gg
Fat:
10gg
Saturated Fat:
0g
Trans Fat:
0g
Cholesterol:
0mg
Sodium:
0mg
Potassium:
0mg
Total Carbs:
33gg
Fiber:
0g
Sugar:
0g
Net Carbs:
0g
Vitamin A:
0
Vitamin C:
0mg
Calcium:
0mg
Iron:
0mg
Nutrition Disclaimers
Number of total servings shown is approximate. Actual number of servings will depend on your preferred portion sizes.
Nutritional values shown are general guidelines and reflect information for 1 serving using the ingredients listed, not including any optional ingredients. Actual macros may vary slightly depending on specific brands and types of ingredients used.
To determine the weight of one serving, prepare the recipe as instructed. Weigh the finished recipe, then divide the weight of the finished recipe (not including the weight of the container the food is in) by the desired number of servings. Result will be the weight of one serving.
Did you make this recipe?
Please consider Pinning it!!