Hey y’all! If you’re searching for a deliciously easy and refreshing treat, these Frozen Yogurt Granola Cups will hit the spot. They’re creamy, crunchy, and made with wholesome ingredients, making them ideal for breakfast, snack time, or even a healthy dessert. Kids and adults alike will reach for these frosty, colorful treats again and again. Let’s get cooking!

Why You’ll Love This Recipe
- Quick and easy: No-bake and ready in just over an hour, including freezing time.
- Healthy and satisfying: Packed with protein-rich Greek yogurt, fiber-filled granola, and fruit.
- Customizable: Easily swap in your favorite nut butters, fruits, or toppings.
- Perfect for meal prep: Store them in the freezer and grab a cup whenever you need a quick, cool snack.
- Kid-approved: Fun to assemble and totally irresistible for little ones.
Ingredients
- 1/4 cup peanut butter (or almond butter)
- 1 tablespoon honey (or agave syrup)
- 3/4 cup granola
- 1 cup whole milk Greek yogurt
- 1/2 cup sliced berries (or fruit of choice)
- 1 tablespoon chopped walnuts
- Honey drizzle (optional)
Directions
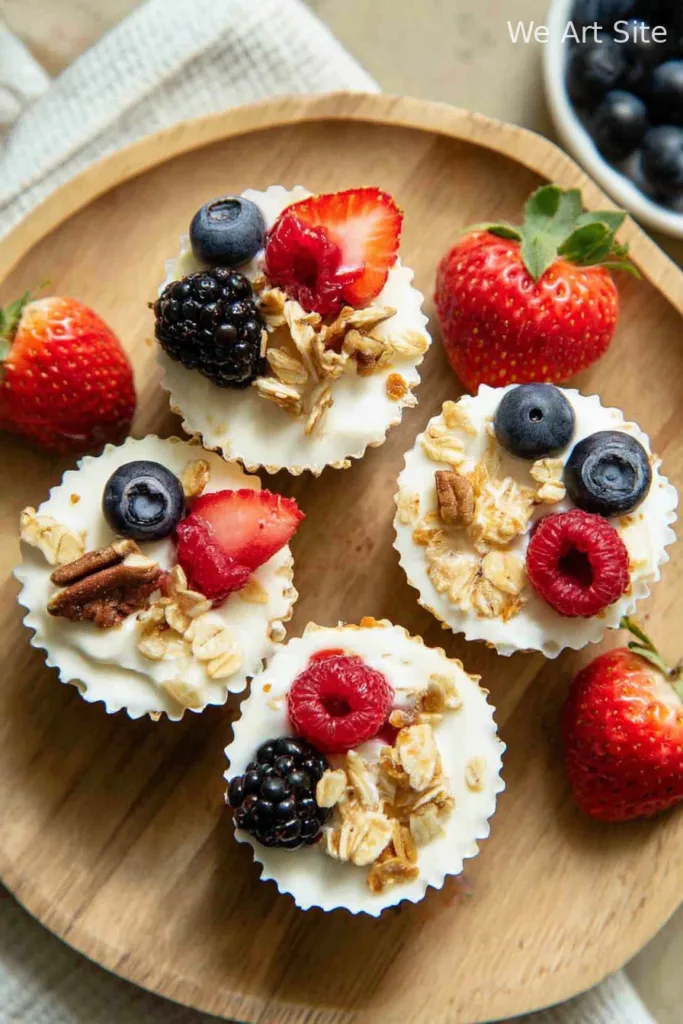
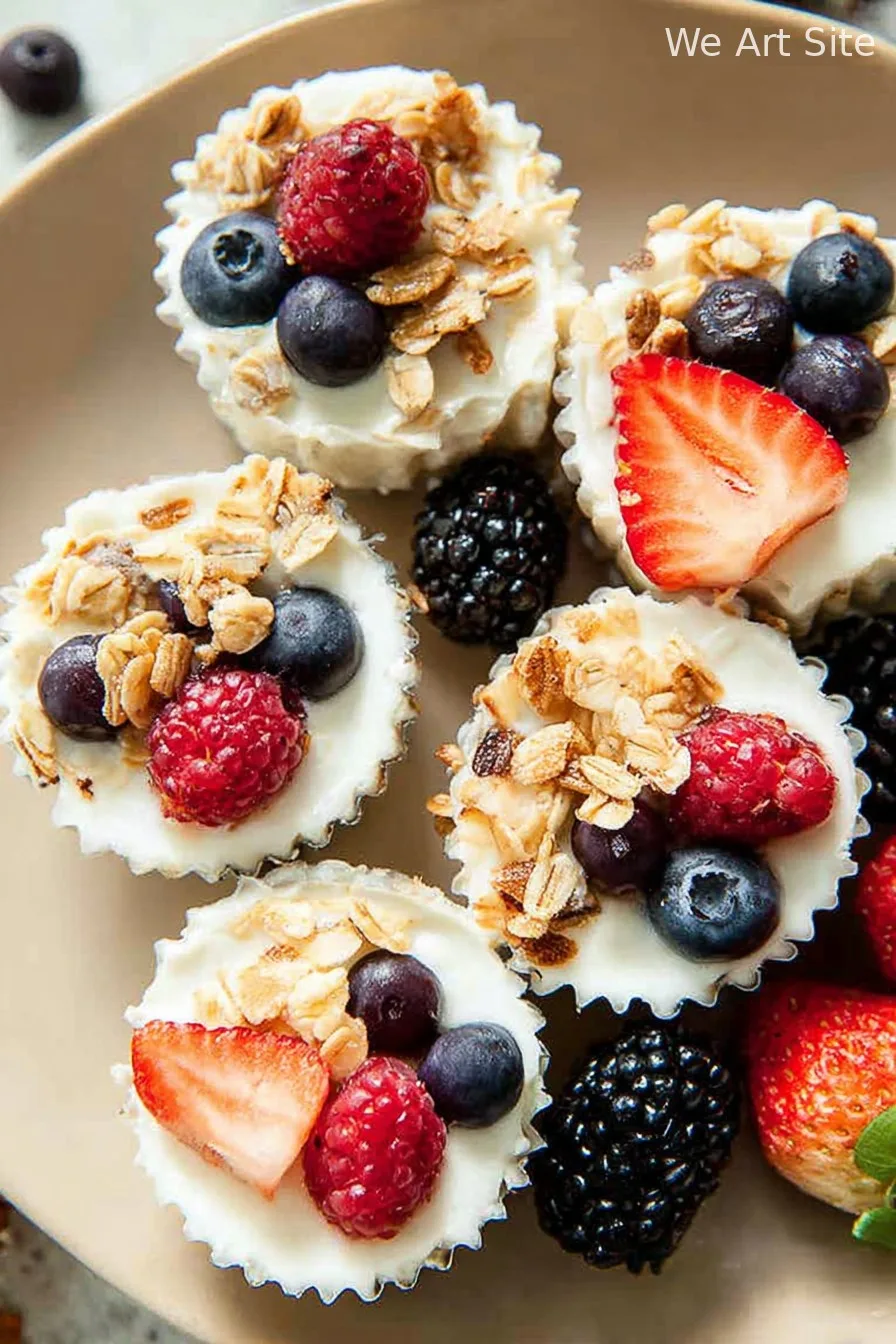
- Prep Your Muffin Tin: Line a standard muffin tray with 6 paper or silicone cupcake liners. This will make removing the frozen cups a breeze later on.
- Make the Granola Base: In a small mixing bowl, combine the peanut butter and honey until smooth. Fold in the granola, stirring to coat every piece evenly with the sticky mixture.
- Fill the Liners: Spoon the granola blend equally among the 6 liners. Use the back of a spoon or the bottom of a small measuring cup to firmly press the mixture into a compact, even base in each liner.
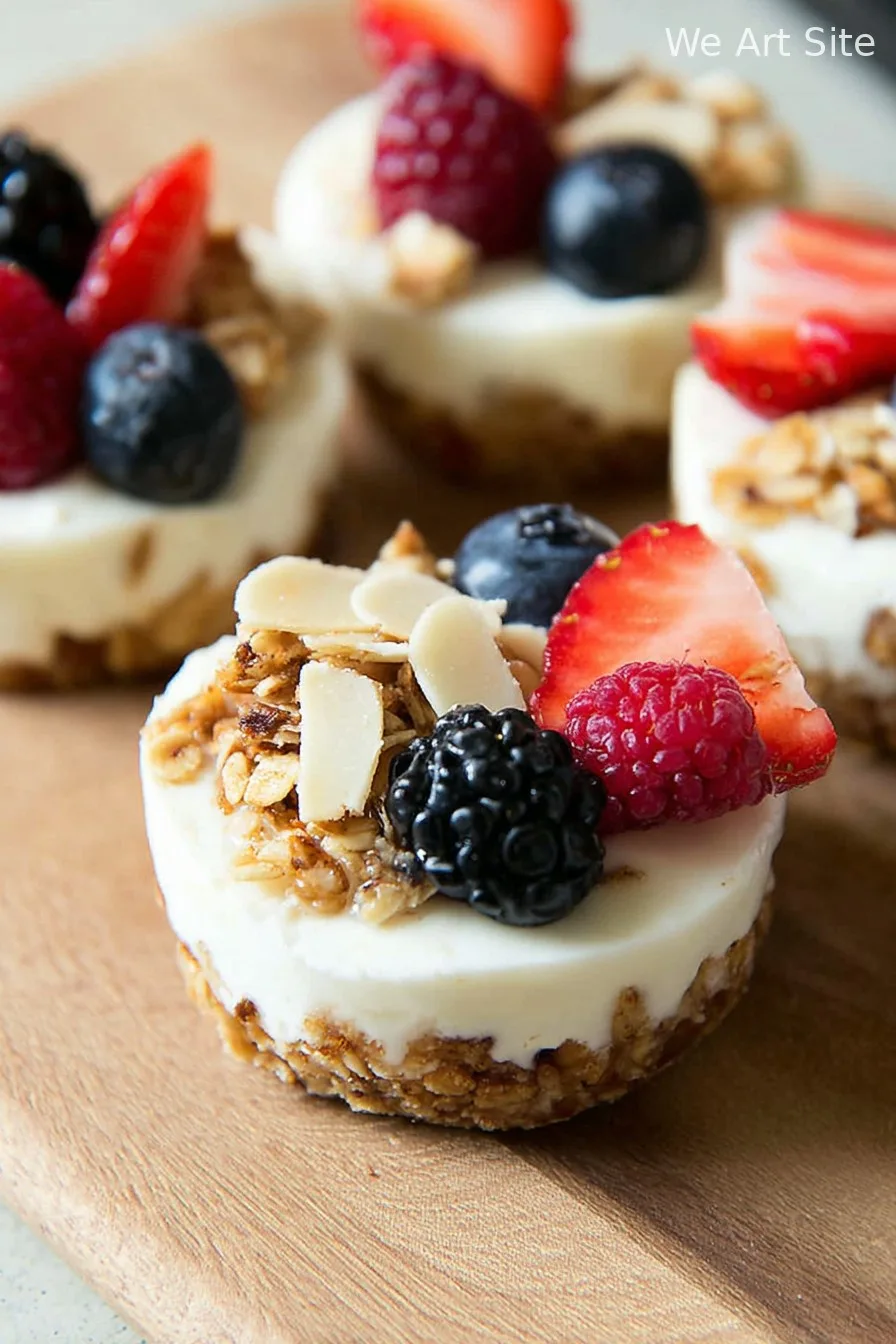
- Add the Yogurt Layer: Dollop about 2-3 tablespoons of whole milk Greek yogurt on top of each granola base, spreading it to cover the surface right up to the edges of the liner.
- Top and Decorate: Arrange your sliced berries (or other favorite fruit) and sprinkle each cup with chopped walnuts. For extra sweetness and shine, drizzle a touch more honey on top, if desired.
- Freeze: Place the muffin tray in the freezer and allow the cups to firm up for 30 minutes to 1 hour, or until completely frozen.
- Release and Enjoy: When ready to serve, let the cups sit at room temperature for 2-3 minutes so they release easily. Gently pull the liners to lift out each cup without breaking.
- Store for Later: If you’re not eating them right away, transfer the frozen cups to an airtight container and keep them in the freezer for a convenient grab-and-go snack anytime.
Notes
- For extra crunch, use granola with big clusters or add some extra chopped nuts to the base mixture.
- If your nut butter is too thick, microwave it for a few seconds to make it easier to mix and distribute.
- Paper liners work well, but silicone liners make removing the frozen cups even easier and reusable.
Variations
- Chocolate Dream: Add a teaspoon of cocoa powder to the yogurt and use mini chocolate chips as a topping.
- Tropical Paradise: Swap the berries for diced mango and pineapple, and add a sprinkle of toasted coconut flakes.
- Seed & Berry Boost: Mix chia seeds into the yogurt and top with a blend of fresh mixed berries.
Required Equipment
- Muffin tin (6-cup)
- Paper or silicone cupcake liners
- Mixing bowl
- Spoon and/or small measuring cup
Storage Instructions
After freezing, move the cups to an airtight container and store in the freezer for up to 2 months. Thaw each cup at room temperature for 2-3 minutes before serving for the best creamy texture.
Suggested Pairings & Serving Ideas
- Enjoy with a hot cup of coffee or herbal tea for a balanced breakfast.
- Serve alongside fresh orange slices for a citrusy touch.
- Pack them into lunchboxes as a wholesome, portable treat.
Pro Tips
- Lightly spray liners with nonstick spray if using paper liners for even easier removal.
- Use thick (strained) Greek yogurt to prevent icy texture and keep the cups ultra-creamy.
- Layer fruit right before freezing to keep it fresh and vibrant.
FAQ
- Can I make these dairy-free?
- Yes! Substitute non-dairy yogurt (such as coconut or almond yogurt) for a completely dairy-free version.
- How long do the frozen yogurt granola cups last?
- They keep well for up to 2 months in the freezer when stored airtight.
- Can I use store-bought granola?
- Absolutely! Just pick your favorite variety, making sure it’s not too crumbly for easy pressing into the base.
Prep Time:
10 minutes
Total Time:
40-70 minutes (including freezing time)
Ingredients
- 1/4 cup peanut butter (or almond butter)
- 1 tablespoon honey (or agave syrup)
- 3/4 cup granola
- 1 cup whole milk Greek yogurt
- 1/2 cup sliced berries (or fruit of choice)
- 1 tablespoon chopped walnuts
- Honey drizzle (optional)
Instructions
-
1Line a standard muffin tray with 6 paper or silicone cupcake liners. This will make removing the frozen cups a breeze later on.
-
2In a small mixing bowl, combine the peanut butter and honey until smooth. Fold in the granola, stirring to coat every piece evenly with the sticky mixture.
-
3Spoon the granola blend equally among the 6 liners. Use the back of a spoon or the bottom of a small measuring cup to firmly press the mixture into a compact, even base in each liner.
-
4Dollop about 2-3 tablespoons of whole milk Greek yogurt on top of each granola base, spreading it to cover the surface right up to the edges of the liner.
-
5Arrange your sliced berries (or other favorite fruit) and sprinkle each cup with chopped walnuts. For extra sweetness and shine, drizzle a touch more honey on top, if desired.
-
6Place the muffin tray in the freezer and allow the cups to firm up for 30 minutes to 1 hour, or until completely frozen.
-
7When ready to serve, let the cups sit at room temperature for 2-3 minutes so they release easily. Gently pull the liners to lift out each cup without breaking.
-
8If you’re not eating them right away, transfer the frozen cups to an airtight container and keep them in the freezer for a convenient grab-and-go snack anytime.
CLICK FOR NUTRITION INFO
↑
Approximate Information for One Serving
Serving Size:
1 serving
Calories:
170 caloriescal
Protein:
8gg
Fat:
8gg
Saturated Fat:
0g
Trans Fat:
0g
Cholesterol:
0mg
Sodium:
0mg
Potassium:
0mg
Total Carbs:
17gg
Fiber:
0g
Sugar:
0g
Net Carbs:
0g
Vitamin A:
0
Vitamin C:
0mg
Calcium:
0mg
Iron:
0mg
Nutrition Disclaimers
Number of total servings shown is approximate. Actual number of servings will depend on your preferred portion sizes.
Nutritional values shown are general guidelines and reflect information for 1 serving using the ingredients listed, not including any optional ingredients. Actual macros may vary slightly depending on specific brands and types of ingredients used.
To determine the weight of one serving, prepare the recipe as instructed. Weigh the finished recipe, then divide the weight of the finished recipe (not including the weight of the container the food is in) by the desired number of servings. Result will be the weight of one serving.
Did you make this recipe?
Please consider Pinning it!