So Here’s the Story Behind My Halloween Pizza Obsession
Alright, you ever have one of those recipes where the kids start asking, “When can we make those again? Can we do them for every holiday?” This is that recipe for us. I first did these Easy Mini Halloween Pizzas on a whim when my now-teen was a little sprout obsessed with all things spooky. It started as a way to keep tiny hands busy between pumpkin carving disasters (long story involving way too many seeds on the sofa), but now it’s a full-blown must each October. Honestly, every time I bust out the English muffins and cheese, someone in the family smirks and says, “Ah, spooky pizza time!”.
Why I Keep Coming Back to This Recipe
I make this when I’m short on time but still want something festive (and edible, unlike some of our costume attempts). The kids go nuts for these little pizzas; probably because they get to decorate their own and make the ghosts look vaguely like llamas. If you’re like me and sometimes, just sometimes, dread digging out the rolling pin, these are a dream. (Okay, occasionally I burn the edges, but they promise me it’s extra crispy that way.)
What You Need: Ingredients & Some Swaps I’ve Tried
- 4-6 English muffins, split (I’ll admit, bagels work in a pinch; pita bread isn’t half bad either.)
- About a cup of pizza sauce – Grandma swore by Rao’s, but honestly, whatever’s on hand usually makes the cut.
- 1.5 cups shredded mozzarella (Or, hack some cheese slices into ghosty shapes – that’s extra fun. Provolone is even stretchier, which can look creepier!, but I digress.)
- A handful of olives, black ones, for “eyeballs” or spiders. If olives are a hard no, use pepperoni, mushroom pieces, or those tiny bell peppers that always seem to be in the fridge drawer?
- A few sprigs of fresh basil (totally optional – my eldest swears it tastes like “leaf” but I love it.)
- Other bits: red pepper flakes, diced onion, heck sometimes a little corn – use what you like.
How I Actually Make the Mini Halloween Pizzas
- Preheat your oven to 400F (or, if you’re me and forgot to check until halfway through, just crank it on and wait impatiently!).
- Set the English muffin halves (cut side up) on a baking tray—no need to be precious, messy is kind of the point here.
- Spoon a decent splodge of pizza sauce on each and swirl it around. This is when the smallest hands in the house usually sneak some straight from the spoon. Can’t blame ’em.
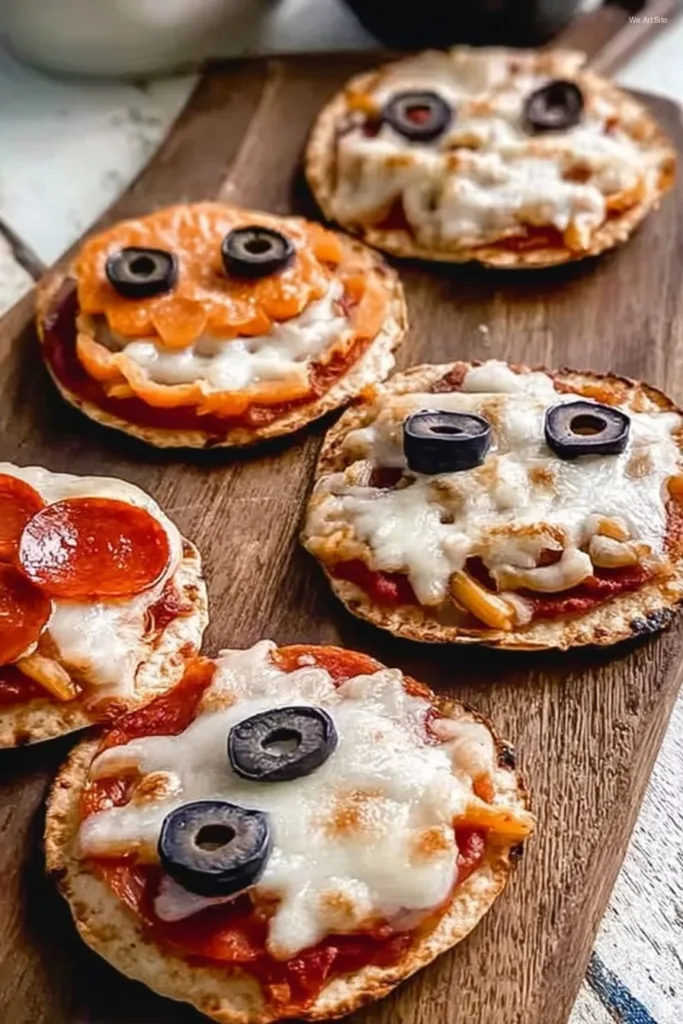
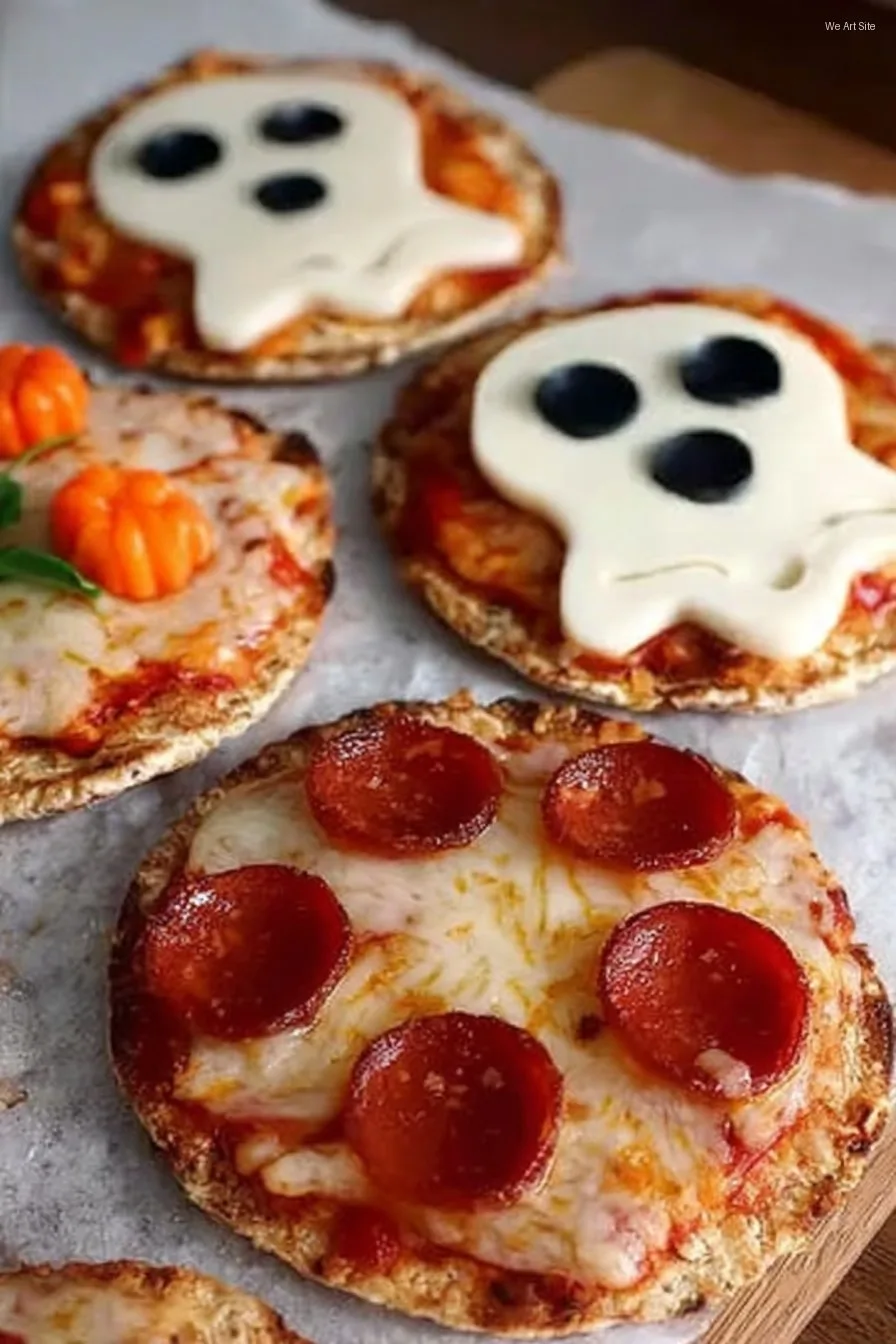
- Sprinkle or lay cheese slices for your “mummies” or “ghosts”. If you wanna get crafy, cut cheese into ragged strips, crisscross them for mummy bandages – or if you have patience (I sometimes do), blob cheese in the middle for a round little ghostie.
- Use the olives for monster eyes, spiders, or big spooky eyebrows. Sometimes the faces turn out more “abstract”, but that just adds character, right?
- Bake for about 8–10 minutes, until cheese is all bubbly and horrifyingly melty. Don’t panic if the edges look a little, let’s say, caramelized. If they haven’t crisped enough, you can give it another couple minutes, but keep an eagle eye (my oven runs a bit hot, which is why I always double-check halfway through).
- Let them cool a moment, unless you like searing the roof of your mouth. I never learn.
My Random Notes (aka, What I Wish I’d Known Earlier)
- If you use too much sauce, you’ll get a soggy bottom—nobody likes that. Actually, I find it works better if I go a bit lighter than I think.
- The cheese doesn’t have to look perfect; a bit unruly is more “Frankenstein’s monster”, which is the vibe anyway.
- One time I forgot to line the tray, but the mess wasn’t as bad as I expected (though a silpat makes cleanup a breeze).
I’ve Tried a Few Out-there Versions
Confession: I once did these with rye bread because it was all I had, but the texture just felt…odd. Not my favorite. But, tortilla pizzas are a win for getting everything super crispy (my son actually prefers those). Sometimes I make mini calzones with the same toppings; those are a whole other scene—honestly, more effort than I usually have time for on a busy October night.
Equipment: What I Use (and Workarounds, Promise)
- Baking sheet (but I’ve done these right on foil, on days when every sheet pan’s buried in the dishwasher)
- Cutting board and a big knife for prepping toppings. Or honestly, just go wild straight from the package if your Monday’s hectic.
- Sharpie for labeling kids’ creations—not necessary, but it’s saved more sibling bickering than I can count.
Will They Even Last? (Storage Info From An Impatient Family)
These keep in an airtight container in the fridge for a day or two. But, real talk—they rarely survive past that first evening at my place. And, maybe I like them cold the next morning? No shame. You can microwave to reheat, but oven or toaster makes the crust less rubbery. Just saying.
How We Actually Eat These (Serving Ideas I Swear By)
We pile them on a platter and let everyone grab (my youngest does a running commentary on which ones have the scariest faces—”That one looks like Dad before coffee!”). Sometimes we serve with carrot stick “witches’ fingers,” or if it’s a proper bash, with other spooky snacks. For a grown-up twist, I’ve offered a side of chili oil or ramped up the red pepper. Bit risky if you’ve got spice-phobes, but I’m a fan.
Lessons I’ve Learned the Hard Way (Pro Tips)
- Don’t rush the cheese. I tried broiling once to speed things up—just turned the tops rubbery.
- Actually, I find a little olive oil brushed on the muffin edges gives a lovely golden finish; wish I’d figured that out sooner.
- If you want the “faces” to stay put, add olives after the first 5 minutes of baking. Otherwise, they kinda migrate. Trust me.
Questions I Actually Get (FAQ Time)
- Can I make these in advance?
Sure, you can assemble them a couple hours early and pop in the fridge. But—and this is key—add the cheese just before baking or it can get weirdly hard. Learned that the hard way! - Are they freezer-friendly?
Eh, I’ve tried it. They technically freeze fine, but for me the texture’s not as nice after thawing. You do you, though. - What’s the best way to get cheese ghosts to look right?
Honestly? Freehand it, wobbly edges and all. Or use a cookie cutter if you’re feeling proper. Homemade always looks silly; that’s half the fun. - Do these work gluten-free?
Completely—grab your fave GF English muffins (or bagels, even rice cakes in a pinch). My cousin does this all the time. - Is pizza sauce necessary?
Nope! I did butter with garlic salt one night in desperation, and it was still eaten faster than you can say “boo!”
And if you’re looking for more Halloween snack inspo, the Kitchn has loads of fun ideas. Happy haunting, and try not to let the tiny ghosts scare you off!

Ingredients
- 1 can refrigerated pizza dough (about 13.8 oz)
- 1/2 cup pizza sauce
- 1 1/2 cups shredded mozzarella cheese
- 16 slices pepperoni
- 8 black olives, sliced
- 1/4 cup sliced bell peppers (red and green)
- 2 tablespoons olive oil
- 1 tablespoon cornmeal (for dusting)
Instructions
-
1Preheat oven to 425°F (220°C). Line a baking sheet with parchment paper and sprinkle with cornmeal.
-
2Unroll pizza dough and cut into 8 circles using a cookie cutter or glass. Place circles on prepared baking sheet.
-
3Brush each dough round lightly with olive oil. Spread 1 tablespoon of pizza sauce over each.
-
4Sprinkle mozzarella cheese evenly over each mini pizza. Arrange pepperoni, olives, and bell peppers in spooky Halloween patterns (like spider webs, mummies, or jack-o’-lanterns).
-
5Bake for 10-12 minutes, or until cheese is bubbly and the crust is golden. Let cool slightly before serving.
CLICK FOR NUTRITION INFO
↑
Approximate Information for One Serving
Serving Size:
1 serving
Calories:
170 caloriescal
Protein:
8gg
Fat:
7gg
Saturated Fat:
0g
Trans Fat:
0g
Cholesterol:
0mg
Sodium:
0mg
Potassium:
0mg
Total Carbs:
18gg
Fiber:
0g
Sugar:
0g
Net Carbs:
0g
Vitamin A:
0
Vitamin C:
0mg
Calcium:
0mg
Iron:
0mg
Nutrition Disclaimers
Number of total servings shown is approximate. Actual number of servings will depend on your preferred portion sizes.
Nutritional values shown are general guidelines and reflect information for 1 serving using the ingredients listed, not including any optional ingredients. Actual macros may vary slightly depending on specific brands and types of ingredients used.
To determine the weight of one serving, prepare the recipe as instructed. Weigh the finished recipe, then divide the weight of the finished recipe (not including the weight of the container the food is in) by the desired number of servings. Result will be the weight of one serving.
Did you make this recipe?
Please consider Pinning it!!