So, You Want to Make Some Spooky-Cute Halloween Cupcakes?
Alright, confession time: I used to be wildly intimidated by decorated Halloween cupcakes. You know those Pinterest-perfect kind with spiderwebs so neat you want to hire the baker for NASA missions? Yeah, not me! Mine always ended up a bit quirky, but (honestly?) that’s how I like them now. Last year, my nephew swore my “witch’s hat” cupcake just looked like a lost traffic cone, but he ate two, so, point for Auntie. Oh, quick side note—if you ever try piping frosting while kids are decorating beside you, expect a sprinkle explosion. That stuff gets everywhere.
Why I Keep Making These Every October
I make this recipe when I feel like my kitchen could use a bit more chaos—plus, my family goes absolutely bananas for them, even the ones with suspicious “monster faces.” (The trick is in the googly eyes, I’m telling you!) I also get to experiment—last time, my orange food coloring looked a bit too much like, erm, salmon. But no one complained. These are perfect when you want an activity, not just a dessert, and especially if you’ve had a long week and just want to play with frosting without judgement. Pumpkin spice latte in hand is optional, but highly recommended.
What You’ll Need (and What You Can Improvise)
- 2 cups all-purpose flour (but I’ve even swapped half whole wheat when I’m feeling sort of healthy)
- 1 1/2 cups sugar (honestly, I use plain white, but brown is lovely too)
- 3/4 cup unsalted butter, softened (margarine totally works if it’s what you’ve got—my grandma always used Blue Bonnet, so maybe that’s why I do too)
- 3 large eggs (room temperature, but let’s be real, I’ve forgotten to warm them and it’s always fine)
- 1 cup milk (almond, oat, whatever’s sitting in the fridge; I once used half yogurt and no one noticed)
- 2 tsp baking powder
- 1/2 tsp salt
- 2 tsp vanilla extract
- Food coloring gels (orange, purple, green—hey, I’ve even used turmeric for yellow!)
- Assorted Halloween candies: candy eyes, mini chocolate chips, licorice, sprinkles—you name it
- Buttercream icing (store-bought or homemade; here’s a great recipe I sometimes use)
- Optional: chocolate chips or cocoa powder (for chocolatey cupcakes, which everyone asks for anyway)
How To Whip These Up Without Making a Mess (Ha)
- Heat your oven to 350° F (or 175° C if you’re not in the US) and plop cupcake liners into your tin. I always forget to spray them, and, you know, life goes on.
- In a big bowl (the kind that’s actually not quite big enough, so you spill a bit; or is that just me?), cream together butter and sugar until fluffy. If you sneak a taste here, I won’t tell.
- Beat in the eggs one at a time. Try not to drop any shell in—if you do, fish it out with a larger shell piece, works like magic. Then add the vanilla.
- In a separate bowl, stir flour, baking powder, and salt. Gradually add dry stuff to wet stuff, alternating with milk. Don’t stress if it looks lumpy at first—it all works out. (Actually, less over-mixing is better, I’ve learned the hard way…dry cupcakes, no thanks.)
- If you want colors inside, divide the batter and tint each with food coloring. Or, keep it classic and go wild on top later.
- Scoop the batter into liners—about 3/4 full—and pop into oven. Bake 18-22 minutes. Stick a toothpick in; if it comes out clean-ish, they’re done.
- Let cool (patience required; once I didn’t wait and the frosting just melted off—learned my lesson there!).
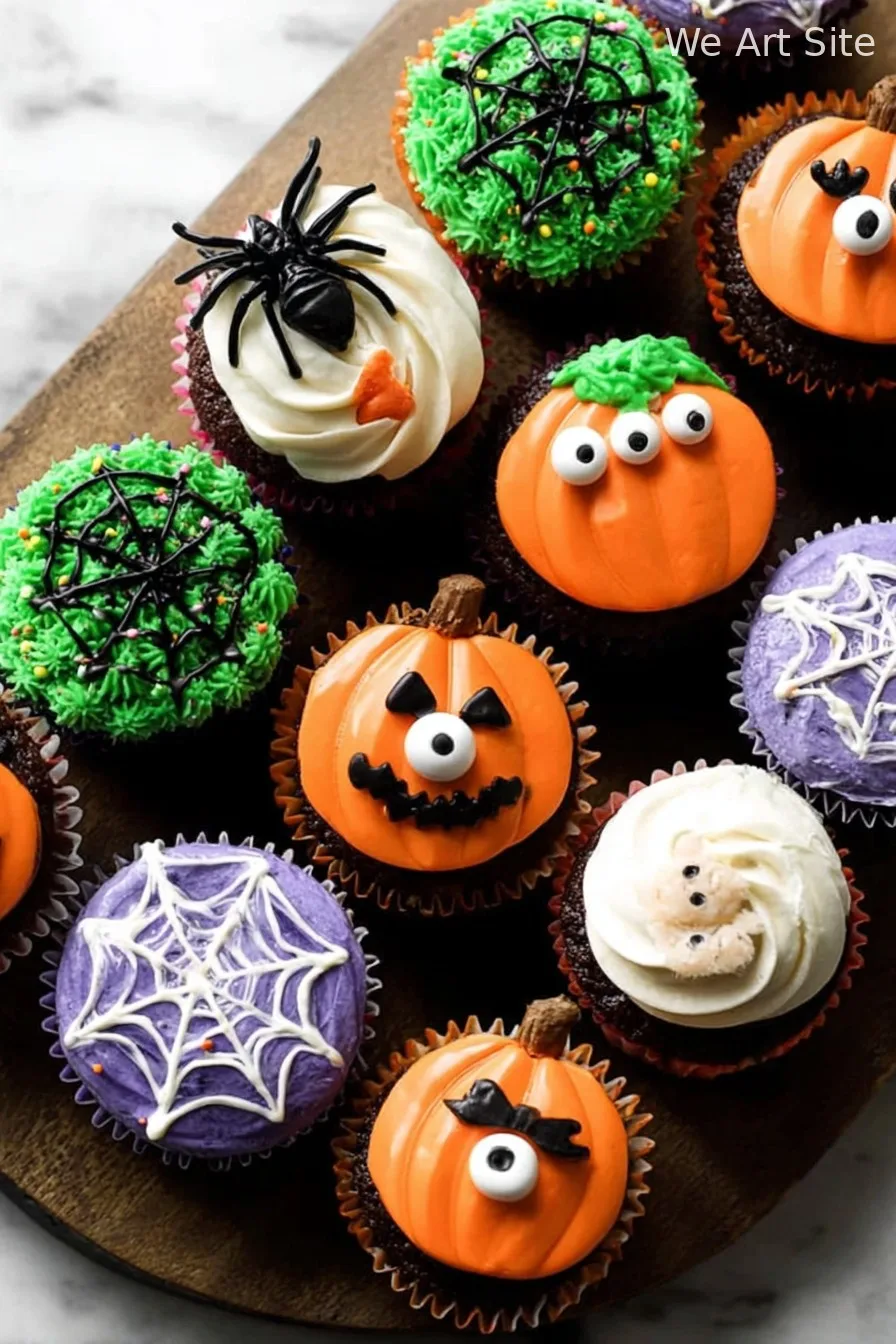
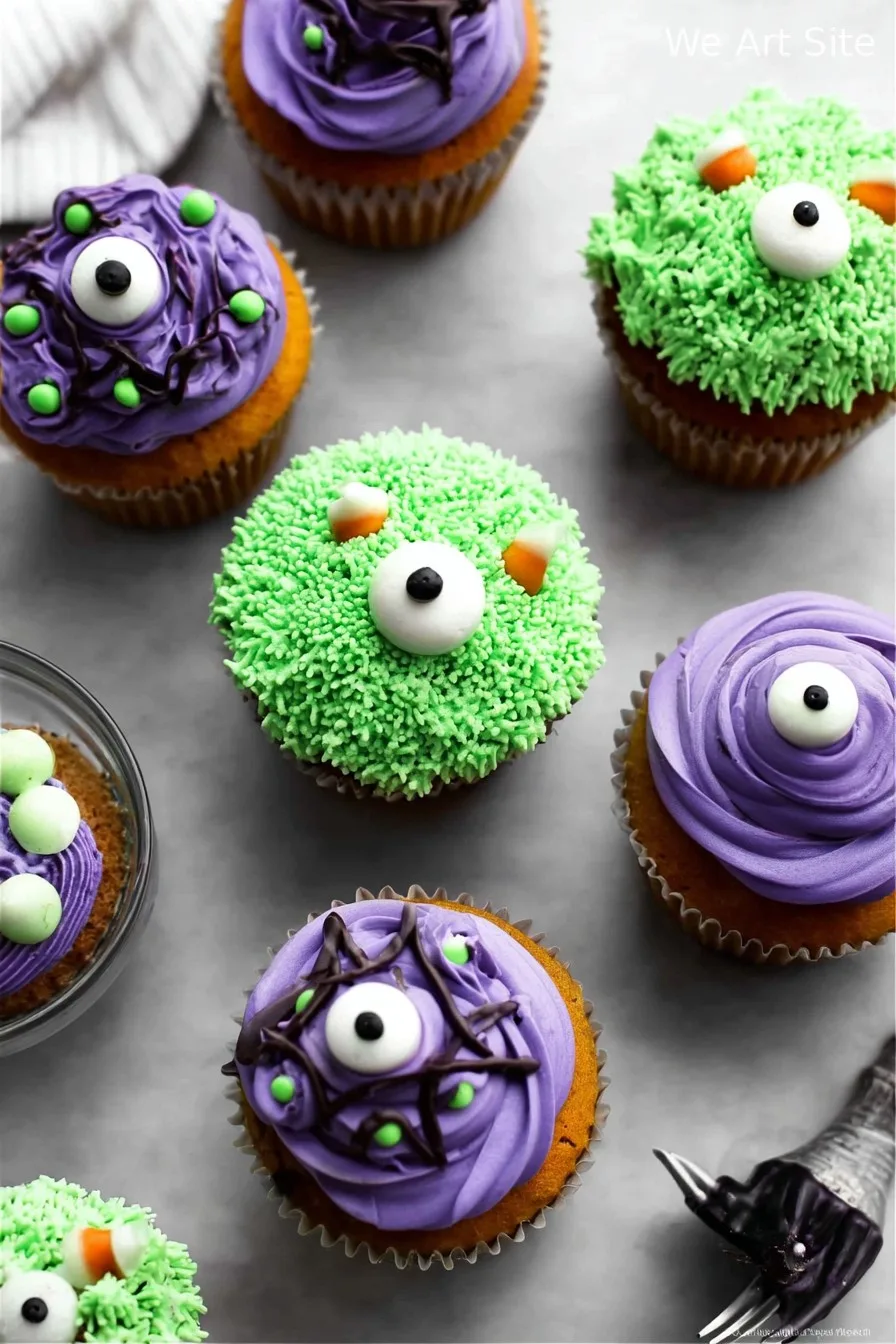
- Here’s the fun part. Frost and decorate however you want. Use candy for monster eyes, twist licorice for spider legs, plunk a marshmallow ghost on there…I usually end up eating half the decorations before they hit the cupcakes. Crafty inspiration? I usually check out Wilton’s Halloween ideas.
Things I Learned the “Hard Way” (aka Notes)
- If you overfill the liners, you get a mushroom-top situation—sometimes that’s fun, sometimes you end up eating all the stuck bits form the tin.
- Piping bag burst on me once; now I double-bag or just use a zip-top plastic bag with the corner snipped. Quick fix.
- I’ve burnt the first batch because I got distracted; maybe set a second timer on your phone (I do now; live and learn!).
If You Want to Mix Things Up (or Experiment Like Me)
- Try red velvet (I did once—turned out more brown than red, so maybe skip the cocoa powder next time!)
- Swap in lemon zest for a zingy surprise
- Use cream cheese icing for “mummy” designs; or peanut butter buttercream, but watch for allergies
- Chocolate ganache ‘melts’ make fun “witch puddles”, although once mine looked kind of like a cow patty…generally, frosting’s easier
What You Really Need (or Can Probably Make Do Without)
- 12-hole cupcake/muffin tin (but, honestly, I’ve doubled cupcake paper in a sturdy baking dish and it worked in a pinch)
- Hand mixer or stand mixer—old school whisking is a good upper-arm workout!
- Piping bags and tips, if you fancy, or a zip plastic bag does the trick
- Cooling rack (sometimes I just pop them on a tea towel; it’s fine)
Keeping Them Fresh (If You Have Any Left)
Store in an airtight container at room temp for 2 days, or in the fridge for up to 4. But honestly? In my house, they vanish in about 30 hours—sometimes less if teenagers are involved. If you’re under attack by hungry trick-or-treaters, good luck; you might not even get one yourself.
How We Actually Eat These (Serving Stuff)
I just pile them onto a wonky old cake stand (dust it off first) and let everyone pick their monsters. Sometimes, my bunch likes a big swirl of cream on the side or, weirdly, they dip them in hot chocolate (don’t ask me why; it’s become a tradition). Oh, and tiny flags with cheesy puns? Always a hit.
Lessons from My Own Cupcake Fails (Pro Tips…ish)
- I tried rushing the cooling step—big mistake. Melted frosting city. Actually, give them 20 minutes bare minimum.
- Forgot to sift the flour once; cupcakes came out a bit dense, but not terrible. If you’ve got a sieve do it, but otherwise, just whisk a bit more. No biggie!
- And if your colors look “muddy” instead of bright? I think it’s just a sign you need more sprinkles.
The Usual Questions I Get (And My Honest Answers!)
- Can I make these ahead? Absolutely. I actually think sometimes they taste even better the next day—frosting soaks in a bit. But decorate the day you need, or candies go a bit soft.
- Do I have to color the cake, or just the frosting? Either way. My kids like a surprise rainbow inside, but the look is just as fun with wild decor on top.
- Can I freeze them? Yeah, unfrosted they freeze ace. Frosted? Umm, I’ve had disasters; the decorations can go all weird and sticky. I’d avoid that.
- What if I don’t have food coloring? No panic—cocoa for brown, a bit of instant coffee for spooky “dirt,” even some beet juice makes wild pink!
- Why do my cupcakes sink in the middle? Too much batter, or oven was too hot, or maybe just one of those days. Happens to the best of us!
- Can I use boxed cake mix? Of course, life’s too short! Doctor it up with extra vanilla or a splash of almond if you’re feeling fancy.
And, well, I probably forgot something, but that’s sort of the magic. Every batch is a little bit different. If you want to deep-dive into design, check out some killer tutorials on YouTube. Now, off you go. Make a mess, eat some monsters, and don’t fret if your bat wings are a bit lopsided. Half the fun is in the imperfection, right?
Ingredients
- 1 1/4 cups all-purpose flour
- 1 cup granulated sugar
- 1/2 cup unsweetened cocoa powder
- 1/2 teaspoon baking soda
- 1/2 teaspoon baking powder
- 1/4 teaspoon salt
- 2 large eggs
- 1/2 cup whole milk
- 1/3 cup vegetable oil
- 1 teaspoon vanilla extract
- 3/4 cup unsalted butter, softened (for frosting)
- 2 cups powdered sugar (for frosting)
- 2 tablespoons milk (for frosting)
- Assorted food coloring (orange, green, black, purple)
- Halloween-themed candies and sprinkles for decoration
Instructions
-
1Preheat oven to 350°F (175°C). Line a 12-cup muffin tray with cupcake liners.
-
2In a large bowl, whisk together flour, sugar, cocoa powder, baking soda, baking powder, and salt.
-
3Add eggs, milk, oil, and vanilla extract to the dry ingredients. Mix until smooth and combined.
-
4Spoon the batter evenly into the prepared cupcake liners, filling each about 2/3 full. Bake for 18-20 minutes, or until a toothpick inserted in the center comes out clean. Cool completely.
-
5For the frosting, beat softened butter until creamy. Gradually add powdered sugar, then milk, and beat until fluffy. Divide frosting into bowls and tint each with food coloring.
-
6Decorate cooled cupcakes with colored buttercream, using piping bags and Halloween-themed candies or sprinkles as desired.
CLICK FOR NUTRITION INFO
↑
Approximate Information for One Serving
Serving Size:
1 serving
Calories:
290 caloriescal
Protein:
3 gg
Fat:
13 gg
Saturated Fat:
0g
Trans Fat:
0g
Cholesterol:
0mg
Sodium:
0mg
Potassium:
0mg
Total Carbs:
39 gg
Fiber:
0g
Sugar:
0g
Net Carbs:
0g
Vitamin A:
0
Vitamin C:
0mg
Calcium:
0mg
Iron:
0mg
Nutrition Disclaimers
Number of total servings shown is approximate. Actual number of servings will depend on your preferred portion sizes.
Nutritional values shown are general guidelines and reflect information for 1 serving using the ingredients listed, not including any optional ingredients. Actual macros may vary slightly depending on specific brands and types of ingredients used.
To determine the weight of one serving, prepare the recipe as instructed. Weigh the finished recipe, then divide the weight of the finished recipe (not including the weight of the container the food is in) by the desired number of servings. Result will be the weight of one serving.
Did you make this recipe?
Please consider Pinning it!!