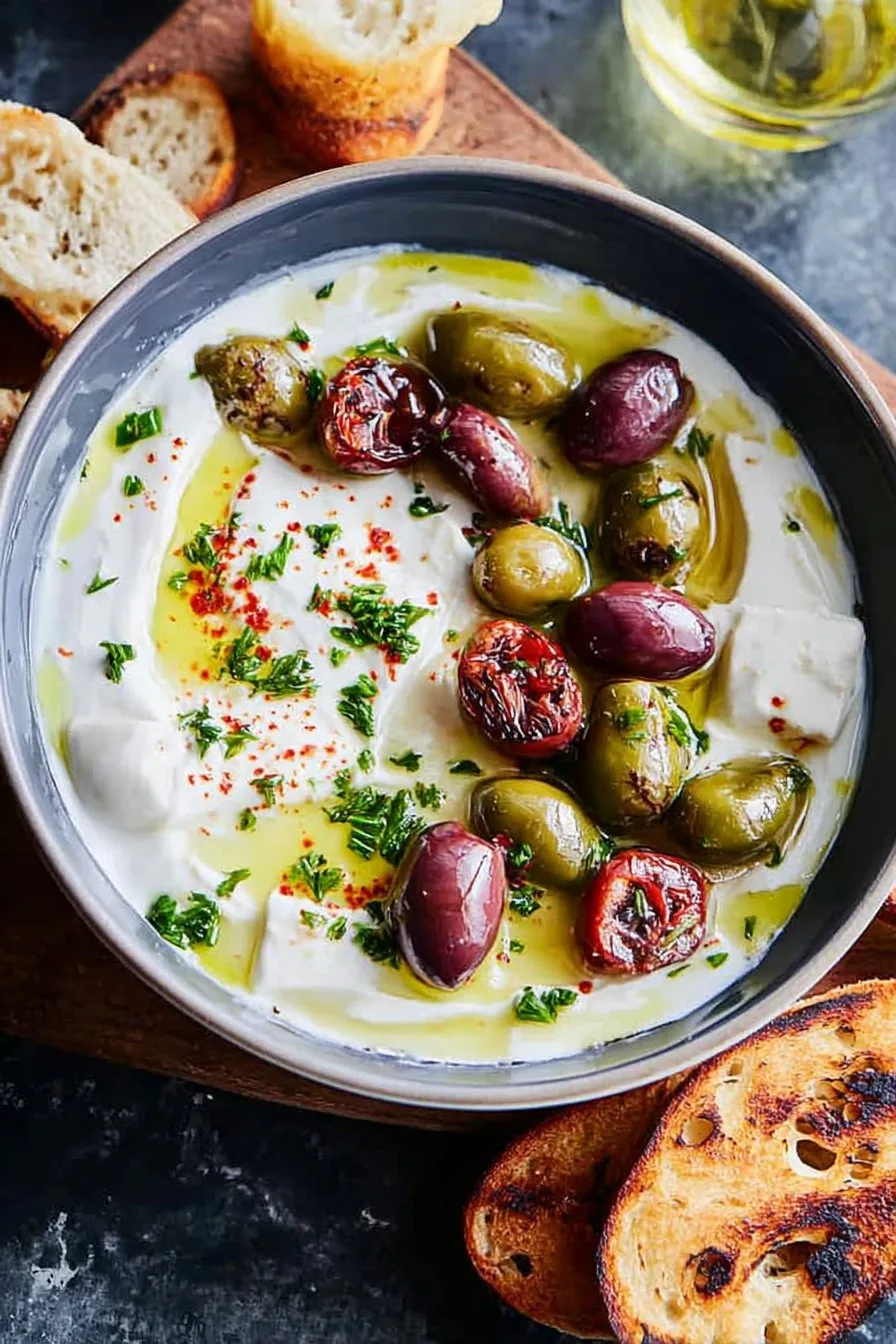
Let’s Chat About Whipped Feta (and Olives!)
If you ever show up at my house, chances are high I’ll plop down a bowl of this whipped feta with roasted olives before you even take your coat off. It became something of a running joke after I made it for a book club once—people basically ignored the book and attacked this dip instead. It’s the kind of thing that looks all fancy and Mediterranean, but honestly, the first time I cobbled it together, it was because I forgot to buy any other snacks (classic me). Now, it’s a mainstay. Also, I once tried doubling the batch and realized my tiny food processor couldn’t handle it; do not recommend unless you want feta on your ceiling.
Why You’ll Love This One
I make this when I want something that feels fancier than hummus, but I can still put it together in between chasing after the dog or answering the door. My family goes mad for it—my mum always tries to steal spoonfuls before it hits the table (I see you, mum). It’s creamy, tangy, salty, and, when those roasted olives go in? Magic. Plus, if you’re like me and sometimes forget to buy bread, it’s also pretty darn good on carrot sticks. (Wouldn’t recommend on apples, though. Learned that the hard way.)
What You’ll Need (But Substitutions Welcome)
- 200g feta cheese (I’ll use the supermarket block, but if you’ve got the fancy Greek stuff, all the better)
- 1/3 cup (80ml-ish) plain Greek yogurt (sometimes swap with sour cream if Greek yogurt mysteriously vanishes from my fridge)
- 2 tbsp olive oil (My gran swore by Kalamata olive oil, but, honestly, any decent olive oil works)
- 1 garlic clove (or skip if you’re not a garlic person—I sometimes do, depending on my plans for the evening)
- 1 cup mixed olives, pitted (sometimes I use more if I get carried away at the olive bar—no regrets)
- 1 tsp dried oregano (fresh is great, but not essential)
- Zest and juice of 1/2 lemon (or a splash of bottled lemon juice if your lemon is more like a rock)
- Black pepper, to taste
- Optional: a sprinkle of chili flakes for a little kick, or a handful of fresh parsley if you want to get cheffy
How I Throw It Together
- First, the olives: Preheat the oven to 400°F (200°C). Toss your olives with a glug of olive oil, oregano, and a pinch of that chili if you’re brave. Roast for 12-15 minutes—until they look wrinkly and lush (don’t panic if they look a bit odd; they taste great). This is when I usually pick at a few, because, well, self-control is overrated.
- Whip that feta: While the olives roast, crumble the feta into a food processor. Add Greek yogurt, garlic, lemon zest and juice, black pepper, and 1 tbsp olive oil. Blitz until super smooth and fluffy. If it looks too thick, add a splash more yogurt or olive oil and blend again. (It always looks lumpy at first—totally normal, just keep going.)
- Spoon and swirl: Scoop the whipped feta into a serving bowl. Now, here’s the fun part—make swirls with the back of a spoon. There’s no need to be precious. (Sometimes I get artsy, sometimes it looks like a cow field. Both are fine.)
- Top with roasted olives: Dump the roasted olives and any oily bits over the whipped feta. Sprinkle parsley or extra lemon zest if you’re feeling splashy.
- Serve: Grab some pita, crackers, or raw veggies and dig in. Oh, and if you want to know more about why feta whips so nicely, Serious Eats has a great explainer that’s far more technical than I’ll ever be.
Notes, From Too Many Batches
- If your feta is super salty, cut back on extra salt. I once made it basically inedible because I got a bit shaker-happy.
- Actually, I find it works better if you start blending before adding all the oil—otherwise it can get too loose.
- Don’t stress if you don’t have Greek yogurt—plain works, or crème fraîche in a pinch.
Variations I’ve Tried (And Some I Don’t Recommend)
- Once swapped in goat cheese for half the feta—bit tangy but not bad.
- Added roasted cherry tomatoes once; that was a hit.
- Tried folding in chopped walnuts… but honestly, it just got weird.
- If you’re feeling extra-adventurous, drizzle a touch of honey on top. Not for everyone, but I’m a fan.
What You Need (But Don’t Panic If You Don’t Have It)
- Food processor or blender (If you don’t have one, a stick blender works, or, with some elbow grease, you can mash it by hand—it’ll just be chunkier. That’s what I did the first time, and no one complained.)
- Baking tray for the olives
- Mixing bowl and spoon
How to Store (If There’s Any Left)
Pop leftovers in an airtight container in the fridge. It’ll keep for 2-3 days, maybe four if your fridge is arctic. But honestly, in my house, it never lasts more than a day; someone always finds the stash late at night. If it firms up, give it a little stir before serving again.
How I Love to Serve It
Pita chips are my ride-or-die, but crusty bread, seed crackers, or even cucumber slices work. Sometimes I dollop it onto a mezze platter with hummus and roasted peppers. Oh! And at Christmas, my cousin insists we serve it with those tiny, overly-salty breadsticks. Family traditions, eh?
Pro Tips (Learned the Hard Way)
- I once tried rushing the roasting step—took them out too soon, and the olives were kinda rubbery. Just be patient; it’s worth it.
- Don’t try to blend everything at once in a tiny food processor; feta everywhere.
- Let your feta come to room temp before blending—otherwise, it just stays in sad little lumps.
FAQ – Real Questions I’ve Actually Gotten
- Q: Can I use pre-crumbled feta?
Oh, sure, but it doesn’t whip up quite as creamy. Still tasty, though. Just don’t tell the feta purists. - Q: What if I don’t like olives?
Skip them! Try roasted peppers, or sun-dried tomatoes. Or just eat the whipped feta straight off a spoon. No judgment. - Q: Do I really need a food processor?
I mean, it helps. But you can mash by hand, or use a potato masher, or even a fork if you’re feeling determined. Will it be as fluffy? Maybe not. Will it still taste good? Absolutely. - Q: Can I make this ahead?
Yep! I think it tastes even better the next day, actually. Just save the olive topping to add right before serving, so things don’t get too soggy. - Q: Where do you get good olives?
I’m a sucker for the olive bar at my local market, but jarred are fine. If you want to geek out about olives, Olive Central has a fun guide. (Some of them have names I still can’t pronounce.)
So, that’s my low-key, high-flavor party trick. If you make it, let me know if you have better self-restraint around olives than I do. Or, if you end up with feta in your hair, we can form a support group. Cheers, mate!
Ingredients
- 200 g feta cheese, crumbled
- 100 g cream cheese, softened
- 2 tablespoons extra virgin olive oil, plus more for drizzling
- 1 teaspoon lemon zest
- 1 tablespoon lemon juice
- 1 garlic clove, minced
- 1 cup mixed olives, pitted
- 1 teaspoon dried oregano
- 1/2 teaspoon crushed red pepper flakes
- Fresh parsley, chopped, for garnish
Instructions
-
1Preheat the oven to 400°F (200°C). Place the mixed olives on a baking sheet and drizzle with 1 tablespoon olive oil. Sprinkle with dried oregano and crushed red pepper flakes. Toss to coat.
-
2Roast the olives in the preheated oven for 15-20 minutes, stirring halfway through, until they are fragrant and slightly blistered.
-
3Meanwhile, in a food processor, combine feta cheese, cream cheese, 1 tablespoon olive oil, lemon zest, lemon juice, and minced garlic. Blend until smooth and creamy, scraping down the sides as needed.
-
4Transfer the whipped feta to a serving bowl and use a spoon to create a swirl on top.
-
5Spoon the warm roasted olives over the whipped feta. Drizzle with extra olive oil and garnish with chopped fresh parsley. Serve immediately with pita bread or crackers.
CLICK FOR NUTRITION INFO
↑
Approximate Information for One Serving
Serving Size:
1 serving
Calories:
220 caloriescal
Protein:
8 gg
Fat:
18 gg
Saturated Fat:
0g
Trans Fat:
0g
Cholesterol:
0mg
Sodium:
0mg
Potassium:
0mg
Total Carbs:
5 gg
Fiber:
0g
Sugar:
0g
Net Carbs:
0g
Vitamin A:
0
Vitamin C:
0mg
Calcium:
0mg
Iron:
0mg
Nutrition Disclaimers
Number of total servings shown is approximate. Actual number of servings will depend on your preferred portion sizes.
Nutritional values shown are general guidelines and reflect information for 1 serving using the ingredients listed, not including any optional ingredients. Actual macros may vary slightly depending on specific brands and types of ingredients used.
To determine the weight of one serving, prepare the recipe as instructed. Weigh the finished recipe, then divide the weight of the finished recipe (not including the weight of the container the food is in) by the desired number of servings. Result will be the weight of one serving.
Did you make this recipe?
Please consider Pinning it!!