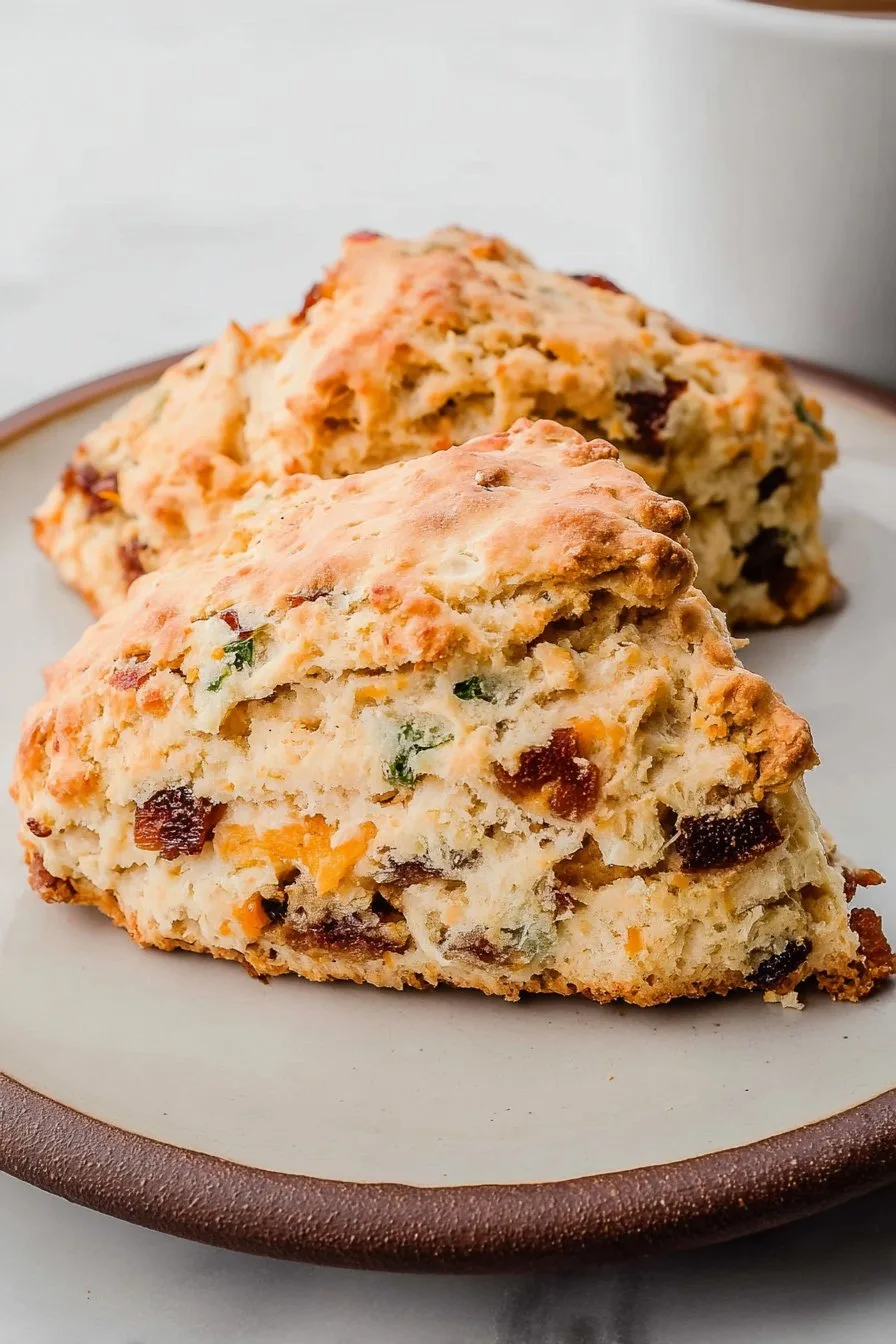
A Bacon-y, Cheesy Scone Story
Alright, so picture this: it’s a rainy Sunday, and I’ve got leftover sourdough starter staring me down from the fridge, practically begging to be used (does yours ever glare at you like that?). That’s how these bacon and cheddar sourdough scones came to life in my kitchen. In fact, I first made a batch while half-watching a rugby match and trying to keep my dog from eating the cheese. They’re now my go-to when I want something a bit fancier than plain old biscuits, but don’t fancy a full-on bread project. Oh, and if you’re not a fan of measuring everything perfectly, you’re in good company.
Why I Keep Coming Back to These Scones
I make these when I want something warming but also, well, just a little bit indulgent. My family goes bonkers for these (especially if I manage to not burn the bacon, which, let’s be honest, isn’t a given). Actually, I started adding the sourdough starter just to use it up, but everyone swears it makes them lighter and tastier, so now it’s become a must. Sometimes I whip up a batch as an apology for forgetting to do the shopping—nothing says “I messed up, but here’s cheese and bacon” like these scones.
What You’ll Need (and My Many Substitutes…)
- 2 cups (about 250g) all-purpose flour (I’ve swapped in a half-cup of whole wheat before and it was fine—just a bit earthier)
- 2 teaspoons baking powder
- 1/2 teaspoon baking soda
- 1/2 teaspoon salt (ok, sometimes I forget and add it at the end, still works)
- 1/4 cup cold butter, diced (my grandma always used Kerrygold, but honestly, whatever is in the fridge works)
- 1 cup cooked bacon, chopped (turkey bacon if you’re feeling virtuous, or leave it out for a veggie version—I won’t tell)
- 1 cup shredded sharp cheddar (I’ve used mild, and once, because I was out, tossed in some Swiss; cheddar is best though)
- 1 cup unfed sourdough starter (not fed for at least 8 hours—straight from the fridge is fine)
- 1/4 to 1/3 cup buttermilk (or milk with a splash of lemon juice; honestly, yogurt thinned with water works too if you’re in a pinch)
- 1 egg (optional, for brushing on top to get that nice shine, but I forget half the time)
Here’s How I Make Them (More or Less)
- Heat your oven to 400°F (200°C). Line a baking tray—I usually use parchment, but foil works if you’re out.
- In a big bowl, mix your flour, baking powder, baking soda, and salt. I whisk it with a fork; proper cooks probably sift, but I never bother.
- Toss in the cold butter cubes. Rub them into the flour with your fingers till it looks like lumpy sand. (Don’t overthink this; if there’s a pea-sized piece left, it’s all good.)
- Stir in the bacon and cheese. This is where I usually sneak a bit of cheese, for quality control, obviously.
- Add in the sourdough starter and just enough buttermilk to bring it together into a shaggy dough. Sometimes I start with a spoon, but usually wind up getting my hands in there. It’ll look a bit weird, like it’s not coming together, but keep going—it does.
- Flour your counter and tip the dough out. Pat it gently into a thick disk—about 1 1/2 inches tall. Don’t go thinner, or you’ll get sad, flat scones.
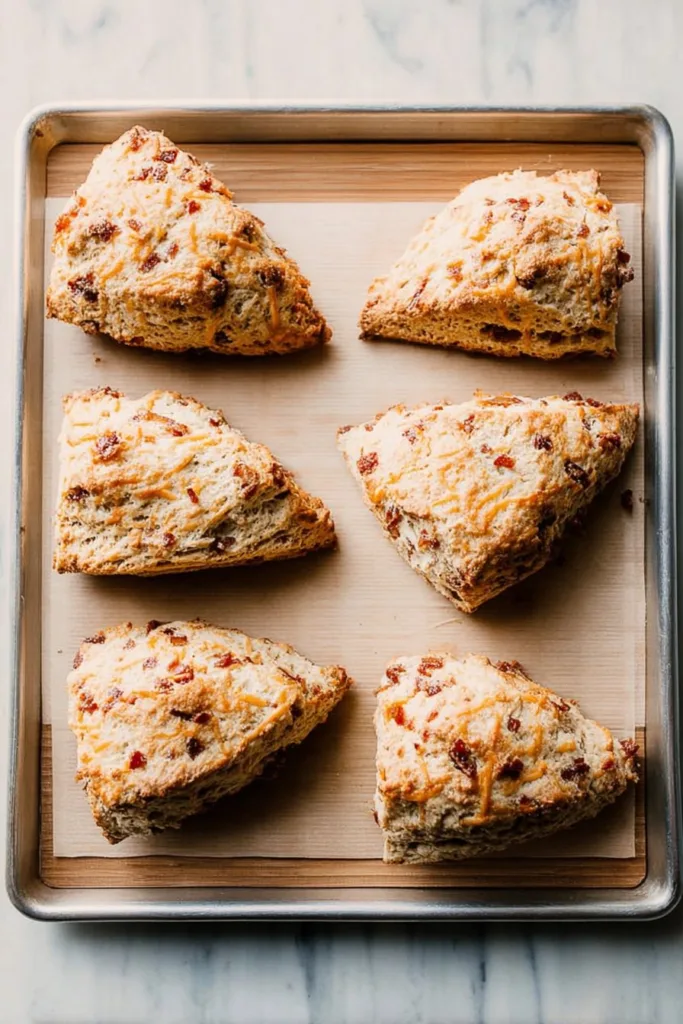
- Cut the disk into 8 wedges (or go rogue and do circles with a glass—I do that when the mood strikes). Pop them on the tray. If you remember, brush with a beaten egg for a glossy finish.
- Bake 18-22 minutes, just until golden and they smell amazing. I always check at 18—sometimes my oven has a mind of its own.
- Cool for at least 10 minutes because the cheese is like molten lava. Or don’t wait and risk burning your tongue (been there, regretted it).
My Notes — or, Things I’ve Messed Up
- Sourdough starter straight from the fridge actually works better than room temp. Don’t ask me why, just trust me.
- If the dough feels too wet, just add a sprinkle more flour. Too dry? A splash more buttermilk. It’s not rocket science.
- Once, I tried using olive oil instead of butter. Spoiler: Not the same—stick with butter.
Variations I’ve Actually Tried (Some Better Than Others)
- Add chopped green onions or chives—they make it somehow taste fancier.
- No bacon? Swap in cooked ham, or just go all cheese. But don’t try smoked salmon, trust me, it was a weird experiment that I won’t repeat.
- For a spicy kick, a handful of chopped jalapeños is brilliant (though my kids weren’t fans—too much heat for them).
Equipment: What You Need, or How to Fake It
- Baking sheet (or whatever flat tray fits your oven—I’ve used a pizza stone in a pinch)
- Mixing bowl (I just use the biggest one I’ve got—no need for fancy)
- Fork or pastry blender (but honestly, clean hands work fine for mixing in the butter)
How I Store Them (But Do They Ever Last?)
In the very rare event you have leftovers, I pop them in a container or wrap them in foil and leave on the counter for a day or two (though honestly, in my house they never last more than a day!). You can freeze them, but I find they taste a bit less exciting after thawing, so I usually don’t bother. If you want to reheat, 5 minutes in a warm oven does the trick.
Serving: What We Do at Home
I love these scones warm, split open and slathered with salted butter. My partner swears by a swipe of grainy mustard (weird, but actually tasty), and when we’re feeling very brunchy, a fried egg on top. They’re also excellent with tomato soup—kind of like a British twist on grilled cheese and soup.
Pro Tips (Learned the Hard Way)
- Don’t rush the butter-integration step. I once tried melting the butter and just pouring it in—result: tough scones. Cold butter, always.
- Don’t overmix the dough. The more you fuss, the denser they get. When in doubt, stop mixing. (Or, as my uncle says, let the scones be!)
- Letting them cool a bit before eating means you don’t burn the roof of your mouth, which I’ve done more times than I care to admit.
FAQ (People Actually Ask Me These Things!)
- Can I use sour cream instead of buttermilk? Absolutely! Just thin it with a splash of milk or water. I’ve done it lots when the fridge is looking bare.
- What if I don’t have sourdough starter? You can substitute with plain yogurt or a bit more buttermilk—the texture will be a bit different but still lovely. Or, try making your own sourdough starter—here’s a simple guide I like.
- Can I make these gluten-free? Probably, with a good gluten-free flour blend. I haven’t tried it yet myself, so if you do, let me know how it goes!
- Do I have to use cheddar? Nope. You can play around with the cheese, though cheddar gives that nice sharp, tangy thing. This cheddar taste test has some fun ideas if you’re curious.
- Why do my scones go flat? Usually from overworking the dough or rolling it too thin. Try patting it thicker next time—about the height of a good thumb knuckle.
Bit of a tangent, but if you’re after a fun read about British baking traditions, check out BBC Good Food’s guide. I went down a rabbit hole one rainy afternoon and learned way more about scones than I ever expected.
And there you have it. If you try these, let me know what twists you come up with—I’m always up for a new experiment (unless it’s smoked salmon, that’s my one rule now). Happy baking, mate!

Ingredients
- 2 cups all-purpose flour
- 1 tablespoon baking powder
- 1/2 teaspoon salt
- 1/4 teaspoon black pepper
- 6 tablespoons cold unsalted butter, cubed
- 1 cup sharp cheddar cheese, shredded
- 4 slices bacon, cooked and crumbled
- 1 cup sourdough starter (discard or active)
- 1/3 cup whole milk
- 1 large egg
Instructions
-
1Preheat oven to 400°F (200°C). Line a baking sheet with parchment paper.
-
2In a large bowl, whisk together flour, baking powder, salt, and black pepper.
-
3Cut in the cold butter using a pastry cutter or your fingers until the mixture resembles coarse crumbs.
-
4Stir in shredded cheddar cheese and crumbled bacon.
-
5In a separate bowl, whisk together sourdough starter, milk, and egg. Add to the dry ingredients and mix until just combined.
-
6Turn dough onto a floured surface, pat into a 1-inch thick circle, and cut into 8 wedges. Place on baking sheet and bake for 22-25 minutes, or until golden brown. Cool slightly before serving.
CLICK FOR NUTRITION INFO
↑
Approximate Information for One Serving
Serving Size:
1 serving
Calories:
280cal
Protein:
9 gg
Fat:
15 gg
Saturated Fat:
0g
Trans Fat:
0g
Cholesterol:
0mg
Sodium:
0mg
Potassium:
0mg
Total Carbs:
27 gg
Fiber:
0g
Sugar:
0g
Net Carbs:
0g
Vitamin A:
0
Vitamin C:
0mg
Calcium:
0mg
Iron:
0mg
Nutrition Disclaimers
Number of total servings shown is approximate. Actual number of servings will depend on your preferred portion sizes.
Nutritional values shown are general guidelines and reflect information for 1 serving using the ingredients listed, not including any optional ingredients. Actual macros may vary slightly depending on specific brands and types of ingredients used.
To determine the weight of one serving, prepare the recipe as instructed. Weigh the finished recipe, then divide the weight of the finished recipe (not including the weight of the container the food is in) by the desired number of servings. Result will be the weight of one serving.
Did you make this recipe?
Please consider Pinning it!!